Whimsical and Homespun Art Creations with a Little Rural Living Thrown In


Friday, April 29, 2011

Planter with Birdhouses out of Barn Boards


My son created this large barn board planter with birdhouses.  He has done some smaller ones in the past, but this one was custom ordered for a swap of goods. ;)  If I get out tomorrow with my camera, I'll post some pics of what he received out of the swap.

We are always on the look out for enamel pots that he can incorporate into his pieces.  The chipped pots work out great for him.  He is working on a smaller one now.  It will have an oval roaster for the planter.  I will have to get some pics to post when he is finished. 

I finally finished going through my aluminum coffee pots today.  Most of the ones that were in good shape went back to the basement and were put on a storage shelf.  My son and his friends can  grab a few to take camping.  Some are just to cool to part with. ;)  The ones that didn't have guts or had rough insides are being reserved  for craft projects.  I am running some ideas by my son and will post as soon as we have finished our collaboration. :)  The rest will get priced and taken in to work.   This girl needs to downsize!     

Saturday, April 23, 2011

Happy Easter!


Aren't vintage cards lovely?  This one is from 1911. *sigh*  


 A Joyful Easter from My Family to Yours!

Sunday, April 17, 2011

Disappearing 9 Patch Quilt ~ Top Sewn


I went into the weekend intending to work on the gourd snowman, but after spending the morning cleaning in the basement Grrrrr!, this quilting project was calling to me.  So... I decided to at least get the top sewn together.  Then of course, I had to make the missing edging to the sides and attach them.  It is a great feeling of accomplishment to see the top together.   Now, I can relax and tackle some other projects.  This will give me time to decide if a border is needed. :)   

Tuesday, April 12, 2011

Disappearing 9 Patch Quilt ~ Reworked

The last couple of days have been dedicated to correcting an error on my quilt.  If you look at my original 9 Patch block, I created it with all the novelty fabric facing me.  It made for a wonderful looking block until it was divided into quarters and rearranged.  So, what happened?   Well...With the quilt top layout that I decided to do, the 12 pumpkin blocks were facing sideways and 12 of the broomsticks would be upside down.  (See the picture of the layout post.)  At first, I thought that I could live with it.  After all, this is my first quilt, and it is the quilter's choice to display the blocks the way she sees fit.  (Excuses..Excuses)  But after a lot of thought, I started ripping apart blocks.  Twenty-four blocks to be precise.  I turned the novelty fabric to the correct position and resewed them.  Oddly enough, it wasn't quite as miserable as it sounds.  At least, I got some more practice on lining up seams. ;) 

After 5 hours of rework, this is a pic of how my (time saving, right?) 9 Patch block should have looked in order to do my quilt top design.  Now, all of the novelty fabric will be facing  the same direction.  Whew!


This post is a heads up for anyone tackling this quilt with novelty fabrics in mind, but mostly it is a reminder for me if I should ever attempt this shortcut again.  I am excited to start piecing together my quilt top, but I have a gourd that needs some painting first. ;)


Friday, April 8, 2011

Thrifty Finds ~ Vintage Aluminum Coffee Pots

*These are Currently for Sale on My Selling Blog*
Click on link below blog title. :)
 
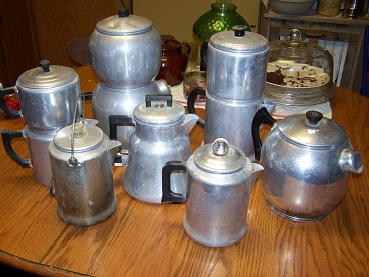
Aren't old coffee pots cool?  I just love the odd shapes and sizes - from unibodies to double deckers - single servings to multi cups.  :)  I was bringing up some of my collection the other night from the basement.  (Just trying to weed out the ones with no guts to use for tole painting or birdhouses.)  They were still sitting in my front room when one of my son's friends came over to visit.  These beauties were the hot topic of conversation.  He informed me that in the dorms at the University, there are students still using these to make coffee.  Duh...I honestly never thought of brewing with them.  My mind is on crafting and displaying vintage items.   Apparently these pots are coveted by some students for making not only a good cup of coffee but a strong one, too.;)  Who knew?  That brought back some old memories of coffee brewing on a camp stove.  *sigh*   


The conversation soon turned to a German student who had a coffee pot that made espresso on the stove top.  As the description of the pot began, I said, "Wait a minute."  I ran downstairs and brought up these three Italian manufactured coffee makers, which were in my "what in the world is that" pile.  I was informed that the largest one was identical to the German student's espresso pot.  (Okay, had I taken the time to flip the small one over, it was written "Lil' Espresso" on the bottom.  How did I miss that?... Oops!)  Mystery solved.  I always wondered what these pots were used for.


They unscrew in the center where there is an area for the espresso grounds.  Water is put in the bottom, boils its way back to the top holding tank where it awaits the happy consumer as highly caffeinated espresso. :)


We talked about the plastic coffee makers, and how times have changed.  The fact that these aluminum bodies are still around as the landfills are collecting the modern ones.  My son commented how a person could even recycle these for the aluminum.  I'll be keeping an eye on him around my pots! ;)  Ahhh yes, the times are a changing.  It was so nice to hear of young people using vintage items. 

So, I had a lesson in the art of making coffee and espresso. (Made me wish that I drank coffee!)  My son's friend lamented over how much one of these would cost if you could locate one in a camping store.  Since the odds of him are pretty low to be attending any flea markets or garage sales in the near future, I let him pick any pot he wanted from my entire collection.  He was a happy man!  He emailed my son a picture to his phone with the caption "Show this to your Mom :)".  It was a picture of a cup of coffee with sugar and cream freshly made from his new/vintage aluminum coffee pot.   How sweet is that! :)

Sunday, April 3, 2011

Making a Gourd into a Snowman Part 1


I really need to get back to painting on some gourds.  So... here is one that is in the early stages of becoming a snowman.  He is a beautiful 15 1/2 inch Georgia gourd.  Our gourds in Northern Illinois seem to never achieve the thickness in the shell like the gourds that I have bought from Georgia, Kentucky, North Carolina, or even lower Indiana.  I swear you could drop them on a cement floor and they wouldn't break.  Oh wait... I have accidentally tested that theory, and it is true ! ;)   Plus, the nice thing about ordering gourds is that I do not have to plant, water vines, pick gourds, dry them in a rodent free enviroment, soak them in water, and spend hours scrubbing the outer layer of slimey mold off them.  Heaven bless my wonderful suppliers! 

This little guy has his paper clay nose and mittens, along with his first coat of primer.  As you can see, there are some sanding spots.  I wasn't completely happy with the surface and decided to smooth over the blemishes with fine sandpaper.  Now, he is ready to get some paint.  I need to look through my books for a design to paint on his belly.  Once I get his belly painted,  I'll post an update.  Since he does not stand, I think he would look great on one of my large wreaths.  Once he is finished,  I'll make him some little bottle or egg gourd buddies.  ;)