Whimsical and Homespun Art Creations with a Little Rural Living Thrown In


Showing posts with label recipe. Show all posts

Sunday, May 1, 2016

Cast Iron Skillet Cookies

Have I mentioned that I love Cast Iron cookware?  ;)   My vintage pieces mean the world to me, and there is a story behind each one.  But every once in awhile,  a cook has to turn to a modern company to fill a need.  This is what happened to me when I learned of the skillet cookie sensation.  I know.... I could have used one of my smaller skillets, but single serving cookies were on my mind.  Unfortunately, not one of my pans fit the bill.  (Sigh of relief at the thought of my family taking forks to my beloved Griswolds and Wagners!)   To fill the bill, I turned to a wonderful modern maker of cast ironware, Lodge.  They are so reasonable and hold on to your chairs folks... They are Made In The USA.  How often do you see that?
 
Below is the four that arrived in their gorgeous cast iron glory.  Trying to stay with a single serving size, these little beauties are 5 inches.  My confession may as well be right now, "I could not make it half way through a cookie at this size."  It would have been even less if there was ice cream on top! :(
 
At any rate, these cookies were made with the addition of mini M&M's and chocolate chips.  Subsequent cookies have been made with the addition of chopped up candy bars... Reese's in particular for Mr. Hollow.   I made the dough with a recipe from Cookies and Cups blog that can be found here.


Here are a few photos of the process.  It is important to me to show that the amount of butter is accurate.  The batter starts out crazy runny but do not fear...


It turns into a butter infused dough with the addition of the flour... I am talking some serious butter!


To make it easier, I divided the dough and mixed in the diner's choice of candies.  (Extra dough can be refrigerated or frozen.)  Be creative.  This dough is a fabulous base to any additional sweets.


The dough is all pressed in place and ready to go!


Viola!  Chocolate chip cookie in a skillet... YUM!


And don't forget the M&M's.  :)


Trust me, it tastes as good as it looks... The flavor is just awesome.  If you are looking for a cake like cookie, this is NOT for you.  If you are looking for a ooey gooey cookie, this is what you have been waiting for.  And if you are tougher than me, try a scoop of ice cream in the center. :)


A big thanks to Shelly over at Cookies and Cups blog for such a wonderful recipe!  And just in case you were wondering, I still cringed as the forks touched  those beautiful new pans!  LOL

Sunday, October 4, 2015

Apple Pie with a Caramel Streusel Topping ~ Recipe

The fall weather in Northern Illinois has been absolutely beautiful.  The colors are a little late in the trees, but the temps have been comfortably cool.  My hubby left for a trip back in September and returned with a bushel of McIntosh apples.  He was passing through Gayes Mills and picked them up as seconds for $20.00. 
 
Since then, our family has definitely eaten our fill of caramel apples!  :)  So this weekend was perfect cool weather for canning some applesauce and making some pies.  I started with the sauce and worked my way through 25 jars.  Then, I decided to make 14 half circle hand sized pies.  With the apples left over, I decided to try a new pie recipe.  It was an apple pie with a streusel topping.  The pie was a big hit here which is great since I froze two for later. ;)
 
The recipe calls for a one crust pie shell... bought or homemade is your preference.  I made my pie in a 8 inch tin and the apples cooked down fine.  McIntosh cook down a little more than other varieties.  I made some alterations to some recipes that I found on line.  So here is my version:


Apple Pie with a Caramel Streusel Topping

7                      medium sized McIntosh apples (any tart apple would do)
2 T                  flour
1/2 rounded t  cinnamon
1/4 rounded t  nutmeg
1/4 c               white sugar (could use 1/3 c if the apples are really tart)

When the pie crust is ready in the plate, peel and slice the apples into a bowl.    Mix the apple slices, flour, cinnamon, nutmeg and white sugar together.  Add them to the pie crust arranging them into a mound. 

Streusel Topping

3/4 c                 brown sugar
1/2 c                 flour
1/2 rounded t    cinnamon
1/3 c                 butter softened

Mix all the ingredients with a fork to combine.  Break up the topping and evenly cover the apples.

Put the pie in a 350 degree preheated oven.  I had the pie tin sitting in a glass 13x9 cake dish situated half way down in the oven,  and it baked for 60 minutes.  Since all ovens differ and my dish had sides that hindered the distribution of heat, check your pie at 40 minutes and decide from there.   I kept checking by pushing on the crust to make sure it was firmed up.

We didn't eat our pie until later in the day.  Mr. Hollow likes his warmed up a little, and mine was straight from the pan.  The one thing we agreed on was a caramel drizzle topping. For that, I unwrapped 6 Brachs caramels  and placed them in a small bowl with a couple of teaspoons of water.  The caramels were microwaved in 15 second intervals until bubbling.  Then, it is simply stir and drizzle.  The pie was absolutely delicious!  Packed with the best flavors of fall.  :)

Tuesday, May 14, 2013

Easy Enchilada ~ Recipe

Now that my kitchen is back in order, I have a new zest for cooking.  Here is an enchilada recipe with little prep time (big plus after a long work day) that is a big hit with my family.  The only change for the next batch would be to off set the filling slightly to one side to make rolling easier.
 
Ingredients needed: 
 
1 lb. ground beef
1/2 of a medium onion (chopped)
1 pkg. Old El Paso taco seasoning
 2 c. shredded taco 3 cheese mix 
2 (16 oz.) cans of Old El Paso refried beans 
 2 (10 oz.) cans of Old El Paso enchilada sauce 
1 pkg. of 8 large flour tortillas (room temp) 
1/2  can black olives (sliced)
 
 
Directions are simple.  Prepare a 13 x 9 pan with a light dusting of cooking spray, drizzle one can of enchilada sauce over the bottom, and set to the side.  Cook ground beef (consistency of tacos) with onions in a medium skillet and add taco seasoning per directions on package.  While your doing this, arrange your 8 tortillas (as below) and begin the assembling process.  First, distribute your 2 cans of refried beans to each one and smooth in a line.  Second, add a scoop of your taco meat and spread over beans.  Then, top with a sprinkling of taco cheese (reserving some for over finished enchiladas).   Now, fold over the top and the bottom of the tortilla and roll into a burrito (offsetting the filling would make this step easier).   


As you finish each one, set them in the 13 x 9 baking dish.  After they are completed, pour the second can of enchilada sauce over all of them, top with the reserved cheese, and garnish with sliced black olives.  Bake at 350 degrees for about 20 to 25 minutes.


And here they are finished.  By using the larger tortillas, one enchilada makes a meal for me.   If you are cooking for children, smaller tortillas would be just the ticket. :)   Although my family prefers the flour tortilla, one could try the corn ones for a more authentic twist.  We didn't need to have all 8 enchiladas for our family; so, I took two from the prep stage, and before rolling them shut, drizzled a little enchilada sauce on top of the filling, wrapped them tight for storage, and froze them for a weekend lunch.  Quick and Easy... :)


Sunday, January 13, 2013

Recipe for Homemade Bisquick Mix

My younger Sister (aka Coupon Con) was telling me of her boxes of Bisquick that she purchased for pennies on the dollar.  She made quite the haul.  Lots of times, the stores around her area run double coupon days or extreme sales on her target items, allowing her to swoop in with her savvy couponing ways.  She lives close in proximity to these outlets which makes multiple stops easy for her.   I love to hear her finds and miss (on occasions like this) the days of having the larger chain stores close at hand.   Her story got me thinking about an alternative.  Why not save money by making my own Bisquick from scratch?  Hmmm.

I began to search around looking for a worthy recipe.  In the end, my mind focused upon a recipe that seemed to be a common thread to all the recipes floating out there.  The only exception is that I did not incorporate the powdered milk, since I seem to always have milk in the house.  Also, there are other recipes that use butter instead of vegetable shortening.  Although I love the idea of butter and may try substituting it someday, my mix made use of Butter Flavor Crisco shortening that does not require refrigeration; although, I am a massive chicken and have my container stored in the fridge! LOL 

Here is the simple recipe that created my homemade Bisquick mix:

6 c.  All Purpose Flour (sifted)
3 T.  Baking Powder
1 T.  Salt
1 c.  Butter Flavor Crisco

All ingredients are placed in a bowl and mixed together using a hand held pastry blender.  The mix should look crumbly like the picture below and is loose flour when picked up in the hand. 

Ta Da!  That is all there is too it. And to my pleasant surprise, the mixing went fast. :)


Here are the biscuits that I made using  2 1/4 c. mix with 2/3 c. milk.  The mix and milk were stirred into a soft dough and rolled out on a floured surface to 1/2" thickness.  They were cut out with a biscuit cutter and baked on a cookie sheet for 8 to 10 minutes at 450 degrees.


The final verdict... They unanimously won the approval of my family.   :0) 

Sunday, November 18, 2012

How to Bake a Whole Sugar Pumpkin to Process and Freeze

While Farmerboy was shopping for his Halloween pumpkins to carve, he brought home three sugar (or commonly tagged "pumpkin pie") pumpkins.  Why?  Who knows... Apparently, he felt that his mother would like to take on the challenge of making her own pumpkin puree from scratch.  UGH!!  My mind was filled with the idea of cutting the tough rinds, scraping out the seeds, cubing and cooking the remaining pumpkin.  The end result would probably be me with a soupy mess!  :(   

I was telling my Mom about my troubles one afternoon, when she mentioned having seen a program on TV that processed the pumpkins by baking them whole.  What?  I am not going to lie here... My mind was filled with exploding pumpkins and seedy guts hanging all over my oven.  I could tell later that evening that Mr. Hollow's thinking wasn't much different.  But, after a little research that surprisingly brought few results, my mind was made up to take a stab at this short cut.   Armed with very little knowledge (and after waiting for Mr. Hollow to leave for work), the little pumpkins went into the oven.  This is how I prepared and baked them:

All three pumpkins were washed and dried.  They were rubbed all over with a paper towel-- moistened in olive oil.  I took a pointed steak knife and pierced the rind all over (was hoping this would deter any explosions!).  They were then set directly on the oven rack with a cookie sheet on the rack immediately below them to catch any run off.  Next, I turned the oven on 400 degrees and let them bake for about an hour.  They were checked by pushing a knife through the pumpkin and into the flesh.  The rind and flesh were soft, so I knew that they were finished baking. The picture below is how they looked after removal from the oven.


 As you can see from the skin of the pumpkins in the photo below, I let them sit and cool for an hour.  They started to deflate and the rinds began to buckle.  Each pumpkin cut easily into quarters as if slicing through butter!  I used a wooden spoon to gently remove the seeds and loose stringy flesh.  Then, the same spoon slid the golden flesh effortlessly from the rind.  Due to the long cooling off period, some of the rinds could even be peeled by hand from the flesh.  How easy is that?


My Braun hand held processor turned the pumpkin flesh into a smooth puree.  Three pumpkins yielded 5 containers of pumpkin puree at 2 cups each.  Four of the containers are now in the deep freeze.  Not a bad haul for an afternoon of experimenting! :)

The next test was to make a pie.  I noticed that the pumpkin did seem a little runnier in the mixing stage... And the pie did bake a little longer than my pies made with canned pumpkin... But I am happy to say that it tasted absolutely perfect!

Did I ever tell you that my all time favorite dessert is Pumpkin Pie?    I don't even need Cool Whip to enjoy it! :)


I do not know if planting, harvesting and processing pumpkins on a larger scale is in my future, but the idea is certainly more tempting with this method! :)

Sunday, July 1, 2012

No Fuss Rhubarb Dessert

With the Fourth of July right around the corner, this Rhubarb Dump Dessert is super easy and quick to make and refrigerates well for preparing the day before your celebration.  ;)   Each ingredient is layered and mixes itself in the cooking process... Yay!  (It is always a plus for me to find a recipe that uses a main ingredient from our garden.) 

There are many variations of this dessert on the Net, and I know some are more concientious about sugar usage.  My personal preference is to use enough sugar to turn out a rhubarb gel similar to a sweet pie filling.   If wish your dessert to be a little more on the tart side, add an extra cup of rhubarb.  Once it is cool, it may not gel up as firm but will be just as tasty! :) 

The recipe is written with each step being followed by the picture.   The dish is 13 x 9 inches, and your oven should be preheated to 350 degrees.

5 Cups   Rhubarb (cut into chunks)

Spread out evenly on the bottom of a 13 x 9 pan.


3/4 Cup    White Sugar
Sprinkle over all of the rhubarb chunks.


3 oz. package of Strawberry Jello

Clip a corner of the package and sprinkle evenly over the other ingredients.


1 box    Yellow Cake Mix

Clip the corner of the bag and sprinkle evenly over contents of pan.  You can use your fingers to push unwanted piles or break up chunks! ;)


1 Cup    Water

Let the water drizzle from the measuring cup.   You can go back and forth and change from side to side.  This will dispense it fairly evenly over dry ingredients.


1/2 Cup    Butter (melted)

Melt butter in microwave safe dish.  Drizzle the butter as evenly as possible over the other ingredients.  As you can see from the photo, I have a few chunks in mine still.  It is a very forgiving recipe! ;)


The only thing left is to bake your dessert.  Your oven should be preheated to 350 degrees.  Which at The Hollow translates to "Turn the oven on about 2 minutes (or less) before sticking the pan in!"  LOL  Set your timer for 45 minutes and pull out a colorful yummy dessert! 


The longer the dish cools -  the firmer the filling will get.  My family can be found scooping it onto plates with a spoon while it is still in a semi warm and liquid state. ;)   For a chilly twist on a hot day, you can add a scoop of vanilla ice cream.   

After the dish gets to room temp,  put a wrap over the top and pop it into the fridge.  It tastes even better after being chilled!  

Enjoy! :) 

Monday, April 9, 2012

Homemade Cadbury Cream Eggs Recipe


Here is a little recipe that can give you that taste of Easter all year long!  :)  It is a homemade version of the Cadbury Cream Egg.  I spotted this recipe online and had to give it a whirl.  They received great reviews on their debut Easter Sunday.  So with the family taste test out of the way ;), I am putting this gem up to share with friends.  In order to give credit to the blog where I located this recipe,  you can get the original list of ingredients by clicking on the name of Susan's blog, "The Royal Cook" .  Below is how I made my eggs with a few minor changes... 

The photo below is the filling consisting of the softened butter, corn syrup, salt, and powdered sugar.   (I forgot the salt, and it still tasted great.  I will add it the next time.  Well... Maybe... If I remember! ;) )   An electric beater was used to mix in the first two cups of powdered sugar.  Then, I switched to mixing by hand for the next two cups. (I've burned out a mixer before combining thick fillings... OOPS!)   The white mixture gets very thick and pliable like a taffy.  After completing the filling, a little over a quarter of the white mixture was transferred to another bowl where 4 drops of yellow food coloring were added and  mixed to an even yellow.  

A rounded aluminum teaspoon was used to scoop out the white filling.  It was dropped onto a nonstick cookie sheet.  Another spoon works great to push it out of the scoop, since warm fingers will make the mixture more sticky. :)  The cookie sheet with the white filling was popped into the freezer.  The yellow mixture (non scooped) was placed into the refrigerator.  They were in there respective places for 5 to 10 minutes for easier handling.     
   
I skipped a picture due to messy hands! ;)  The white and yellow filling was pulled from the fridge.  The white was flattened, and a 1/4 teaspoon was scooped from the yellow bowl and placed in the middle.  It looked like a little fried egg!  The white was then closed around the "yolk" and placed back on the tray.  I completed six wraps, placed the entire cookie sheet into the freezer to firm, then completed six more, and repeated until finished.  After all the wraps were made, I let them sit in the freezer on last time before dipping. 


An  11.5 ounce bag of Nestle's Milk Chocolate Chips were used for the outer coating.  My microwave and I are not always simpatico with concerning chocolate ;), so I decided to create a double boiler by taking a little sauce pan and holding it afloat in a larger pan of boiling water.  The milk chocolate chips melted fast!  To make the chocolate smooth, I added only a 1/2 a Tablespoon of the Crisco. 


Nothing left to do but dip the eggs! :)   I removed the eggs from the freezer, set them (one at a time) into the milk chocolate with a fork, scooped chocolate over them until thoroughly coated, and lifted them out and onto their cookie sheet.  Voila!


Here is the finished product!  My hubby had two gone right away and said they were even better at room temperature.  And you know what??  It only cost me roughly $3.00 and an hour of time to make 22 eggs.  (Okay, I could work on shaping them more like eggs next time! ;) )  Cadbury Eggs are 79 cents a piece at our store.  Plus, I still had quite a bit of dipping chocolate left in the pan! :)


For those friend's with little kids, I think this would be a fun Easter project.  My hubby sure is looking forward to having another batch in the house! ;)     

I hope that everyone had a Happy Easter... Welcome Spring! :) 

Tuesday, February 14, 2012

Soft Sugar Cookie Recipe for Valentine's Day

Last night my son came home with two of these LARGE sugar cookies.  A friend of his that is still in high school bought him two for Valentine's Day.  Side Story... Our small local school sells balloons, flowers, cookies, and lollipops  for Valentine's Day.  All items are $3.00 down to 50 cents.  It is a fun time for the kids, affordable for the parents and teachers to gift their students, and they are hand delivered to their home rooms.  The big seller is the 50 cent lip pops, and these $1.00 cookies that are made by our very own home ec classes and volunteers.   We are a small school, but the numbers of these cookies ordered are staggering!  Anyways... My son came home with these cookies, and my hubby started to circle in.  He loves sugar cookies.  Well, needless to say the kid was not in a sharing mood, so hubby did not get one. :(


Before he left for work, my hubby gifted me a large box of chocolates  for Valentine's Day.  I have the day off from work, so the list on my studio wall was waiting for me.  After completing a few projects, I remembered that there was sour cream in the fridge (something that I normally do not stock) and the key ingredient in my soft sugar cookie recipe.  In honor of the day, my schedule was cleared for the afternoon, and I whipped up hubby some soft sugar cookies for Valentine's Day.  They aren't as fancy as the kid's cookies ;) , but they will still be a big hit for after dinner. :)


Here is the recipe if you would like to give them a whirl:

Soft Sugar Cookies

1/2 c.     Butter (softened not melted)
2            Eggs
1 c.        Sugar
1 t.         Vanilla Extract
3 2/3 c.   Flour
1 t.         Baking Powder
1/2 t.      Baking Soda
1/2 t.      Salt (optional)
1/2 c.     Sour Cream

Mix butter and sugar together.  Add eggs and vanilla.  Mix until smooth.  Add flour, baking powder, baking soda, salt and sour cream.  Mix until blended and dough is in a ball form.  Add more flour if dough is too loose.  Refrigerate for 2 hours or overnight for best results.  On a floured board, roll out dough to 1/4 " thick.  Place on cookie sheet.  Heat oven to 425 degrees.  Bake 4-6 minutes.  (Springs back to the touch.)  Remove cookies to a wire rack for cooling.

The dough for this recipe is very sticky when mixed.  That is why they suggest refrigerating.  The chilly temps firm up the dough for handling and makes the surface require less flour in the rolling out process.  This step makes for a softer cookie.  If you want, use only a small amount of dough at a time and keep the rest waiting in the fridge.

These cookies are great for any occasion and come highly recommended by my family! ;)

Happy Valentine's Day! :) 

Saturday, February 11, 2012

Recipe for Double Hot Chocolate & French Vanilla Hot Chocolate Mix

With this little cold snap that we are having in Illinois right now, I finally had the chance to put these recipes to use.   No complaining here about our mild winter,  but I am a chocoholic and our above average highs kept me from longing for my favorite winter time drink.  Unfortunately, it had me hunting for chocolate in bar form. :(  After drinking a glass of this double hot chocolate, I am happy... at least  for a few days! ;)  And since my hubby does NOT share my love of  doubly chocolate goodness, I adapted a vanilla hot chocolate recipe that even makes him smile. :)  Are you ready for some recipes?  Here we go...


Double Hot Chocolate Powdered Mix

7 1/2 c.     Nestle Quick  (I actually prefer the IGA Shurfine "no name" brand)
2 3/4 c.     Carnation Creamy Chocolate Coffee Creamer **
2 c.           Powdered Sugar
6 c.           Powdered Milk

Mix all the dry ingredients in a large bowl.   Add three tablespoons (depending on your taste) to 8 oz. of  hot water.  Some of you may want to add less or more depending on personal preference.  If you are like me, throw some marshmallows on top and give it a little blast in the microwave! :)

** The original recipe that I received called for any type of plain coffee creamer.  The kids really liked it, but they flipped over the difference in taste with the Carnation Creamy Chocolate.   The plain creamer gives the drink  a mellower chocolate taste but is very good and cheaper to purchase.  The Carnation creamers due go on sale quite often.  I haven't found a "no name" chocolate creamer in my area grocery store, but maybe there are some in other locations.  Plus, if you check out Carnation's website, they list coupons throughout the year! :)


French Vanilla Hot Chocolate

3 1/2 c.      Nestle Quick (or a "no name" brand)
2 (8oz)       Carnation French Vanilla Nondairy Powdered Creamer (or a "no name" brand)
2 3/4 c.      Nondairy Powdered Creamer (can use French Vanilla for stronger taste)
4c.             Confectioner's Sugar
10 1/2 c.    Powdered Milk
1/2 t.          Salt

Combine all ingredients.  Add 3 heaping T of mix to 8 oz. of water.

I know this is a huge recipe, but this is how the original recipe proportions were before I altered it.  Most of the time, I quarter the recipe and use all French Vanilla creamer (which can be found in a "no name" brand at my IGA).  Not sure what the salt does.  I have left it out, and hubby hasn't missed it! ;)

If you haven't tried making your own Hot Chocolate Mix,  I highly recommend it.  There are plenty of terrific recipes out on the web, and it can really stretch your hard earned dollar.  Plus, it really looks cool in an oversized ball jar! ;) 


Sunday, November 6, 2011

Recipe for Strawberry Rhubarb Freezer Jam

A few weeks ago, my rhubarb plants finally collapsed to the ground for the year - the frost from the night before did them in.  They have had the longest growing season that I have ever witnessed.  There are bags upon bags of rhubarb cut into chunks and stored in the deep freeze for this winter's desserts. The over abundance of rhubarb lead me to trying out an old freezer jam recipe.  It is simple, quick, and no canning required! ;)

Strawberry Rhubarb Freezer Jam

10 c.            Fresh Rhubarb Chunked
2 c.              White Sugar
1  (20 oz)     Can Crushed Pineapple
1   (6 oz)      Box Strawberry Jello

In a deep pan, combine the Rhubarb, Sugar, and Crushed Pineapple- bring to a boil using medium heat while stirring constantly.  Keep stirring and cooking for another 20 minutes until the Rhubarb is tender.  Remove from heat and add Strawberry Flavored Jello.  Tada...That's it! 


I placed the cooked jam in a big Ziploc plastic tub and set it in the refrigerator overnight.  The next day, I filled 7 half pint Ziploc plastic tubs, placed the lids on, and popped them into the freezer.  The photo below is my little bit that was left over for sampling. 


I must say, I was a little skeptical about this recipe, since I am not a huge fan of pineapple... But this jam was absolutely delicious.  The flavor closely resembled  cranberry sauce.  I absolutely LOVE cranberry sauce but am not a fan of the after taste that taints the taste buds - Not the case with this jam.  I was amazed by the flavor when sampled straight from the tub, and it was even better on toast! :) 

Thursday, March 3, 2011

Brown Bag Caramel Corn in the Microwave Recipe

Is it caramel corn time? :)  Caramel corn is one of those treats that I make once in a while for my family.  A year ago, I would have popped my popcorn, poured my coating over it, and put it in the oven for about an hour on low during the mixing process.  During that time, I usually would forget to mix, making the process take longer :(, and would still not achieve a nice evenly coated corn. (I'll spare you the story about the year that I forgot it in the oven!)   This method of cooking caramel corn has always bugged me, but I never went in search of a better way...  But as fate would have it, a better way found me! 

I purchase my popcorn from a local farmer, who also happens to work in our little post office in town.  We were chatting one afternoon, and she mentioned how easy it was to make microwave caramel corn.  Stop the press... It sounds like a shortcut is about to be revealed!  And the only magic required, other than the microwave, was a simple brown bag!

Brown Bag Caramel Corn in the Microwave

4 quarts      popped corn
1 c              brown sugar
1 stick         oleo (aka margarine or I use butter)
1/4 c           Karo syrup
1/2 t            salt
and for later use   1/2 t baking soda

Pop your popcorn and set it aside in a large bowl.  (Can use cooking spray lighlty inside bowl for easier clean up.)

Melt together brown sugar, oleo, Karo syrup, and salt.  Bring to a boil, and boil 2 minutes stirring to prevent scorching.  Take off burner and add 1/2 t baking soda.  Stir well until it foams.  Pour over popped corn and mix well.  (* Note* Just get it to cover as good as you can.  Some corn will not be completely covered, and the microwave heat will take care of that.)  Put your corn in a brown paper grocery bag and fold over top a couple of times, place in the microwave,  and cook on high 1 minute.  *Caution*  The bags contents will be hot.  Take the bag out of the microwave and shake well.  Turn bag over (I just lay it on its side.), and microwave for 1 minute on high.  Shake a little more and quickly empty contents into a long pan while still hot.  Spread out to cool.


Remember especially on the final cooking cycle, the bag will come out with very HOT oil spots.  Some of the corn will stick to the inside of the bag.  These remnants can be removed by hand.  *Note*  I have a small microwave, so if all I have is a regular size brown grocery bag, I end up cutting about 6 inches from the top before folding. 


Here is a batch fresh from the bag.   Not only is this a fast way to make caramel corn, but it is a wonderful way to have an even coating, allowing the cook to break apart the caramel corn without being left with big blobs.  And even better, there is no risk of burning or over cooking.  And if you are like me and pop too much corn, just make your coating batch a half size larger. ;) 


After this pic, I spread the corn out on some cookie sheets to cool.  If you have an empty ice cream tub, it works well for storing your caramel corn.  Of course, we are lucky if it lasts a couple of nights around this house! ;)

Saturday, February 19, 2011

Having Fun Thursday Making Homemade Egg Noodles & Recipe

Sorry for the late post, but I wanted to make sure my little endeavor turned out successful before posting.  

So the story began a long long time ago ;), I had told my Mom that I was looking for a pasta machine.  Originally, my thoughts were to use it to work with fimo clay to make carrot noses for my gourds.  That idea changed as I found out that paper clay suited my needs better.  Over a year later, I received a call from my Mother.  She and her sister Barb were talking, and my Aunt had a pasta machine that she wanted to get rid of.  My Mom, who forgets nothing, told her that I was in search of one.  She called me to tell me the news.  Pasta machine?  Hmmmm.  I had just been complaining to my hubby, aka noodle fanatic, that the prices of egg noodles were ridiculous, and the fact that he eats them with almost every meal would put us in the poor house. LOL  Was this a sign?  Should I try to tackle making my own egg noodles?  The church ladies in town quit selling them in the fall.  Maybe, I thought, it was because they were too much of a pain to make.  And lets face it,  I was coming in as a complete newbie, but I now was the proud owner of my own pasta machine.  Heck, my Aunt even threw in the lasagna attachment!  I was determined to give it a try... anything to save some money and have it made from scratch. :)  
 

The most shocking thing that I have learned in this process is that there is not many ingredients in the making of egg noodles.  Eggs, flour, salt, olive oil, and water.  There are other recipes that involve milk and butter, but I decided to go with the earlier ingredients for my first try.

Recipe for Egg Noodles:

2          beaten eggs
1t         salt
2c         all purpose flour
1T        olive oil
4T        water
Mix dry ingredients.  Add beaten eggs and mix well.  Add olive oil and enough of the water to make the dough take shape.  (I used all 4T, but my eggs were straight from the coop and might have been of a smaller size.)  Knead the dough for 3 to 4 minutes. ( I used my Kitchenaid on the 2 setting with dough hook for this step.)  Let the dough rest covered in its bowl  for at least 15 minutes to make it easier to handle.  Now it is ready for hand rolling and cutting or the pasta machine.


I can honestly say this was the most exciting adventure that I have had in a while.  I cut my pasta dough into fourths, set my roller on 1 and began to run my dough through.  It was so fun.  Then, I changed the setting to number 3 for the next pass for the dough and the final at 5.  I was ready to change my handle to the noodle cutter.  You can see by the picture how that step went.  This was way COOLER than play dough!!  As my noodles gathered at the bottom, they wanted to stick together a little.  So my next batches were lightly dusted with flour before running through the cutter.


Some wooden spoons balanced between 2 qt. Mason jars were perfect for hanging the noodles to dry.  This is probably my favorite picture.  I could have kept making them all day!  It was an absolute blast!  I have an ornament hanging tree downstairs that my hubby made for me.  It is a thick dowel rod with alternating smaller rods for branches.  I could get a lot of noodles on that baby!  Hmmmmm....


Today was the big test day.  I imagined throwing my noodles in the boiling water and watching them disintegrate.  But guess what?  It didn't happen.  Yay!!  Can you believe that?  SUCCESS.  Even better, my husband came in, tried them, and said they tasted just like his Grandma's.  Now,  I will not make you crazy with my calculations of the money that I can save weekly by making my own noodles.  (I am a soup fanatic, hubby likes them as a side dish, and we both love beef and noodles.)   But, it will definitely be far less than the Amish ones that I am currently buying.   


Here is my lunch today.  How great is that?  Homemade turkey soup and homemade bread.  It makes me feel good to take one more prepackaged item out of my families meals.  Plus, it is actually a process that I find fun!  It is the best of both worlds.  My hubby and I were discussing trying a recipe for wheat noodles.  I am a wheat bread fanatic and have not tried wheat noodles in my life.  This opens a whole new world to explore.  I love learning new things!  A huge debt of gratitude goes to my Mom for never forgetting any of my ramblings ;)  and to my Aunt Barb for a super-fantastic pasta machine!  :)

Monday, February 14, 2011

No Egg Double Chocolate Chunk Cookie Recipe

If you are a chocoholic like myself, this is the recipe for you.   I LOVE chocolate.   It drives my hubby nuts.  He says that I go overboard and have no will power.  (Okay, I did finish off the big bag of m&ms!)  These cookies are so strong with chocolate that I can only eat one!   And do you know what is even better?  I do not have to get a lecture for eating raw cookie dough from my sister, because this little gem of a recipe does NOT require eggs.  I do not know how the magic happens... I just eat the results! LOL :0)

Here is the recipe if you feel like giving them a whirl:

No Egg Double Chocolate Chunk Cookies

2 c        flour
1/4 t      salt
1/4 t      soda
1 c        sugar
1/2 c     packed brown sugar
1 c        butter or margarine, softened
1 t         vanilla
5T         unsweetened cocoa powder
1/4 c     milk
1 c        coarsely chopped nuts (if desired)
1 1/2 c  semi sweet chocolate chunks (or chips)

Preheat oven to 325 degrees.  Line a baking sheet with foil.  All of the batches will be cooked on the same sheet.  In a medium bowl mix flour, soda, and salt.  In a large bowl cream the butter, sugars, and vanilla.  Using the low speed blend the milk and cocoa into the butter mixture.  Add flour mixture slowly at low speed to the butter and cocoa mixture.  Fold in nuts and chocolate chunks.  Measure mix in 1/4 cup quantities and drop onto cookie sheet.  (Only 4 cookies will fit on a cookie sheet, and I refrigerate unused dough between batches to keep firm.)  Bake 20 minutes or until the tops look dry.  Cool cookies on the sheet for 5 minutes, so they are easy to lift off and enjoy!

Tuesday, February 1, 2011

Butter Pecan Cookie Recipe with Heath Bits

The weather outside is very frightful.  This would have to rank up as one of the worst blizzards that I have seen.  There is not a soul out on the streets tonight.  The roads are impassable.  At dusk,  I saw a rabbit running up the street. ( I feel so sorry for the little critters out in the cold.)  But he looked as if he had a plan in mind as he dashed up the road.  Hopefully, he found his way to his fur lined burrow!

I spent my time indoors today and decided that running the oven might not be a bad thing. ;)  So, I got around to making some Butter Pecan cookies.  This recipe is based on the Pillsbury Funfetti Cookie recipe.  Another words... It can't get much simpler!

All you need to mix together is:

1          box of Betty Crocker Butter Pecan Cake Mix
1/3 c    oil
2          eggs
1          8 oz bag Heath English Toffee Bits (Minus the ones I ate!)
1/2 c     chopped pecans (optional)

Preheat oven to 375 degrees.   Combine the above ingredients in a bowl with a spoon until mixed and thoroughly moistened.    Shape into 1 inch balls.  Flatten each cookie with the bottom of a glass that has been dusted with flour to about 1/4 inch thickness.  Bake for 6 to 8 minutes or until edges are lightly browned.  Cool on cookie sheet for 1 minute before removing.  

I like the bits of pecan in this recipe.  I think it enhances the pecan cake mix flavor wonderfully, but if you desire to pass on them, I think the recipe would still be very good.


Here is the dough mixed up.  It is pretty dense and easy to mold.   


Aaah... the finished product!  The smell of pecan and toffee is amazing... I like the Funfetti Recipe, because the cookies always keep such a nice shape.  They do not spread out very much, so you can put quite a few cookies on a sheet.  The less times that I have to set my timer and remember to take out a batch of cookies the better!  

My husband likes to have these with coffee in the morning.  He claims the flavors compliment each other well.  My son is a milk and cookies kind of guy.   Me... Well, I do not drink coffee or much milk, but I could munch on cookies all day long! ;)

*Note*  My post has been invited to be a part of Sweets for Saturday 3 by Lisa from Sweet as Sugar Cookies .  If you want to enter a world of sugary bliss, click on the name of her blog and check out the wonderful people submitting recipes. :) 

Thursday, January 13, 2011

Homemade Vanilla Extract Recipe

Here we go... I do not even know what got this started in my head (maybe it is all the winter baking), but this is the latest experiment in my kitchen. After days of research on the web and mulling the idea around for a month, I decided to take the plunge and make my own vanilla extract. It sounds weird, but it really bothers me when I have to buy vanilla . That little 2 0z. bottle is like liquid gold. The last time (stocked up so its been awhile) that I purchased pure vanilla, the cost was $2.99 for a generic bottle at Aldi. It doesn't take long to empty one either... at least not for me. (You can imagine my horror when I knocked an open bottle over while making popcorn balls. Argh!)

Making vanilla extract is easy in the sense that it takes vanilla beans, vodka, and time...

After much research, I ordered my beans through eBay from vanillaproducts (great info in their listings if you click on one of their items). They also have a website http://www.vanillaproductsusa.com/ . From my research, they are noted for the best prices with quality beans. (Another notable seller is http://www.amadeusvanillabeans.com/ .) This photo shows how they arrived. They were in vacuum sealed bags. I purchased 1 pound of Tahitian Organic Extract Beans 5-7" for $12.98 and 1/2 pound of Madagascar Bourbon Extract 6-7" beans for $15.59. Vanillaproducts is running a sale right now, so they gifted me an extra 1/4 pound of Tahitian Grade A Beans 5-6". The grade A were nice, but the consensus from the companies is save your money. Both agree that the drier bean works well for extract... so grade B beans will work out just fine. While I am thinking about it, another great site to check out is http://www.vanillareview.com/ . It has lots of great info too.

The Tahitian beans smelled very fruity. It reminded me of a new bottle of children's chewable vitamins (odd the things that the mind thinks of isn't it?) with a hint of tobacco. They were a little drier of a bean than the Madagascar but still very pliable. A few were a challenge to cut, but most cut easily and were full of exposed seeds.

The Madagascar beans were more oily of a bean. They had the familiar vanilla smell with a hint of tobacco (which I am sure is due to being a dried bean). I found them easy to cut and loaded with seeds.

Here is the first step - splitting the vanilla bean in two. (I am sorry it is hard to see. It is the top bean that is split.) The little flecks on the plastic are tiny seeds. This may sound crazy, but a vanilla bean reminds me of a mini skinny dried out banana. Once you start your cut right under the hooked end, the knife naturally follows the fibers to the bottom. (You might need to hold the bean on your way down.)

Some recipes call for scraping out the caviar (or seeds), but the majority of recipes do not. I found that with both variety of beans some of the seeds were falling out, while others were nicely exposed in their pod. Since they will be covered with alcohol and shaken on occasion, I didn't see a need to scrape.
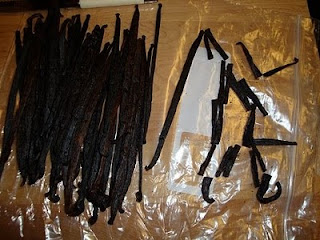
Here is another decision one must make. Some cooks add the vanilla bean whole, while others chop the beans into segments. I found, while working on the first bottle, that it would work better to chop up the vanilla bean. I didn't want any of the bean to be exposed to the air in the bottle and figured it could only help with the flavor.


**Another tip from Amadeus Vanilla Beans... buy the cheapest vodka. The more expensive brands add their own touch of flavor. This is not needed when vanilla is the only flavor that is wanted. So, why not save some money? ;) ***

So the golden question is the ratio of vanilla beans to vodka. Well if you jump to the above websites, they will tell you it is regulated by the federal government. The only problem is that homemakers are working with far less advanced methods of extraction, so the leading sites seem to agree on 1/4 pound of beans to a quart. If you want a strong extract... add more. Most chefs work with 2x vanilla. This is a case of the more the merrier!
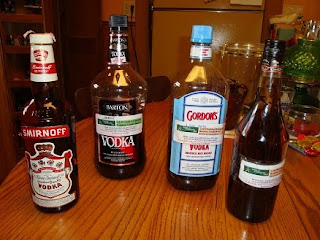


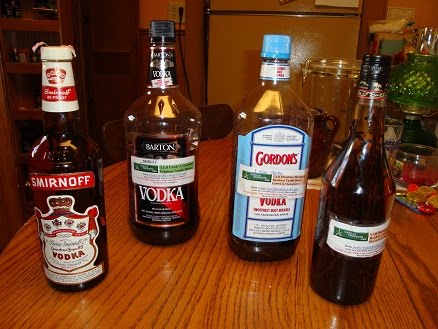
Contrary to how this looks, I haven't touched a mixed drink in about...let me see...at least... oh, one kid ago. I actually had the Smirnoff bottle (that was gifted to us), but the seal was broken (by my brother in law 18 years ago!). It was way back in the pantry, and I dumped it out to have the bottle. My husband insisted the liquor was still okay, but it had evaporated and had white flecks in it. Hubby wasn't willing to take a drink... so down the drain it went! Off to the store I went to buy my new vodka. Talk about being out of my element, but I managed to find a few of the cheaper bottles. ;)

My two bottles (I am planning to gift vanilla to friends!) that I purchased were 1.75L (roughly 7 1/2 cups). (If you start out with the smaller bottles that are 750ml (roughly 3 1/4 cups), you will have to remove 1/4 cup to get your beans in and still have some room for shaking. If your frugal, store the extra in a small mason jar and add after extraction process is done.) I put three cups into the extra glass bottles that I had and left the remainder in their original large plastic bottles. I might change out the plastic bottles for sterilized ball jars to conserve on space. They need to be kept from light (or made in dark glass) so to the back depths of my pantry they went. The bottles get shaken every day for a week, and a few times a week after that. The vanilla should be good enough to use in 4-6 weeks but the longer the better. The Vanilla Review stated that full strength (and slight syrup consistency) is achieved after 6 months, and at that time, the beans can be strained out. The vanilla can then be put in their final jars. A fresh bean or two can be added at that time to dress it up for shelf appeal or gifting! ***Shelf life, due to the liquor is stated to be indefinitely.***

The alcohol used in the extract must be 35% to 40% in volume. Vodka is 40% making it 80 proof. Rum, Brandy, and Whisky fall in this category also. Vodka is the go to guy do to its lack of flavor. If one wants vanilla with a twist, there have been favorable reviews with Rum. I had a bottle of Canadian Whisky that was gifted to us and never opened. It smells rather medicinie to me, but I added some beans to see what would happen. The bottle would have never been used for anything else, so why not? :)

So should I bore you with my money crunching?? Here we go... With shipping and over buying ;) (larger amounts are cheaper, so share with a friend or in my case my sister!), my total cost for beans was $34.00 for 1 3/4 pounds. I purchased 2 bottles of vodka in 1.75L bottles (this was before I read the Amadeus hint) for $26.17 (there were even cheaper bottles on sale for $9.49 each, so I could have saved another $4.50... oh well!). So roughly speaking it will cost me $17.95 for a liter of vanilla. So on the rounding side, if I get even 7 cups of vanilla that equals to 56 ounces. The shelf price would be $83.72 before tax. (And lets face it, I am sure this will be a more potent grade as I threw in a few more beans than asked for.) So even making vanilla using the smaller bottle of vodka with a smaller batch of beans, a homemaker can save some serious money while getting a healthier vanilla. ***Just a note worthy fact... the store brands contain sweeteners to help cut the smell of the alcohol and artificial colors.***

Kind of a lengthy post, but as my hubby will attest, I research my purchases and experiments to the ends of the earth. (This was actually the shortened version!) If you have some free time and would like to give this a try, check out the other sites for additional info. I will add updates to my vanilla in future posts. I will also be making some vanilla sugar that I will post about later. (This post is long enough!)

Working with vanilla beans has been exciting. The amount of money saved is (or hopefully will be ;) ) incredible, the product will be of better quality (minus the added preservatives!) , and the smell in the kitchen is heaven!! :)