Whimsical and Homespun Art Creations with a Little Rural Living Thrown In


Showing posts with label Pies in a jar. Show all posts

Thursday, September 20, 2012

Hay Days and Apple Processing Time!

Apple harvest time is here again... Thanks to Mr. Hollow! :)

Hubby's yearly travels takes him to Hay Days in North Branch, Minnesota.  (It is a Huge snowmobile swap meet.)  He goes with his brother every September and always arrives home with new treasures.  Past purchases have involved sled tracks and parts, truck rims and tires, chainsaw parts... You name it and they have it there for the guys.  Well this year on his way home, he decided to stop by the town of Gayes Mills and bring a few things back for yours truly...  2 Bushels of Apples! :)


Aren't they lovely?


As if the apples were not enough, he purchased some fresh cider donuts, and a gallon of apple cider to be heated and spiced up!  Mmmmm...


This past week has been busy with peeling and slicing, which has been a breeze thanks to my handy dandy apple peeler/slicer from the Pampered Chef.  What a time saver!


For a huge money saving versus grocery store prices, I decided to flash freeze and pack 21 quarts of apple slices this year, along with 3 quarts of halved apples, 12 quarts of applesauce, 3 large pies, a caramel apple pie  and 2 dozen pies in a jar.  (Pies in a jar can be read about in an earlier post here. )  That still left plenty of apples for slicing and pouring caramel over... Yum!


Mr. Hollow and I might still do some travelling near the orchards before the season is over and will definitely pop in to enjoy the smells and sites of the season, but I am relieved to have the processing of the apples is over for the year. :) 

Tuesday, November 8, 2011

Vintage Sled with Hand Painted Snowman and Gingerbread House

How about a apple pie from a jar and a nice cup of hot green tea to kick off the morning?  I know... So much for watching my calories, but I will make up for it on the treadmill later. ;)   My quiet morning moment was spent with my mind conjuring up a list of things to do for the day.  Now that I have a few more days of the week open, my work schedule is made up by yours truly.  And let me tell you, my boss is a demanding one! ;) 


First job of the day was to get some photos of my newest creation.  This is a vintage children's sled with a snowman tole painted on it.  The design was inspired by a line drawing from Jamie Mills - Price (another one of my tole favorite artists).   I can't help but alter the drawings a little to fit my personality (the little building was originally a birdhouse), and the fact that I LOVE gingerbread houses! ;)  Plus after years of working with ceramics, I like to put my own eyes on my pieces.  It gives a sense of familiarity to the little being looking back at me. :)

This is one of my smaller sleds measuring 32 1/2 inches tall.  I left as much of the sled original as possible.  The metal and runners are rusty with a little bit of their original red paint.  The painted image is only on the top side of the seat, so the original wood is exposed from the back.  I could see some pine tree bough accents added to this sled, but due to shipping weight and box size, I decided to leave that detail to the new owner.


The image on the sled is approximately 21 inches tall.  I filled every bit of the wood space with the painted scene.  It made it a little challenging with the size of the sled, but it looks sooo cute!


I made a matching coffee stained hand tag for gift giving.  The snowman on the tag was colored with washed out acrylics to give it a watercolor appearance.


A close up of his darling face! :)


I really could have went crazy with the details on this gingerbread house.  They have always fascinated me.  My favorite holiday show is the gingerbread house competitions on the Food Channel.


I really love working on vintage sleds and have made it an option to do custom ones on my Etsy store.  Past customer's have really enjoyed the new life that it gives to their children's old playthings, and it really adds a wonderful touch to their wintry decorations. :)

Now, I am off to put a few coats of varnish on a vintage Santa sled.  There are some new wooden Christmas ornaments that need their photos taken.  Then,  I need to get painting on some little gourds... Better get movin'! :)

Sunday, January 9, 2011

Pies in a Jar Baked Assortment

I was rearranging my freezers yesterday. :( You may ask why I would undertake such a task at this time of year. Well... my son (aka Farmer boy) made a deal with a friend of his and raised two pigs. He had one taken to the processor a week ago and didn't have anyone lined up for the meat. YIKES! (This is the time of year that my freezers are maxed out until spring.) Luckily, we thought of two families that would take a quarter each. But we were still left with half a pig and 80 pounds of meat that I wasn't planning on adding to my chest freezer! Luckily, I am the queen of pack rats (or at least my hubby says so!), and after a whole lot of moving from one freezer to another, the meat is now safely on ice. Whew!

Now where was I going with this? ;) Well... in order to get some of the pork to fit into the freezer, my menus for the week were planned and the coordinating meat moved to the fridge. It was then that my pies in a jar caught my eye. Hmmm. All the Christmas candy is gone. Yay! The misery of being over stuffed by large meals is just a memory... Time to break out the desserts again!
How handy is that? I wanted peach, my son wanted cherry, and hubby wanted apple. It is so nice to be able to choose!

See the apple in the upper right corner. I know it is hard to see in the pics, but the top half and crust raised above the jar line more than the other two. I suppose, it was due to the fact that it was made with fresh fruit and more juice built up. They looked puffed up and perfectly contained coming out of the oven.

I took them out of the freezer this morning and let them sit on the counter with their lids on. (Okay, I forgot them on the counter.) By the time I spotted them, they were pretty much thawed out. I took off their lids, cut three slits in each crust, stuck them on a cookie sheet, and popped them in the oven at 350 degrees. That got me thinking about space, I could throw a few in while making bread in the afternoon and save on the oven use. (Lower that electric bill!) Now there is really nothing else left to do for dessert but try to find out which freezer I put the vanilla ice cream in!! :)

Wednesday, December 22, 2010

Pecan Pie in a Jar

I love pecan pie (almost as much as I love pumpkin!). Many times I have enjoyed a slice, but I have never took the time to actually make this pie. Since I am the only one in my family that likes pecan, I thought, "Why not make it in a jar?" I found a southern recipe that sounded good, cracked some pecans our neighbors gifted us from Missouri, and created my mini pies. A standard 10 inch pie crust worked well for this project along with a recipe for a 9" pie filling. The pic is a little dark, but I must say they turned out well. YUM!

As everyone knows, pecan is a super rich and sugary pie. (Gelled syrup and nuts? What would you expect!) So, controlled portions is always good. One thing I would change is to make six or seven jars instead of five and make the pie more shallow in the jar. Doing five jars made the pies way to thick and caused the baking time to go quite a bit longer than the recipe called for. Now granted baking longer is no big deal, but a bubbling and rising pie that threatens to go over the jar is not a pretty sight. Also, the less time cooking... the less time the pecans are browning. (Foil can only protect them for so long!) Plus, I could only eat half of the pie for a dessert. Thank heavens for a sealed lid to save leftovers, but I think a more shallow pie needs to be created. Something more similar to the depth of the mini pecan pies that can be found in the stores would be nice.

Even with the future changes, I consider this kitchen experiment a success. I will never again have to wait for a special event to have a slice of this great pie. Which reminds me... I better go walk the dust off my treadmill. I think that I could use the exercise! ;)

Friday, November 19, 2010

Thrifty Friday Find~ Pampered Chef Apple Peeler, Corer, & Slicer

Peeling apples has never been a problem for me but cutting the apple into even slices... well, that's another story. I'll just say that I have always had a rustic look to my pie filling! Nothing commercial looking comes out of this kitchen, and that's okay with me. :) But for pies in the jar, I needed a uniform even cut to assure better cooking time. So, I went on the hunt for an apple peeler, slicer, and corer. After a few days of reading different reviews on blogs, store sites, and cooking forums, I decided to purchase a new Pampered Chef slicer.

I was aware that there may be a problem with my apples being to soft to peel, since they were from the McIntosh variety. The apples were in the refrigerator when the unit arrived. I think the chill made them a little tougher, and they peeled, cut, and sliced beautifully. Although the instructions could have been a little clearer (for someone who had no idea what she was doing), it was an easy device to figure out and to clean. No more fingers turning brown from apple juice! Yay!!

You will notice that this apple was not peeled by the machine. I turned the peeling apparatus back and locked it to the left side (nice feature). This apple was done a few weeks after the machine arrived and was very soft. The peel would have gotten stuck in the knife, because the flesh was not firm. Most of the reviewers warned about this potential problem in regards to all the different peelers. The harder the variety- the easier the knife can cut over the outer edge and not gouge into the apple.

**See in the measuring cup to the right... I could cut my slices into little stacks! It went so quick. I flew through the filling preparation. :0)

Here is a friendly tip when using the corer... When skewering the apple with the tines of the machine, think of an imaginary line from the top of the stem to the bottom core. Then, line the center of the tines up to be a part of that line and push the apple on. You may not get perfectly symmetrical slices (remember we love rustic anyways!) , but you won't get any of the seeds or casing. I didn't have one apple that would have worked if it had been put straight on by lining up the outside of the apple.

I remember seeing one of these simple machines back when my son was a baby. All I could think was, "Who would need a gadget like that?" Well, now I have my answer...Me. If you are a person that does a lot of pies in an afternoon, this machine is truly magic. It cuts preparation time down dramatically. It even cuts down on waste by not leaving much left on the core. (I am sure our chickens were disappointed!) I recommend the Pampered Chef brand that I purchased and am sure some of the others would have done wonderfully as well. This little gem is a fabulous find for me and will be indispensable for saving me time in the harvest season.

Monday, November 15, 2010

How to Make Pie in a Jar

In past years, I have used up orchard apples by making and freezing 8 inch apple pies. They were so nice to be able to take out of the freezer and enjoy all year long, but with my son getting older and being gone most of the day, left over pie began to be a problem. I have a terrible time with tolerating waste, so I found myself eating more than I normally would. ~Which in turn, meant more hours on the treadmill later! :( So, I was on the hunt for a solution to my dilemma.

While on vacation in Kentucky, I purchased some single serving baked pies from the Amish that were very good. They made a circle out of the pie dough, added filling, closed the dough making a half circle, and baked. This idea was great! I was excited for the apple season to begin. The only possible problem would be storage. I figured... I would flash freeze, throw them into a bag, and hope they wouldn't find there way down into the bottom of the deep freeze! It was a great plan, ready to go into action, until I read an article about pies in a jar on http://www.ourbestbites.com/ . I was sold completely on this idea. Over to Amazon I went, and three days later my 36 half pint Kerr jars arrived!

This process is so smart and practical! You simply make a pie in a 1/2 pint wide mouth Kerr jar and freeze. The best part of the whole process is that you bake the pies in the same jar! You heard me... WOW! No more waste!! And better yet, everyone can pick their own favorite flavor. Genius!


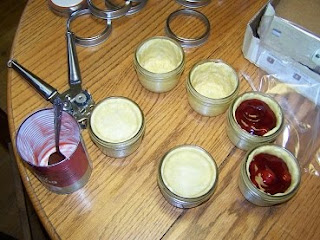
Here is the beginning of my pies. I mixed up a two crust 10 inch pie dough from my favorite recipe. (It gave me enough to do six jars with a little left over.) I took a piece of dough and pressed it onto the sides of the jar and bottom. I spread the dough pretty thin, since my family is not big on lots of crust.


I rolled out the remaining dough and used the band from the jar to cut the top for my pie. The dough was rolled thin but easily movable.


Okay, I cheated and used cherry pie filling! One can made four individual pies. I set the crust on top of the jar and gently pushed it down onto the filling. It naturally formed a bowl with the dough of the top crust circle joining the dough on the sides of the jar. I pinched the dough sides to form a good seal and removed any excess above the jar mouth. And they were ready to be frozen.


Here are the peach pies that I made. Okay, I cheated on them too! I used peaches from a can and this recipe http://hillbillyhousewife.com/deepdishpeaches.htm . The only changes I made to the recipe was to halve it, cut the peaches into small chunks, and use a little more nutmeg to taste. It worked out wonderfully.
One word of caution... Make sure to set your different flavors in their own area for identification or work with one flavor at a time. Once the crust goes on, it gets tough to identify. (I do not put slits or air holes in my pies to be frozen.)

I put my finished pies on a cookie sheet and set them in the freezer to flash freeze the top. Then, I put the lids (with a flavor label) and bands on them, set them back into their card board box, and stacked them in the deep freeze. (Before baking them, I let mine sit an hour to adjust to the climate with the lid on, and then remove lid and bake.)

I will be working on apple, apple/cranberry, and pecan this week. I'll throw some pics up when they are finished. Pies in a jar are a practical solution for individuals living alone, families with picky kids, or families that just can't seem to finish that 8 inch fruit pie. ;)

And just think of the possibilities. I make my own pot pies from scratch all the time. Why not in a jar?