Whimsical and Homespun Art Creations with a Little Rural Living Thrown In


Showing posts with label Work in Progress. Show all posts

Sunday, March 6, 2016

Bucilla Alphabet Quilt WIP


Has this been a crazy winter or what?   Believe it or not, I actually have the window open while typing this post, and the sun is shining cheery and bright through the window.  Fresh air and sunlight... Aaaah...  It renews the spirit.  :)
 
While cleaning in the living room, my eyes wandered over to the Bucilla Alphabet quilt.  Obviously, it has been awhile since my last update.  As you can see, a few more rows done.  The colors are a true reflection of the 60's and 70's.  They would definitely grab a baby's attention!  LOL.  I just love this quilt.  I really do!


If you want  a lesson in embroidery, this quilt is it.  It has made me do some stretching.  The King's eyes really gave me a time!  LOL   I remain positive and dedicated.  Only 9 letters left, I know... it should be 10.   I jumped down and did the U already.  Not sure why... Just went crazy one day a few rows back! :)

Sunday, July 5, 2015

Vintage Bucilla Alphabet Quilt ~ WIP

Here is the progress on the vintage Bucilla Alphabet quilt.  The colors are so funky bright, and the little characters are charming.  They really should have kept making this quilt.  It is such a wonderful starting place for newbies to embroidery.  I have been stretching my knowledge with this one.  I inadvertently screwed up the pattern by using the outline stitch instead of a backstitch around the main characters.  Funny thing... My Mom was certain she used the outline stitch when she made my sister's.  Talk about channeling the past! ;)
 
 
E is for Elephant...  Very exotic looking isn't he?


F is for Frog... I was so proud of how the satin stitch worked out on his eyes!!


G is for goose...  His beak looks a little weird due to the hoop being just removed off it.  :(


H is for Humpty Dumpty (in progress)...  Is he still popular?  LOL


These character quilts are so fun, but I really need to reduce my stash!  With my million other interests, it will be hard to complete them all.  Plus, I really doubt Farmerboy is going to have that many kids! LOL

Monday, September 1, 2014

Vintage Bucilla Alphabet Quilt

I have began working on my vintage Bucilla stamped cross stitch alphabet quilt from the 1960's - early 70's.  It boggles my mind a little to think that the crisp new quilt, that was manufactured that long ago, is finally taking its first venture out of the protective plastic packaging.  Even more weird, is the fact that I can still remember my Mom embroidering one of these for my younger sister 41 years ago.  Yikes! 
 
Ever since I listed one of these quilts partially finished on my selling blog, there have been several inquiries emailed to me about this particular kit.  I've decided to show each block on completion to help those inquiring about a color chart.  There are some pretty wild colors used in this quilt, due to the era that it was manufactured in.  The thread was also included in the original kit.  It would be interesting to see one of these quilts with more modern and tamer colors, but I love it just the crazy way it is. :) 
 
So with no further delay, here is the apple for letter A.  This was taken on a sunny day without a flash and portrays the border's blue and red the most accurately.


The bright little Blue Bird for letter B.  Due to today being a dark and rainy day, the flash has given a touch more intensity to the colors on the rest of the photos.  (I will take a progress to date picture on future posts to give a truer representation of the floss to use.)


The cat representing the letter C.


And to bring up the rear for now, the sky blue dog sporting his bright pink hat.  How is that for some 1960's colors?  ;)


The one thing that I really like about this quilt is that it incorporates more embroidery techniques than its modern day counterparts.  It really challenges me to broaden my skills into different stitches.  I also made a choice to bury my stitching in the quilt.  It hasn't been to difficult so far and is a nice change from always pulling the needle through the back.  Plus, there will not be a backing to attach later. :)   Well... I am off to do a little work on my Hummingbird quilt...

Hope everyone is having a wonderful Labor Day Weekend!

Tuesday, July 29, 2014

Summer in the Hollow

It is hard to believe that July is almost over! I have so much to catch up on and share.  Here is a little glimpse into the happenings here at the Hollow...
 
I have been working away on Great Grandma's Hummingbird quilt.  My purchase of a Huion light pad  has been a huge help in the piecing process.  The soft light helps me to fit the Hummingbirds around the octagon without any eye strain.  The light pad will be a great help with transferring quilt patterns and fine art as well.  :)


Does this look familiar?  I found another Bucilla stamped cross stitch alphabet quilt.  These over sized quilts are so charming!  They date from the late 60's to early 70's.   Although my bunny quilt is still in the process of getting the edging stitched on, this one is going to be the alternate stitching quilt for those cool fall evenings to come... or maybe sooner! ;)


Did I tell you that my birthday was a few weekends ago?  I will show you later the special gift that I purchased for myself.  Let me just say, it made me smile... I know myself so well! ;) 

Below is a special gift that I received from my coworker.  Lots of candy, a wonderful article on gourd crafting and a beer bottle that has an insert to be a candle.  Take a look at the label... Pumpkin Ale.  Isn't it wonderful!!  I think that it suits me perfectly and am going display it on one of my son's barnboard creations.  It will look so rustically cool! :)


I hope everyone is having a wonderful summer. :)  My camera is overloaded with events and items to share, and I have been doing some serious baking.   My fellow bloggers have been putting up some wonderful recipes!!  My next purchase better be a new treadmill, or this blogger is going to need a new wardrobe! ;)

Thursday, March 20, 2014

Vintage Hummingbird Quilt 74 Year Old WIP


For those of you that are new to the Hollow, the story behind these Hummingbird's can be found here.  They were a project that I knew would have to wait for my knowledge of quilting to expand. 
 
During the fall of last year, I took a day to try and figure out the geometric measurements of the octagon that would be needed to put these little guys together.  Seems easy right?  It nearly drove me nuts.  I remember being completely frazzed, walking away, and vowing to make the little Hummers into plain square blocks.  But after having a cup of tea and clearing my head, I threw common sense out the window, along with my ruler, and began sketching the pieces with transfer paper.  The ruler was used as a straight edge to clean up the design and in the final stages to make everything square.  My pattern was designed with hand stitching in mind, keeping with the style my Great Grandma ended with on July 4th of 1940. 
 
Below are the final sketches that I found in a binder last weekend.  Let me add that they were untested sketches.  No fibs here dear friends... It took me a minute or 20 :(  to reacquaint my mind on how I thought this pattern would work.  During the trial run of assembly, there were quite a few stitches ripped out trying to understand the order of construction.  My frustration was eased by imagining how different the world must have been when Great Grandma was constructing her pieces to this quilt... A quilt unknown to her that a Great Grand daughter would be destined to try and finish.  I couldn't help to also think of my Grandma, and how blessed I am that she kept these little pieces of cloth safe over the years. 
 
Have I ever told you how much I love to hand sew?
 
I truly do...


I am so proud to show you a peek at my progress!  It is as if my hands are being guided by generations. 


There is a long way to go, but I am so ready for this challenge.  A little hand stitching here and there calms my soul.  The timing feels right for me to venture into this quilt.  I intend to work on this one a few hours a week and take my time enjoying the process...


Sunday, March 16, 2014

Sweet Meadow Farm's Prim Easter Bunny Finished!

I hope that everyone had a Merry Pi Day on 3/14!  We celebrated the mathematical constant at our house with a slice of cherry.  After telling my co workers about the dessert planned for my family, my branch manager pulled out a huge apple pie that she had stored in our break room freezer.  Instead of pulling a 10 hour shift, I went home for a few hours and did some baking! LOL  So... my team at work got to celebrate with a slice of  heavenly apple pie! (For her generosity, I brought my manager a piece of cherry back, since that is her favorite! ;) )   We were talking about next year's plans, since the date will be 3/14/15 and that will account for the first 5 digits of Pi.  I am thinking that we should all bring a different pie and spend the day sampling!  LOL


I finished my darling little bunny from the Sweet Meadow Farm's pattern.  She is every bit as cute as I imagined.  Thank the heavens that she is prim, since my skill level is perfect for that style! ;)  ** Oops... the remnants of the Pi celebration are in the background! :)


She is complete with genuine feed sack bloomers.   It would be fun to do a bunny with all feed sack clothes.  For this little girl, the dress fabric was dipped in coffee, and it gave the wee outfit a wonderful vintage look.  One lesson that I learned was not to fold the fabric over a hanger to dry after dipping.  The coffee settles on the cloth that is resting on the hanger and leaves a dark line.  But if you dip the affected pieces again, squeeze them a few times while in the coffee and finish by hanging them with clothes pins; the lines will go away... Lucky for me!


Her colors go well with my living room walls.   I would like to make her a dark little boy playmate and some wool Easter toys.  It would give her arms something to do.  Now, I am off to look for another project that needs completion!

 
I hope everyone is having a lovely weekend! :) 


Tuesday, March 11, 2014

Sweet Meadow Farm's Prim Bunny

A few years ago, I picked up the "Simply Bunnies" pattern from Maureen Mills of Sweet Meadows Farm. (Maureen was the designer of the gingerbread girl doll that I purchased for Christmas 2011, during an online craft show (here). )   My desire was to purchase more of her finished dolls.  But since my searches came up empty handed, I decided to check out her patterns.   Yikes!  You should see her sweet little dolls.  I left her site with three patterns ordered.  :)  Quite the big dreams here, since my experience in doll sewing is ZERO.  After receiving the patterns, I really enjoyed looking, reading and filing them away in my "to do" drawer.  Sound familiar? ;)
 
The bunny pattern was calling to me last summer, so I broke out some muslin hidden in my "hope that its needed someday" stash and created some bunny body parts.  Unfortunately... not long after completion, the parts were put in a tub and forgotten about.  :(
 
As you can see below, this little darling was rediscovered last weekend... just in time for Easter.  What had I been afraid of?  Time to break out and have a little fun.  I made some stain from instant coffee  (It was pretty light... Makes me wonder if brewed coffee would stain a bunny darker?)  and began wiping the body down with a soaked sponge.  It took a few coats to get to the final shade.


Painting the eyes was reminiscent of my ceramic days... sigh... with my  paint caddy getting to see a little action! LOL  Then, I was surprised to find that Maureen uses my favorite colored pencils for the detail work... Prismacolors.  They are another item that hasn't seen a whole lot of daylight in the past year.  The whole process is so addictive!  My mind was buzzing with possible dye methods and assorted shades of pencils to use on future bunnies. :)

Below is how she sits right now.  Tonight, the assembling will begin.  Then, my Easter fabric will get a once over for an outfit.  The coffee stain will come in handy to give the fabric an antique feel to it.   This whole project has been amazingly fun.  I love the excitement of tackling something new, and Maureen's designs are definitely newbie friendly...  Trust me!


The eyelashes are very prominent on this little one, so a dress will be constructed.  My mind is already imagining a dark little boy playmate.  I think that I'd better start experimenting with some natural dyes!  :)

Tuesday, February 11, 2014

Finished Tumbled Rocks

This past year was like a whirlwind of events.  I am concentrating on slowing things down a little around the Hollow and completing some projects.  Below is some photos that were on my camera from last summer.  These are the rocks that I was tumbling... remember that? ;)  The whole process was quite the adventure, since yours truly didn't read books on the topic. 
 
All of the stones lost mass as the grit wore away at their jagged surfaces.  In this experiment, I found out in a "hands on" way the lessons of tumbling.  The yellow and white stones are Citrine.  As you can see, they tumble and polish beautifully.  They can go through a regular tumbling process and stay somewhat predictable on their shape, losing a 1/4 to a 1/3 of their mass.  If you look at the upper right corner, the tourmaline and amethyst can be seen.  They lost very little mass in the tumbling process and turned out equally as well.  The moonstone in the upper left corner suffered very little surface loss but never really achieved a smooth finish. :(  Will definitely have to be getting some books on the subject to correct this problem.
 
While tumbling all of these stones, the most important of all lessons is to take out the stones with surface fractures and reserve them for another tumble.  Upon completion, many of my stones had  internal fissures.  My personal thought is that fissures add to the mystery of the stones.  They give them a rustic inner beauty.  With the rough cut bulk stones that I purchased on Ebay and my vast inexperience,  I was fortunate to have several nice finished pieces.   


Remember all that gorgeous Fluorite that I had?  Most of it disappeared in the tumbling process. Yikes! Upon more research into the subject via the Internet, my suspicions were confirmed that it is a softer stone.  I proved this with my little pile that is one over from the Citrine on the left.  They came out with a frosted appearance like the moonstone.  But they still are very pretty. :)

On the bottom left is the Labradorite.  It will be going into the tumbler again.  I will be doing some major reading on this rock.  They lost very little mass and were pulled out after the second tumble, due to all of the surface cracks.  The lot definitely needs to go back to the rough grit until their exterior surfaces are smooth.


I really did enjoy diving into this process of rock tumbling armed  with little knowledge.  Normally, my method is to research a topic to death.  This time, I decided to just enjoy the process.  Here are some things that I did learn: 
1.  Get a Cheap Strainer to clean the rocks.
2.  Take out the rocks with surface flaws after the second tumble.
3.  With Chicago Tumbler,  buy a Lortone belt that will not break!
4.  Clean your rocks outside over a large bucket or pot.
5.  Be careful where you dump the rinse water.
6.  Keep a notebook with times and pointers.
7.  Be Patient with the Process!

This summer will definitely find me tumbling again, and I look forward to wire wrapping a few of these to make pendants.  My son is a wonderful jewelry maker.  His attention to detail is absolutely amazing.  Hopefully, he can teach his Mom a little about the craft!  ;)

Tuesday, January 14, 2014

Disappearing 9 Patch Quilt & A Little Free Motion Quilting

Hello everyone!!  It is so nice to be blogging again.  Thankfully, my son's laptop has not had as many updates as mine.  So far, blogger's system is tolerating my posting from here.  I hope that this will hold out long enough for blogger to finish fixing the problem...

I have not been idle this winter.  Do you remember my first quilt?  Shouldn't be too hard-- I have only worked on two.  LOL  Well, the plunge has been taken to quilt it on my own machine.  The preparation began on the batting... My choice was a thick wool blanket.  I was terrified of bearding, so a layer of cheesecloth was added to each side.  Let the pinning begin! 

The large safety pins were purchased at a discount store.  They are huge.  I bent them to make the sandwiching process easier.  To be honest, my finger and knees were sore by the time it was completed.  My cat sat up on the couch watching the whole time! ;)


It is hard to see, but the center was finished with a simple stitch in the ditch.  (Well simple for someone that is NOT a newbie! ;) )  The process was a lesson in patience for me.  Not only was I trying to get use to this big bundle of a quilt (the blanket was really thick) , but my need for speed was smacked down a few times.  Synchronization with the machine is definitely a necessity to get a nice smooth line.  With it being my first pieced quilt, there were a few flaws here and there to work around. ;)


Then came the free motion quilting.  I could have easily lost my patience over my own inexperience.  First thing learned-- the need to get the pressure from the foot right. My batting was soooo thick.  It was a shock how much it needed to be changed.  Second--  Sit higher than normal to have a birds eye view of my work.  When sitting at normal height, I found myself pulling the quilt causing an unfortunate needle break.  Third--  Never blame the machine.  Yours truly broke two needles by putting them in backwards.  I didn't even know that they could be put in backwards! LOL  That one cost me 20 minutes of hard thinking.  I just laugh, thinking back about it. 


I really had a blast fumbling my way through quilting.  It was something that I never dreamt I could do.  It seriously felt good to practice at a new art.  Hopefully, the future will find me perfecting my technique, but this quilt will always stand tall as being my first of everything in the quilting world.  My pride over floweth on this one.  It means the world to me.  Now, the next decision is the choice of binding.  I hope to have it finished by the end of the month! :)

Sunday, August 18, 2013

How to Tumble Rough Rocks

Intricate cut stones and high end jewelry have never been something that I cared for much; but a few years ago at a  stop on the 127 Yard Sale, a lady from Jamaica had set up a stand with her handmade creations.  A beautiful necklace caught my eye.  Its pendant was a Moonstone carefully housed in a cage of wire that was twisted in the most intricate shapes.  Mr. Hollow (who is extremely picky about jewelry)  complimented the artist on her obvious talent, and I vowed to return to purchase the necklace.  Sad to say that after a long walk around the venue, I blanked out a return to the stand and was miles down the road before remembering my mistake... Uggghhh!  I have never seen her booth on our subsequent trips. :( 
 
Since that first encounter with this fine wire art, Farmerboy was lucky enough to have a teacher that gave his class a glimpse and hands on experience at creating jewelry from scratch.  He had the opportunity to  twist pieces of fine metal into some amazing pieces of jewelry.  I admire his meticulous talent in this area and dreamed to one day take a try at creating some metal designs of my own.  Of course in my mind, the metal would be housing a shiny stone.  So after a little research, I decided to start from the very basics of jewelry making and tumble my own stones...
 
Many hours were spent researching gemstones and varying rocks for their spiritual meanings.  I love a piece of art with a hidden meaning. ;)  The first purchase (pictured below) consisted of  rough lots of Citrine, Fluorite and Labradorite and some Apache Tears (which are volcanic glass).  My second purchase was smaller samplings of Amethyst and Moonstone.  The stones were quickly followed by a package with various tumbling compounds...


Talk about putting the cart before the horse, my last purchase was a Chicago dual drum rotary rock tumbler.

** Note**  I will be honest and tell you that rock tumbling makes me feel like a fish out of water. It is frightening and exciting to venture into the unknown.  My son had a small child's tumbler years ago, but it was Mr. Hollow that helped him with it... :(


Sometimes you just have to dive in. :) 

Here is a picture of the rocks in the two drums, before the 4 T of coarse grit and water were added.   As you can see, these stones are intriguing even in their rough state.  It will be great fun to see them transform into a polished stone.  I will be honest and say that I did not check hardness of stones prior to tumbling; although in my research, these types were mentioned at being tumbled together.  The Apache Tears were left out, due to the fact that they are comprised of volcanic glass-- making them a touchier piece to tumble and remove scratches from.


The tumbler is downstairs on the basement floor tumbling away.  My endeavor is on day 4, and I will give update posts of the progress...

Monday, May 20, 2013

Disappearing 9 Patch Quilt ~ Prim Rearranging

As I was measuring my "Sister's Choice" quilt for its border, my eyes wandered over to my wicker work basket where my very first quilt was folded and tucked away.  The "Disappearing 9 Patch"  was composed of my very favorite fall themed fabrics.  It was folded and set aside, because I couldn't make up my mind on a border.  Enough procrastinating...  The border will be black.  I unfolded the top, measured, cut, sewed, and viola. 
 
The finish to this quilt has been on my mind ever since the discovery of my newest obsession  The Free Motion Quilting Project blog by Leah Day.  Leah has inspired the designing artist in me to take a stab at some thread art.  Her blog is a wealth of knowledge on the "how to" of machine quilting.  Leah is such an inspirational quilter and human being.  Her blog is full of helpful videos, and she has classes available for purchase on Craftsy.   After a lot of reading, Kenna and I have decided to create some loose spider webs on the black border of this quilt.  You know, the kind that cover the garden plants in the fall. *sigh*  :)  


There's been a little delay in the practice of free motion quilting, as I awaited some supplies to get Kenna and myself prepared:   quilter gloves, a soapstone pencil, a darning foot, and a walking foot.  I am so excited to take this next step.  I have some mini projects planned for the upcoming week! :)


Here is a pic of my new work area in the front room.  Due to the addition of the kitchen island, my oak table had to move to the front of the house.  I am not a big fan of the heavy pattern to oak furniture.  The table definitely needed to be toned down, so I folded up one of my garage sale quilt scores.  (It is a hand quilted beauty that if I remember correctly was $10.00.)   It makes a nice runner and adds a very homey feel to the front room.  My wooden trencher fits in nicely after I darkened the wood with some instant coffee. ;) 


Got to get some mowing done today.  Hopefully, I will be able to get some sewing in after work tomorrow! :)

Thursday, April 18, 2013

Sleeping Bunnies WIP ~ Embroidery Floss Dispenser Tip

 
I had a relaxing evening last night watching the Pink Panther on STARZ with my son and working on my Janlynn quilt "Sleeping Bunnies".  This quilt got put on the back burner for a while, because I was having difficulty deciding the color of the bowed border.  Here is the progress to date...


Since going out on a limb and veering away from assigned pattern colors, there is a lot of relief in writing that I am very happy with how the colors are intermingling on this quilt.  The darker border makes a nice frame and adds some dimension to the piece.  Hopefully, this quilt will see a finish by the end of May.  :) 


While working on my various baby quilts, I have tried different ways of storing and dispensing floss.  (My storage bins can be viewed here.)  But while working on my projects over the years, I was not happy with the methods that I was using for keeping the floss handy.  The individual baggies worked great for organizing the amounts of skeins needed, but my problems began once the thread was being dispensed.  On lazy days, I wrapped the thread back around the skeins and used a baggie for the odd divided strands.  On days that I was more organized, I tried the small cardboard dividers.  If my work consisted of counted cross stitch, I might have been more satisfied with the cardboard dividers and the cases that could be purchased, but they seemed too small and were just not working out for me...

While catching up on blog reading, I caught one of Lisa's beautiful pictures at her blog Lil' Fish Studios.  She was doing some embroidery on one of her fantastic felted stones and sitting next to her project was an assortment of floss wrapped around clothespins.  It was absolutely homespun dispensing and right up my alley! :)  Maybe this idea was not new, but it certainly was to me.  So I headed out to the store and purchased a few packages, because let's face it... clothespins are cheap and have a 101 uses! ;)

I am happy to report that the clothespins are working out great.  Size wise, they are easy for me to grab and not loose in the couch cushions, and I can still wrap the cut threads onto the pins and clamp them securely into place.  As with everything in life... this method was just suited for me, and I am glad that I stumbled upon it.  Plus... the clothespins look cool! ;)


The handles on the pins are perfect for labeling the floss number with a fine sharpie marker. :)


With the day off from work today, my "Sister's Choice Quilt" will be getting a border to finish it into a flimsy ***Yay!!***,  a few butterflies will get added to my baby quilt at lunch time, and then I have a date with a graphite drawing that has been waiting patiently in my studio... A perfect plan to settle down to on a rainy day. :) 

Monday, February 25, 2013

Sister's Choice Quilt ~ Progress

A quick update on the progress of my "Sister's Choice" quilt...

I finished all of my blocks and jumped into the task of choosing where they would all fit in the main design.  My method should have been easy --only requiring a few color rearrangements.   But as with all great plans a little error can be expected, and I apparently skipped one side of an outer row, which required me to take a little bit longer completing my task. :(  Well that and a little black furry critter kept making a nuisance of herself! ;) 


Finally, all blocks were in place.  I did a few adjustments on color and picked up my rows.  They are in the process of being sewn together.  It is so exciting to be working on my first full size quilt! :) 


Wednesday, May 9, 2012

Gourd Snowman "Make Do" Work in Progress

Remember those bed springs that I purchased many months ago??  Well, I am finally getting around to playing with one of them.  I have been fascinated by the primitive "make do's"  and am finally working on one of my own. :)  My little snowman started out as a cannonball gourd.  And as you can see, he is still waiting on his upcycled wool sweater hat and scarf.  I hope to get them and him completed this weekend.  He has been chilling ;)  on his perch patiently.  The studio has been quiet the last couple of weeks while I have been training full time for a new daytime job.  My new hours will be part time (unless I'm needed to fill in for vacations).  So... Back to the studio for me... Yay!!! :)

I  am so excited to work on my first "make do" and am thrilled with his progress.  As you can see,  he has a mache nose. And for a new twist, I added mache eyes for extra dimension.  I think, the addition of mache eyes will keep his hat from traveling down his face, too! ;)   After a little more shading, his makeup will be complete.  Then, it will be off to the spray booth for some sealer...      


Sunday, March 4, 2012

"Sister's Choice" My New Quilt Project

As my friends that follow my blog already know, I have a little bit of a fabric stash. ;)  (I wrote  about it here.)  It was purchased with the hopes that one day I would learn to quilt in my spare time.   Last year, the opportunity to learn presented itself  with Sewn's "Skill Builder Challenge".   My skills have grown by leaps and bounds.  Thanks to Leila, my little Kenzie and I have been humming ever since!  Now, I can open quilting books or look at patterns on fabulous quilting sites and understand the directions... WOW!!

After completing over half of the challenge, and due to the fact that we are on a break from the Challenge (Hope your feeling better Leila!), I went on a search for a quilt pattern for my bedroom.  Since I wanted it to be from my stash, a scrappy quilt was called for.   My design preference has leaned towards star based blocks with a simple design.  So with that in mind, I looked through some favorite sites to find my first major quilting adventure.  The search ended at Bonnie K Hunter's "Quiltville's Quips & Snips" site.  Bonnie has several wonderful free patterns that I am anxious to try, but for this project, I fell for the name and design of the quilt "Sister's Choice".  (You can click on the title to view the pattern and check out Bonnie's outstanding blog!) 

Our front room table transforms into the designated area for construction of my quilt... for at least twice a week anyways! ;)  The center of the star block is a nine patch and at least one of the two colors will be a form of  red/burgundy.  The only other set color will be the star points, which will be done in a shade of green. 


I hunted for the right fabric out of my stash and cut the pieces for the nine patch centers first.  It took quite a while, but I loved every minute of it! :)  On my new work at home schedule (desperately needed it to keep my home business art and hobbies organized... Aaaagh!), Friday and Sunday afternoons are allotted for sewing machine piecing.  These were the first nine patch centers that were assembled.  More blocks have been added to them today.  I plan to finish all the nine patch blocks before starting the outer border of the stars. :)


I thought that I would share this final block from the Skill Builder Challenge, since this post is on the subject of quilts. :)   It was one of the applique challenge blocks.  This block surprised me in being a fun project.  Needle turn applique would not have been a technique that I would have looked to learn on my own.  


I cannot honestly say that I am in a hurry to start an applique quilt with cotton fabrics, but it does get my mind spinning about the possibilities of wool applique.  Penny rugs and candle mats are something that I am anxious to try.  This block gave me the push to begin drawing my first mat.  It will be fun to stitch on at night! :)


Sunday, January 15, 2012

Vintage Rusty Bed Springs & Gourds

Here are some rusty bed springs that my kid found for me.  Aren't the pretty? ;) I was thinking about playing around with some of my little gourds and mixing them with recycled stands.  Since I do most of my thinking out loud LOL, my kid decided to help my plans along by locating some rusty springs.   How lucky am I ? :)


For the creations that do not require the added rust, I purchased some new springs from Deb's Etsy shop  My Stitches to Treasure .  The new ones have such a nice clean look to them, and the base is more narrow than the vintage springs.  They should appeal to potential customers that do not desire the rough weathered look.


My collection of nail kegs hold all of my small and mini gourds.  They look so wonderfully prim stored in that fashion!  Here is a little guy in the most basic form! ;)   Thank the heavens that he has some friends, since I can see many different whimsical beings created from that shape.  The sketch book will be getting filled up tonight! 


My next thought was to turn to my jumbo egg gourds, but then I decided to give myself a little challenge... How about these mini dipper gourds with their curly tops?  I'm thinking, a few of them are going to make their way to the studio.  :)

When looking at the photo of the mini dipper gourds, I laughed when noticing the tag from the flea market.  It will stay on the keg and remind me of the great times hunting for treasures... and the adventures to come! :)


Stay tuned for more updates on the mini gourd front... :)

Tuesday, January 10, 2012

Revised Honey Pot on Winnie the Pooh Vintage Cross Stitch Baby Quilt

I wanted to show some finished work on my Winnie the Pooh cross stitch quilt that is getting close to being finished.  My quilted Winnie the Pooh officially has his honey pot!  Below is the picture from the quilt kit.  For being a Disney design, I found it rather blah.  So... my stash of DMC threads was put into action... 


And here is the end result.  It is enough of a change to make the pot a little more dimensional and pleasant to the eye.  The older Disney quilts tend to not have a lot of color variations going on.  Little changes in the layout can add so much to the quilt's appearance and give it some individuality from the mass production.  I think that the flowers will get altered, since they are mapped out to all be of the same shade...  Just a few more flowers and Winnie the Pooh's body are left to finish up! :)


And just in case you were wondering... I ordered my Lorax fabric today!  Kaufman fabrics created two lines one of earth toned colors and another of brights to make quilts with.  The original book is in earth tones, so I ordered that line.  Maybe later, the bright colored Lorax fabrics will find there way to my house, too. ;)   But, there is the Cat in the Hat fabric line that is calling my name... plus the rest of the spotted Seuss fabric... Aaaagh!  What is a girl to do?  Then as I wandered around the Fat Quarter's shop, I ran into Eric Carle's "Hungry Caterpillar" fabric.  My son's favorite book as a child and another addition to my wish list! ;)  It was then that I decided to work on finishing some projects, before I found too many more to start! :)

Thursday, October 27, 2011

Making Little Gourd Snowmen ~ Works in Progress

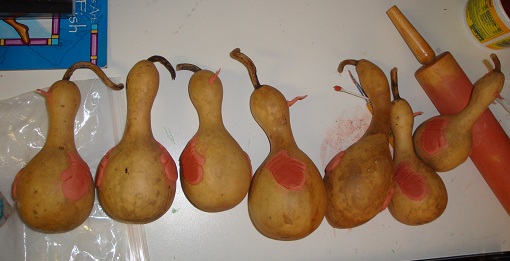
Sometimes I've just got to take a break and play with some paper clay! :)  There were a few other projects that needed to be finished up, but these little guys were calling to me and won the afternoon time slot.   I hadn't realized that I had some "Slushpile Gang"  mini members patiently awaiting to be created. Gee Whiz!!  Below is the line up of new inductees in the rough.  The tallest of this group is 8 inches and the shortest is 5 1/2.  They do not have much room for art on their little bellies, but rest assured... I will get some on each. ;) 

One of  the gourds got kicked out of the group.  As I was fitting him for his mittens, he had a lean that strongly resembled a chicken or turkey.  You know that kind of crook to the neck that only a cocky bird can get.  It is funny how each gourd's shape has such a personality.  There was just no way that gourd could have ever have been a snowman.  So, he is waiting in the "wings" (accidental pun!) for his costume fitting at a later date...


My drafting table looked as if a bomb went off!  Little bodies laying everywhere.  As you can see, a few larger members to the gang are in the beginning stages.  I can see a lot of white paint in my future! ;)