Whimsical and Homespun Art Creations with a Little Rural Living Thrown In


Showing posts with label Freezing. Show all posts

Sunday, October 4, 2015

Apple Pie with a Caramel Streusel Topping ~ Recipe

The fall weather in Northern Illinois has been absolutely beautiful.  The colors are a little late in the trees, but the temps have been comfortably cool.  My hubby left for a trip back in September and returned with a bushel of McIntosh apples.  He was passing through Gayes Mills and picked them up as seconds for $20.00. 
 
Since then, our family has definitely eaten our fill of caramel apples!  :)  So this weekend was perfect cool weather for canning some applesauce and making some pies.  I started with the sauce and worked my way through 25 jars.  Then, I decided to make 14 half circle hand sized pies.  With the apples left over, I decided to try a new pie recipe.  It was an apple pie with a streusel topping.  The pie was a big hit here which is great since I froze two for later. ;)
 
The recipe calls for a one crust pie shell... bought or homemade is your preference.  I made my pie in a 8 inch tin and the apples cooked down fine.  McIntosh cook down a little more than other varieties.  I made some alterations to some recipes that I found on line.  So here is my version:


Apple Pie with a Caramel Streusel Topping

7                      medium sized McIntosh apples (any tart apple would do)
2 T                  flour
1/2 rounded t  cinnamon
1/4 rounded t  nutmeg
1/4 c               white sugar (could use 1/3 c if the apples are really tart)

When the pie crust is ready in the plate, peel and slice the apples into a bowl.    Mix the apple slices, flour, cinnamon, nutmeg and white sugar together.  Add them to the pie crust arranging them into a mound. 

Streusel Topping

3/4 c                 brown sugar
1/2 c                 flour
1/2 rounded t    cinnamon
1/3 c                 butter softened

Mix all the ingredients with a fork to combine.  Break up the topping and evenly cover the apples.

Put the pie in a 350 degree preheated oven.  I had the pie tin sitting in a glass 13x9 cake dish situated half way down in the oven,  and it baked for 60 minutes.  Since all ovens differ and my dish had sides that hindered the distribution of heat, check your pie at 40 minutes and decide from there.   I kept checking by pushing on the crust to make sure it was firmed up.

We didn't eat our pie until later in the day.  Mr. Hollow likes his warmed up a little, and mine was straight from the pan.  The one thing we agreed on was a caramel drizzle topping. For that, I unwrapped 6 Brachs caramels  and placed them in a small bowl with a couple of teaspoons of water.  The caramels were microwaved in 15 second intervals until bubbling.  Then, it is simply stir and drizzle.  The pie was absolutely delicious!  Packed with the best flavors of fall.  :)

Sunday, November 18, 2012

How to Bake a Whole Sugar Pumpkin to Process and Freeze

While Farmerboy was shopping for his Halloween pumpkins to carve, he brought home three sugar (or commonly tagged "pumpkin pie") pumpkins.  Why?  Who knows... Apparently, he felt that his mother would like to take on the challenge of making her own pumpkin puree from scratch.  UGH!!  My mind was filled with the idea of cutting the tough rinds, scraping out the seeds, cubing and cooking the remaining pumpkin.  The end result would probably be me with a soupy mess!  :(   

I was telling my Mom about my troubles one afternoon, when she mentioned having seen a program on TV that processed the pumpkins by baking them whole.  What?  I am not going to lie here... My mind was filled with exploding pumpkins and seedy guts hanging all over my oven.  I could tell later that evening that Mr. Hollow's thinking wasn't much different.  But, after a little research that surprisingly brought few results, my mind was made up to take a stab at this short cut.   Armed with very little knowledge (and after waiting for Mr. Hollow to leave for work), the little pumpkins went into the oven.  This is how I prepared and baked them:

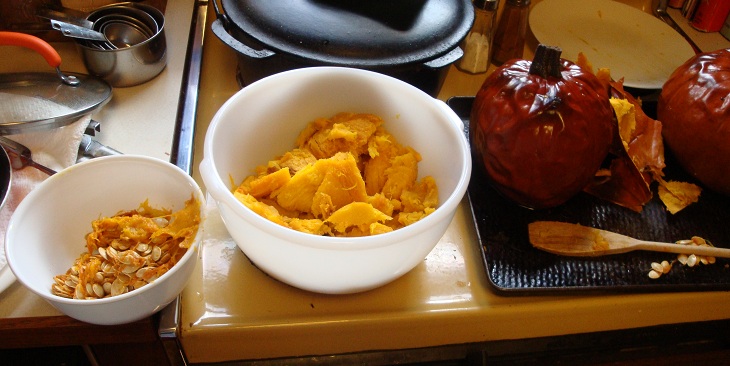
All three pumpkins were washed and dried.  They were rubbed all over with a paper towel-- moistened in olive oil.  I took a pointed steak knife and pierced the rind all over (was hoping this would deter any explosions!).  They were then set directly on the oven rack with a cookie sheet on the rack immediately below them to catch any run off.  Next, I turned the oven on 400 degrees and let them bake for about an hour.  They were checked by pushing a knife through the pumpkin and into the flesh.  The rind and flesh were soft, so I knew that they were finished baking. The picture below is how they looked after removal from the oven.


 As you can see from the skin of the pumpkins in the photo below, I let them sit and cool for an hour.  They started to deflate and the rinds began to buckle.  Each pumpkin cut easily into quarters as if slicing through butter!  I used a wooden spoon to gently remove the seeds and loose stringy flesh.  Then, the same spoon slid the golden flesh effortlessly from the rind.  Due to the long cooling off period, some of the rinds could even be peeled by hand from the flesh.  How easy is that?


My Braun hand held processor turned the pumpkin flesh into a smooth puree.  Three pumpkins yielded 5 containers of pumpkin puree at 2 cups each.  Four of the containers are now in the deep freeze.  Not a bad haul for an afternoon of experimenting! :)

The next test was to make a pie.  I noticed that the pumpkin did seem a little runnier in the mixing stage... And the pie did bake a little longer than my pies made with canned pumpkin... But I am happy to say that it tasted absolutely perfect!

Did I ever tell you that my all time favorite dessert is Pumpkin Pie?    I don't even need Cool Whip to enjoy it! :)


I do not know if planting, harvesting and processing pumpkins on a larger scale is in my future, but the idea is certainly more tempting with this method! :)

Thursday, September 20, 2012

Hay Days and Apple Processing Time!

Apple harvest time is here again... Thanks to Mr. Hollow! :)

Hubby's yearly travels takes him to Hay Days in North Branch, Minnesota.  (It is a Huge snowmobile swap meet.)  He goes with his brother every September and always arrives home with new treasures.  Past purchases have involved sled tracks and parts, truck rims and tires, chainsaw parts... You name it and they have it there for the guys.  Well this year on his way home, he decided to stop by the town of Gayes Mills and bring a few things back for yours truly...  2 Bushels of Apples! :)


Aren't they lovely?


As if the apples were not enough, he purchased some fresh cider donuts, and a gallon of apple cider to be heated and spiced up!  Mmmmm...


This past week has been busy with peeling and slicing, which has been a breeze thanks to my handy dandy apple peeler/slicer from the Pampered Chef.  What a time saver!


For a huge money saving versus grocery store prices, I decided to flash freeze and pack 21 quarts of apple slices this year, along with 3 quarts of halved apples, 12 quarts of applesauce, 3 large pies, a caramel apple pie  and 2 dozen pies in a jar.  (Pies in a jar can be read about in an earlier post here. )  That still left plenty of apples for slicing and pouring caramel over... Yum!


Mr. Hollow and I might still do some travelling near the orchards before the season is over and will definitely pop in to enjoy the smells and sites of the season, but I am relieved to have the processing of the apples is over for the year. :) 

Sunday, November 6, 2011

Recipe for Strawberry Rhubarb Freezer Jam

A few weeks ago, my rhubarb plants finally collapsed to the ground for the year - the frost from the night before did them in.  They have had the longest growing season that I have ever witnessed.  There are bags upon bags of rhubarb cut into chunks and stored in the deep freeze for this winter's desserts. The over abundance of rhubarb lead me to trying out an old freezer jam recipe.  It is simple, quick, and no canning required! ;)

Strawberry Rhubarb Freezer Jam

10 c.            Fresh Rhubarb Chunked
2 c.              White Sugar
1  (20 oz)     Can Crushed Pineapple
1   (6 oz)      Box Strawberry Jello

In a deep pan, combine the Rhubarb, Sugar, and Crushed Pineapple- bring to a boil using medium heat while stirring constantly.  Keep stirring and cooking for another 20 minutes until the Rhubarb is tender.  Remove from heat and add Strawberry Flavored Jello.  Tada...That's it! 


I placed the cooked jam in a big Ziploc plastic tub and set it in the refrigerator overnight.  The next day, I filled 7 half pint Ziploc plastic tubs, placed the lids on, and popped them into the freezer.  The photo below is my little bit that was left over for sampling. 


I must say, I was a little skeptical about this recipe, since I am not a huge fan of pineapple... But this jam was absolutely delicious.  The flavor closely resembled  cranberry sauce.  I absolutely LOVE cranberry sauce but am not a fan of the after taste that taints the taste buds - Not the case with this jam.  I was amazed by the flavor when sampled straight from the tub, and it was even better on toast! :) 

Friday, September 30, 2011

Harvesting Sweet Corn & Felting Sweaters

In the midst of my commission work posted on my "Sketches" blog, I am late blogging about some of the happenings from September and hope to get them caught up this week.  One of my first endeavors came from the cornfield during the first weekend of September... courtesy of my son. 

My little farmer boy planted a field of sweet corn on a vacant lot that we own in town.  (He has the best luck for not getting any hungry critters invading and stealing the harvest.)  To my surprise, he called me on my way home from the Edgerton Thresheree (promise to get those pics up this week) and told me that he was picking all the sweet corn.  Aaaaagh!  So, I put aside my afternoon work and began to shuck some corn.  Thirty-seven quarts later... I decided to throw in the towel.  After all, there is only three of us in the household.  And although we love corn, that figures to approximately 3 quarts a month.  I packed the quarts for freezing and can get two days worth of veggies from each one... plenty for our family!  After gifting a couple of grocery bags full to friends, setting some aside for the week, and coaxing the hutch bunny to eat a few small ears (how desperate it that?! LOL), we were still left with a third of the ears still in the trailer.  Thank heavens for the neighbors!  Farmer boy told them of his harvest, and they came over the next afternoon and carried them off to put up for the winter.   We fed the remnants to neighboring farm animals, so there wasn't waste. Yay!  It went so smoothly that one would have thought it was carefully planned. ;) LOL    


Winter sweaters from the thrift store... Yay!!   Along with wool clothing and jackets, wool sweaters are on my list.  Here are some of the sweaters (already felted) that I have accumulated this month.  They are felted in a hot wash and dried on high heat.  I try to wait until there are enough similar colors before doing a day of felting.    It is so cool to witness the transformation!  Trust me, it is a very addictive hobby.


I spent yesterday morning starting to organize part of my stash from the bins and mix in the new haul.  For easier storage, I decided to cut off the arms and wide waist bands, since those parts are used for different projects.   The sleeves even got a stapled label of what kind of animal fibers that they are composed of.  How's that for organization?  Wish I would have thought of that when I started building my stash last fall!  Aaaahhh... better late than never...


I have been so excited to have the opportunity in September to create some pieces that will be listed in my Etsy store for fall and winter.  Tomorrow's post will show how I encorporated a few of these upcycled sweaters into embellishing a new project. 

This is the first year that I will be able to spend the fall and winter creating upcycled and fiber art, along with my graphite work.  My list of projects and sketch books are full of ideas that have my mind spinning, but I think that I finally have a pretty good schedule going.  It is a crazy balancing act with all the different medias... just the way this multi tasker likes it!! :)

Wednesday, July 27, 2011

Preserving The Garden Produce

The garden vegetables have been rolling in.  Let the blanching and freezing begin! :)  I've been picking green beans for some time now, but they are starting to slow up a little after the heavy rains.  Although we have eaten them with dinners, I have still managed to blanch and freeze 4 quart bags full of them and might end up with a few quarts more.  My son only planted a few rows this year, so I think that they did pretty good.  This years garden was kind of experimental.  We tried a smattering of different things.  Then we can decide which items to put more in of next year, and where they will be placed.  The green beans are a hit, so there will definitely be more rows next year. 


The green peppers have been very sluggish.  The high wind storm really took its tole on them.  I find that the green bell pepper plants are a heartier variety for our soil.  The multi colored varieties are just sitting stagnant.  I have been chopping up those that were harvested and flash freezing them on a cookie sheet.  So far, I have filled 1 1/2 quart bags.  I hope that the plants will come out of their funk to produce a few quarts more.  I definitely will buy more of the green bell variety next year.  During the winter months, I add green peppers to a lot of my main dishes.  Yum!


I haven't planted jalapenos in years, but it sounded good when the kid and I were purchasing our plants.  The three little plants in our garden just love to grow!  Here is the first pickings.  My initial inclination was to freeze these little guys, but I have many other items to fill my freezer with before the snow flies.  So, my other option was to string and dry them.  Don't they look pretty?  I can't wait to pick some more.  They add some spice to my decorating as well! ;)


My greatest success so far was training my cucumbers to climb the corner trellis.  They just haven't wanted to do it in subsequent years.  The first ones that were picked were long and skinny.  I almost thought that they needed to sit on the vine longer, but after tasting one, I knew they were ready for a recipe.  There were three cucumbers in the first picking, so they were turned into bread and butter pickles.  Since there wasn't many cucumbers, I found this recipe to make a small batch in the microwave.  How crazy is that?  They were a hit with my family.  Next year the garden will see more cucumbers, and you'll find me canning some bread and butter pickles!  I hated these as a child but love them as an adult.  Mmmmm... :)

If you are interested in the recipe for the microwave bread and butter pickles, they can be found here at All Recipes.  They really taste great and come in handy for a quick batch. 


The tomatoes are just starting to turn a reddish orange color.  I only planted six of these.  My family is not big tomato eaters.  Salsa use to be a big hit, but even that has lost its appeal.  There are some squash vines growing like crazy and some eggplant.  We have never eaten egg plant, so it should be an interesting adventure.  The three plants are covered in flowers, and there are six baby eggplants already growing.  I will have to look around for some recipes. ;)   My rhubarb is having a long growing season with 6 quarts cubed in the freezer, and another pile of stalks waiting to be preserved.  I see some strawberry rhubarb freezer jam in my future... ;)

Tuesday, November 23, 2010

Cooking Home Made Salsa

What do I do when I need more freezer space? Make salsa. During the tomato harvest, I blanch my tomatoes, cut them up, measure them, and freeze them. The summer temperatures are always to balmy for me to stand over a boiling pot, so I got in the habit of freezing my tomatoes for cooking salsa in the winter. The plan did not include making salsa a few days before Thanksgiving, but the sale on turkeys was too good to pass up... Time to make some space in the freezer!

Unfortunately for my son, my hubby was home while the cooking was going on, and he likes his salsa hot. (The taste tester always wins!) I didn't have all of my ingredients for the impromptu session, so I just threw in what I had on hand.

Salsa

15 cups skinned tomatoes chunked
4 cups chopped onions
2 cups chopped green peppers
2 jalapeno peppers chopped (seeds removed)
2t crushed red pepper (dry)
1 1/2 teaspoon cayenne
1/4 cup sugar
2 Tablespoon salt
1/2 cup white vinegar

Set aside 1/2 cup tomato juice. Mix everything together in a large pot. Bring to boil, cook for 25 minutes stirring constantly, so it doesn't stick. Mix together 1/4 cup cornstarch with the reserved tomato juice. Slowly add (until desired thickness) to mixture, stirring well. Remove from heat. I just freeze any extra in serving size containers.

Yes, it was very hot. So to keep peace in the family, I added a can of stewed tomatoes (with juice) to a quart of salsa and that brought it down to edible for my son.

Here is the recipe that this was adapted from. Above, I used more tomatoes due to mixing up my measurements before freezing! :)

Salsa

11 cups skinned tomatoes, chopped
4 cups chopped onions
2 cups chopped green peppers
3 jalapeno peppers
2 red chillies (I usually skip them due to heat level!)
1/4 cup sugar
2 tablespoon salt
1/2 cup white vinegar
1 1/2 teaspoon cayenne (if you want it to burn!)

Just follow the instructions above to mix. The jalapeno peppers, chillies, and cayenne can all be played around with to the desired amount of hot. I have made the recipe with 2 jalapeno peppers and no chillies or cayenne, and it was a very nice mild salsa.

Monday, November 15, 2010

How to Make Pie in a Jar

In past years, I have used up orchard apples by making and freezing 8 inch apple pies. They were so nice to be able to take out of the freezer and enjoy all year long, but with my son getting older and being gone most of the day, left over pie began to be a problem. I have a terrible time with tolerating waste, so I found myself eating more than I normally would. ~Which in turn, meant more hours on the treadmill later! :( So, I was on the hunt for a solution to my dilemma.

While on vacation in Kentucky, I purchased some single serving baked pies from the Amish that were very good. They made a circle out of the pie dough, added filling, closed the dough making a half circle, and baked. This idea was great! I was excited for the apple season to begin. The only possible problem would be storage. I figured... I would flash freeze, throw them into a bag, and hope they wouldn't find there way down into the bottom of the deep freeze! It was a great plan, ready to go into action, until I read an article about pies in a jar on http://www.ourbestbites.com/ . I was sold completely on this idea. Over to Amazon I went, and three days later my 36 half pint Kerr jars arrived!

This process is so smart and practical! You simply make a pie in a 1/2 pint wide mouth Kerr jar and freeze. The best part of the whole process is that you bake the pies in the same jar! You heard me... WOW! No more waste!! And better yet, everyone can pick their own favorite flavor. Genius!


Here is the beginning of my pies. I mixed up a two crust 10 inch pie dough from my favorite recipe. (It gave me enough to do six jars with a little left over.) I took a piece of dough and pressed it onto the sides of the jar and bottom. I spread the dough pretty thin, since my family is not big on lots of crust.


I rolled out the remaining dough and used the band from the jar to cut the top for my pie. The dough was rolled thin but easily movable.


Okay, I cheated and used cherry pie filling! One can made four individual pies. I set the crust on top of the jar and gently pushed it down onto the filling. It naturally formed a bowl with the dough of the top crust circle joining the dough on the sides of the jar. I pinched the dough sides to form a good seal and removed any excess above the jar mouth. And they were ready to be frozen.


Here are the peach pies that I made. Okay, I cheated on them too! I used peaches from a can and this recipe http://hillbillyhousewife.com/deepdishpeaches.htm . The only changes I made to the recipe was to halve it, cut the peaches into small chunks, and use a little more nutmeg to taste. It worked out wonderfully.
One word of caution... Make sure to set your different flavors in their own area for identification or work with one flavor at a time. Once the crust goes on, it gets tough to identify. (I do not put slits or air holes in my pies to be frozen.)

I put my finished pies on a cookie sheet and set them in the freezer to flash freeze the top. Then, I put the lids (with a flavor label) and bands on them, set them back into their card board box, and stacked them in the deep freeze. (Before baking them, I let mine sit an hour to adjust to the climate with the lid on, and then remove lid and bake.)

I will be working on apple, apple/cranberry, and pecan this week. I'll throw some pics up when they are finished. Pies in a jar are a practical solution for individuals living alone, families with picky kids, or families that just can't seem to finish that 8 inch fruit pie. ;)

And just think of the possibilities. I make my own pot pies from scratch all the time. Why not in a jar?

Thursday, October 28, 2010

Freezing Butternut and Acorn Squash

Here are my butternut squash. I cut off the stem end, halved them, scooped out the seeds, and turned them upside down on a cookie sheet that was covered in aluminum foil and sprayed with cooking spray. I poured a half a cup of water around them and put them in an oven at 350 degrees. It took about 1 hour and 20 minutes when my fork could go throught the skin and flesh easily. This is what they looked like pulled out from the oven.


This is the finished product. I found that using an ice cream scoop was pretty effective in getting the flesh from the skin. I mashed the flesh and whipped it with a beater until it was smooth. I measured it into 2 cup servings, put it in a Ziploc freezer bag, squeezed out the air, and stuck it in the freezer. Finished!

Did you wonder if I tried any of this? The answer is yes. It was nothing like I thought it would be. Of course, there was no other flavors or sugar on it, so I could get a true assessment. It tasted like a sweet potato -minus the sweet with a touch of stewed pumpkin -minus the sweeteners. I can see why this squash has been used in so many recipes to fill in for pumpkin. The taste is so very similar. It will be interesting to experiment with in the kitchen!


Here are the acorn squash. To keep them nice and mashable, I cut them in half, scooped out the seeds, put the flesh side down (flipped them over for the pic to cool), poured a half a cup of water around them, and baked them at 375 degrees for about an hour on a cookie sheet that was lined in foil and sprayed with cooking spray. I must say, these were very small in size, so I think that is the reason for the quick baking time.

Just wanted to add~Some of these little gems had a very tough skin, so thanks to a tip from the Internet, I scored a line from stem to tip on both sides, where my cut would be, and microwaved for 1 1/2 minutes. It heated them up enough to make for an easier cut. A word of caution, they are hot when they come out of the microwave, so be careful!

Here is the cooked product. With the rind being so tough, it was a whole lot quicker to use the ice cream scoop. It went faster than the butternut. Then, I proceeded to mash and blend until smooth. (I read a tip that a blender will pull any stringy pieces out if you didn't get the squash scooped out correctly before baking.) One could also use a hand puree blender, but my squash seemed to do well with the regular hand mixer. I packed them the same as the butternut for freezing.

I tried the acorn, also. Quite a difference from the butternut. I can see why my friends like this particular squash. It is a lot sweeter than the butternut, and the taste is strongly similar to the sweet potato which shocked me, since I am a huge fan of them. Just an interesting side note~ I read in more than one article that the more orange color on the acorn squash the sweeter the taste. Hmmm. I will have to test that info next year. I am sure all of these veggies (and squash are considered fruits as well due to their seeds) will be in my garden.


Here are a few bags of my frozen squash getting transferred to the deep freeze. The camera does not do the beautiful colors justice. Like I said in an earlier post, I want to go 'greener' in my life and more natural. It's time to open the door to some new flavors!


How to Freeze Zucchini

Here is my produce haul from my local stand: 7 zucchini, 8 butternut squash, and 12 acorn squash. I threw in a snake gourd to round it out and drove away with $10.00 worth of produce. This is a new food to my home. Yes, you heard me right. In 42 years of life, I have never tried any of these three home grown foods. Can you believe that? Me, the lover of the pioneering spirit, forager of natural sources of food, the woman that nearly choked off her flower bed with an incorrect placement of spearmint, has turned her back on this popular veggie source all of these years. (Of course, I cannot account for the Gerber years of 1968-69.) So what was the final push to make me buy?? A simple trip to the post office.

You can learn a lot in a small town post office, and the lady who fills in for the post master is a wealth of farming knowledge. Oh and by the way, she has a local produce stand at her farm! I have had people in the past tell me the glories of eating squash and zucchini bread, but the clincher was when this kind lady told me that butternut squash could be made into a pie similar to pumpkin. I do love pumpkin pie! How could that be? I would have to give it a try. Then she informed me that she still had a few left for sale. How lucky is that? I ran out to her farm and bought all of her butternut squash for 50 cents a piece. Then I spied the zucchini in a crate, I took all she had at 25 cents a piece. I moved on to the acorn squash that has been praised by many of my friends. I bought those for 3 for $1.00. Not bad! Off I went on my merry way with my bounty.

Now I must say that I do can and freeze other fall veggies and fruits, so time and space is always limited at this time of year. The answer was to store these items for use in the future. After checking the Internet and questioning the locals, I picked the most popular way of storing each item. I also picked up some new recipes to use them in!

Maybe I should ask for a food processor for Christmas? LOL The zucchini's were very large. I chose to grate them for use in bread. After some research, there is debate over blanching and freezing or just straight freezing. The unanimous vote from the preservation pros around here is grate, pack in Ziploc bags, and freeze. I made sure to squeeze the air out of the bag and made a note that many of my favorite food preservation bloggers praise Food Savers for keeping items fresh. (Another item for the Christmas list!) I also froze them in 2 cup measures which seemed to be common in many zucchini bread recipes. With this task done, I look forward to trying my new recipes and sharing them when the harvest season slows down. :)