Whimsical and Homespun Art Creations with a Little Rural Living Thrown In


Tuesday, November 30, 2010

Painted Large Snowman Gourd

I will be getting to the Santa sled later on in the week ( took a break for the Holiday!). Here is a snowman gourd that I painted for the season. His eyes are a lot different from the one posted earlier. This thick Carolina gourd is 15 inches tall (without his hat) and very large around, so larger eyes were called for. (All the years of putting in various shaped eyes in ceramics is coming in handy!) He is a very popular size gourd, since the body leaves plenty of room for painting.


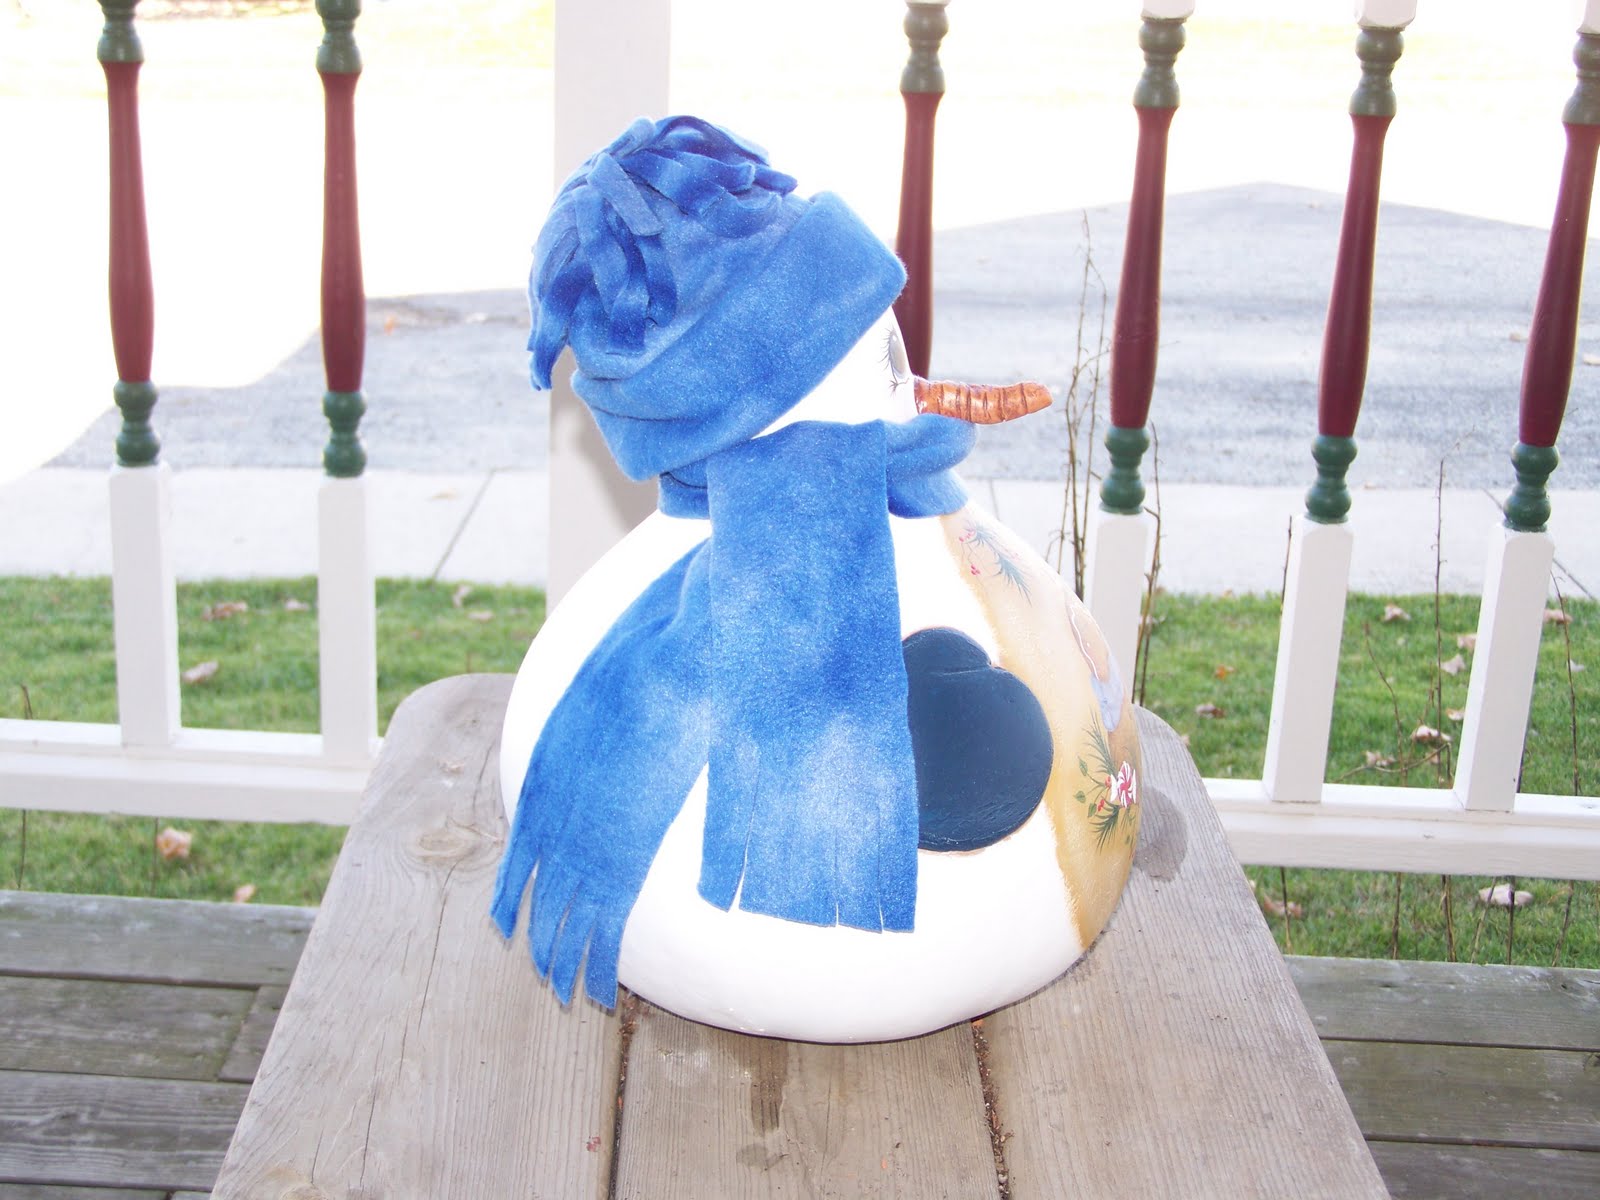
How do you like that profile? :) He is sporting a nice sized carrot nose that I think he carries off pretty well! And look at how he sits. On some of my bigger gourds, (handmade) boots are needed to keep them sitting upright and solid, but this guy sits tall and proud on his own. I will be doing some gigantic gourds in the near future, and some of those will be sporting boots. The addition of boots can sometimes add another dimension to the piece that works even better with the design.


Renee Mullins is a fantastic tole artist, and this design is no exception. A chilly winter's night scene. The design has characters presented on a large scale which is accentuated by the size of the gourd. The colors were picked to match the scarf and hat. The hat and scarf are not glued to the gourd, so ... the new owner can "re dress" their gourd if he or she ever tires of the pattern!

Friday, November 26, 2010

Thrifty Black Friday Find~ KitchenAid

I hope everyone had fun on Black Friday. Some of my sisters got up before dawn and ran to get deals. This dedication is not shared by this shopper. My hubby and I got up around 6 o'clock and were to the store by 7. We missed the craziness but found some nice left overs to pick through. Hubby got his dream TV for the bedroom. (I personally hate watching TV in bed. Makes me feel like I am sick!) But, the plus to his find is that he went to bed early tonight, and I got control of the large TV downstairs for awhile. Yahoo! We both found some presents for my son and have him near to being finished for Christmas. Yay! But what was the best find of the day? I can scarcely believe it is true... A 5 quart Artisan KitchenAid in metallic chrome. What a beauty! And I am the new proud owner!! I have wanted one of these for years now. As many know, this is no ordinary kitchen gadget-- this is a kitchen appliance. I know many of my readers may already own one, but this little slice of heaven is a new experience for me: 10 speeds, tilt-head design, unique planetary mixing action, durable all-metal construction (translation- it's heavy!), and powers over 12 (yes, 12) optional attachments while sporting a flawless paint job. But the most important feature... I won't have my wrist hurt from kneading bread any more!!

I look at the box imagining the possibilities. The wonderful culinary creations that we will make together. The new attachments that hopefully will find there way to my stocking! (hint, hint Santa!) The lovely afternoons of me filling the bowl and this machine doing all of the labor. (Okay, a little one sided of a friendship, but I promise to keep it cleaned and polished! :0) Can you smell the bread baking? *sigh*

I found this one on clearance at Lowe's. KitchenAid is running a 30 dollar rebate, and I had a 10 dollar coupon for the store. With some money kicked in from my hubby (gets him out of having to shop for me himself for Christmas!), I had enough funds to make up the difference and bring this dream machine home! If I wasn't so darn tired from shopping all morning, I would play with it tonight!!


Thursday, November 25, 2010

HAPPY THANKSGIVING!

I wish everyone a safe and Happy Thanksgiving!!

This is my little angel Mew. She looks how I felt today after dinner! Lucky for her, I didn't even have the energy to cross stitch!

Tuesday, November 23, 2010

Cooking Home Made Salsa

What do I do when I need more freezer space? Make salsa. During the tomato harvest, I blanch my tomatoes, cut them up, measure them, and freeze them. The summer temperatures are always to balmy for me to stand over a boiling pot, so I got in the habit of freezing my tomatoes for cooking salsa in the winter. The plan did not include making salsa a few days before Thanksgiving, but the sale on turkeys was too good to pass up... Time to make some space in the freezer!

Unfortunately for my son, my hubby was home while the cooking was going on, and he likes his salsa hot. (The taste tester always wins!) I didn't have all of my ingredients for the impromptu session, so I just threw in what I had on hand.

Salsa

15 cups skinned tomatoes chunked
4 cups chopped onions
2 cups chopped green peppers
2 jalapeno peppers chopped (seeds removed)
2t crushed red pepper (dry)
1 1/2 teaspoon cayenne
1/4 cup sugar
2 Tablespoon salt
1/2 cup white vinegar

Set aside 1/2 cup tomato juice. Mix everything together in a large pot. Bring to boil, cook for 25 minutes stirring constantly, so it doesn't stick. Mix together 1/4 cup cornstarch with the reserved tomato juice. Slowly add (until desired thickness) to mixture, stirring well. Remove from heat. I just freeze any extra in serving size containers.

Yes, it was very hot. So to keep peace in the family, I added a can of stewed tomatoes (with juice) to a quart of salsa and that brought it down to edible for my son.

Here is the recipe that this was adapted from. Above, I used more tomatoes due to mixing up my measurements before freezing! :)

Salsa

11 cups skinned tomatoes, chopped
4 cups chopped onions
2 cups chopped green peppers
3 jalapeno peppers
2 red chillies (I usually skip them due to heat level!)
1/4 cup sugar
2 tablespoon salt
1/2 cup white vinegar
1 1/2 teaspoon cayenne (if you want it to burn!)

Just follow the instructions above to mix. The jalapeno peppers, chillies, and cayenne can all be played around with to the desired amount of hot. I have made the recipe with 2 jalapeno peppers and no chillies or cayenne, and it was a very nice mild salsa.

Friday, November 19, 2010

Thrifty Friday Find~ Pampered Chef Apple Peeler, Corer, & Slicer

Peeling apples has never been a problem for me but cutting the apple into even slices... well, that's another story. I'll just say that I have always had a rustic look to my pie filling! Nothing commercial looking comes out of this kitchen, and that's okay with me. :) But for pies in the jar, I needed a uniform even cut to assure better cooking time. So, I went on the hunt for an apple peeler, slicer, and corer. After a few days of reading different reviews on blogs, store sites, and cooking forums, I decided to purchase a new Pampered Chef slicer.

I was aware that there may be a problem with my apples being to soft to peel, since they were from the McIntosh variety. The apples were in the refrigerator when the unit arrived. I think the chill made them a little tougher, and they peeled, cut, and sliced beautifully. Although the instructions could have been a little clearer (for someone who had no idea what she was doing), it was an easy device to figure out and to clean. No more fingers turning brown from apple juice! Yay!!

You will notice that this apple was not peeled by the machine. I turned the peeling apparatus back and locked it to the left side (nice feature). This apple was done a few weeks after the machine arrived and was very soft. The peel would have gotten stuck in the knife, because the flesh was not firm. Most of the reviewers warned about this potential problem in regards to all the different peelers. The harder the variety- the easier the knife can cut over the outer edge and not gouge into the apple.

**See in the measuring cup to the right... I could cut my slices into little stacks! It went so quick. I flew through the filling preparation. :0)

Here is a friendly tip when using the corer... When skewering the apple with the tines of the machine, think of an imaginary line from the top of the stem to the bottom core. Then, line the center of the tines up to be a part of that line and push the apple on. You may not get perfectly symmetrical slices (remember we love rustic anyways!) , but you won't get any of the seeds or casing. I didn't have one apple that would have worked if it had been put straight on by lining up the outside of the apple.

I remember seeing one of these simple machines back when my son was a baby. All I could think was, "Who would need a gadget like that?" Well, now I have my answer...Me. If you are a person that does a lot of pies in an afternoon, this machine is truly magic. It cuts preparation time down dramatically. It even cuts down on waste by not leaving much left on the core. (I am sure our chickens were disappointed!) I recommend the Pampered Chef brand that I purchased and am sure some of the others would have done wonderfully as well. This little gem is a fabulous find for me and will be indispensable for saving me time in the harvest season.

Monday, November 15, 2010

How to Make Pie in a Jar

In past years, I have used up orchard apples by making and freezing 8 inch apple pies. They were so nice to be able to take out of the freezer and enjoy all year long, but with my son getting older and being gone most of the day, left over pie began to be a problem. I have a terrible time with tolerating waste, so I found myself eating more than I normally would. ~Which in turn, meant more hours on the treadmill later! :( So, I was on the hunt for a solution to my dilemma.

While on vacation in Kentucky, I purchased some single serving baked pies from the Amish that were very good. They made a circle out of the pie dough, added filling, closed the dough making a half circle, and baked. This idea was great! I was excited for the apple season to begin. The only possible problem would be storage. I figured... I would flash freeze, throw them into a bag, and hope they wouldn't find there way down into the bottom of the deep freeze! It was a great plan, ready to go into action, until I read an article about pies in a jar on http://www.ourbestbites.com/ . I was sold completely on this idea. Over to Amazon I went, and three days later my 36 half pint Kerr jars arrived!

This process is so smart and practical! You simply make a pie in a 1/2 pint wide mouth Kerr jar and freeze. The best part of the whole process is that you bake the pies in the same jar! You heard me... WOW! No more waste!! And better yet, everyone can pick their own favorite flavor. Genius!


Here is the beginning of my pies. I mixed up a two crust 10 inch pie dough from my favorite recipe. (It gave me enough to do six jars with a little left over.) I took a piece of dough and pressed it onto the sides of the jar and bottom. I spread the dough pretty thin, since my family is not big on lots of crust.


I rolled out the remaining dough and used the band from the jar to cut the top for my pie. The dough was rolled thin but easily movable.


Okay, I cheated and used cherry pie filling! One can made four individual pies. I set the crust on top of the jar and gently pushed it down onto the filling. It naturally formed a bowl with the dough of the top crust circle joining the dough on the sides of the jar. I pinched the dough sides to form a good seal and removed any excess above the jar mouth. And they were ready to be frozen.


Here are the peach pies that I made. Okay, I cheated on them too! I used peaches from a can and this recipe http://hillbillyhousewife.com/deepdishpeaches.htm . The only changes I made to the recipe was to halve it, cut the peaches into small chunks, and use a little more nutmeg to taste. It worked out wonderfully.
One word of caution... Make sure to set your different flavors in their own area for identification or work with one flavor at a time. Once the crust goes on, it gets tough to identify. (I do not put slits or air holes in my pies to be frozen.)

I put my finished pies on a cookie sheet and set them in the freezer to flash freeze the top. Then, I put the lids (with a flavor label) and bands on them, set them back into their card board box, and stacked them in the deep freeze. (Before baking them, I let mine sit an hour to adjust to the climate with the lid on, and then remove lid and bake.)

I will be working on apple, apple/cranberry, and pecan this week. I'll throw some pics up when they are finished. Pies in a jar are a practical solution for individuals living alone, families with picky kids, or families that just can't seem to finish that 8 inch fruit pie. ;)

And just think of the possibilities. I make my own pot pies from scratch all the time. Why not in a jar?

Friday, November 12, 2010

Thrifty Friday Find ~ Measuring Spoons & Cups

One of the main things that I look for at a garage sale or flea market is kitchen utensils. Not only are vintage pieces beautiful to decorate a kitchen, but they have a tendency to be manufactured with sturdy construction for longevity and can be more practical.

Here are some measuring spoons and cups that I found at sales. The measuring cups range from 2 cups down to 1/4 cup. I had seen a set similar to these in a magazine for $18.95. (Many new fangled items are repros of vintage counterparts.) So, they went on the 'search for' list. (Steel is so much nicer to work with than plastic!) My search ended at a town garage sale where a lady's mother-in-law was down sizing her kitchen. She had them marked at $1.50. I was so happy that I didn't even haggle on the price!

The measuring spoons were found at a flea market. My hubby and I like to go to the cheap sale booths that are outside the sale buildings on the lawn. It was there that I found a lady with two blankets spread out on the ground full of kitchen items. She had five sets of these measuring spoons. I fell in love at first sight! As you can see from the pics of my kitchen, I love to store my seasonings and baking supplies in canning jars. These long handled measuring spoons work perfectly for reaching down to the bottom of the jars. No tilting or shaking the contents for a better scoop in this house! Even better, I got all five sets for $2.50 (Yep, 50 cents a set!!).

Monday, November 8, 2010

Painting Santa on a Vintage Sled


Here is my next work in progress from a pattern created by Shirley Wilson entitled A Merry Little Christmas. I love the use of contrasting colors on this piece. They accentuate the glow of the candle. It might get a little snow on the black background. (The sled will get sealed first and then the snow applied. That way, I can wipe it off if I do not like it!) I'll post the finished piece when the wood at the top gets its paint and lettering. A catchy name for the top has not transformed yet. Hopefully, it will come to me in the next few days! ;)

Friday, November 5, 2010

Thrifty Friday Find ~ Jar Lids

Canning jar lids and rings can be expensive to replace. Imagine my surprise when I walked into a flea market, found a beautiful booth with hand crafted lamps, and under one of the tables spotted two enormous boxes filled with bags that consisted of 12 canning bands & lids in each. She had both wide and regular jar sizes. So why would one person be selling so many? Well, this particular crafter makes lamps out of Ball jars. The Ball jars come with new bands and lids that she has absolutely no use for. So she thought, why not try and sell them? And at $1 a bag, who would pass them up? (or at least anyone who would be canning!) My husband wanted to make a "how much for all"deal that would have taken me to the next millennium in canning, but I decided get 12 of each size. The hubby of the crafter threw in some extra bags. What a deal! It never hurts to be on the look out for 'by products' of a craft. I had never thought about that with jar lamps. This couple was happy to get rid of (what they considered to be) a nuisance/space taker, and I was absolutely thrilled to have a good supply of bands and lids! :)

Wednesday, November 3, 2010

Snowman Painted Gourd

The weather outside will be getting 'frightful' relatively soon. I think, it is time to get my newly painted snowman gourd dressed for the cold weather! Doesn't he look snugly in his tye dyed blue fleece stocking cap and matching scarf?


These dried gourds are a relatively new passion of mine. They combine the art of painting and sculpting (which is a new medium for me) into one project. Plus, I get the added fun of ordering all types of printed fleece to make miniature snow apparel. I have spent hours looking at gourds and carefully picking desired shapes. Everyone of them is a little individual waiting to take form. These creations put my imagination to the test. The options are limitless from the little being it will be... to the art... to the apparel.

This little guy is a thick North Carolina gourd. He stands approximately 13 inches tall without his hat. His nose, arms, and mittens are hand sculpted. As you can see, he sits up very proud awaiting those first snowflakes!


Not only do I have the fun of picking out the outfit for these little gourdations, but I also get to select the art to sit center stage on their bellies. Oh... there are so many wonderful books and patterns to thumb through and choose from!! (I have even been sketching a few of my own lately.) The snowman and gingerbread pattern for this gourd is from Renee Mullins. I simply love her whimsical style.

I have been busy setting up an Etsy store. I hope to get it up and running in the next week, so this little guy will be for sale in time for the holiday season!