Whimsical and Homespun Art Creations with a Little Rural Living Thrown In


Showing posts with label finished item. Show all posts

Friday, May 22, 2020

Bucilla Alphabet Quilt Ready to Personalize

Here is the finished photo of the Bucilla Alphabet quilt from the late 60's kit.  When digging through my UFO's, this finished quilt was still safely stored away...  Unphotographed and forgotten.  The stitching was created with the original floss that came with the quilt.  I feel a great sense of accomplishment, when looking back over this quilt.   Oddly enough right after my discovery, my daughter in law reminded me the quilt's little recipient was waiting to get it!  Yep... Our first grandchild.  :)
 
I am going to sit today and stitch his name on the corner square and mine in the other.  Just like my sister's quilt my Mom made for her... Would it be impolite of me to say how many years ago.  lol  It would probably make her quilt an antique!  I can make that joke, since I am 5 years older.  :)    


It is amazing the items found when you do a thorough reorganization of a house and studio.  Kinda funny really.  Disorganization stifles my artistic pursuits of every kind.  The last few years of my life have seen me just getting by with quick pick ups.  Now my house is in place and so are my thoughts.  On to the next project!  

Wednesday, February 10, 2016

Home Spun Yarn

I cannot say enough about the classes on Craftsy.  I am learning so much!  It has been a blast, and I am hopelessly and happily hooked on spinning wool... Which is a good thing, since there are fleeces stored in bins all over my house. LOL
 
It doesn't look that pretty, but below is a photo of my first plied yarn from Farmerboy's ram, Brick.  This was an unbelievable learning experience.  It also inspired me to sign up for two more classes on drafting and plying on Craftsy. ;)  My technique is getting there, but it could use a whole lotta help.  Isn't it amazing to think from sheep to yarn... all with my own hands?   Major accomplishment! 


After a good wash, the two brown twists are my very first yarn.  It looks like yarn too!  Albeit not perfect but yarn just the same. ;)  The third cream twist is from some comb top Corriedale that I received with my wheel.  It is a longer staple and was spun after my completed class with Amy.  This skein was so much more uniform than my initial go with the wheel.  I think Amy would be very proud of my progress.   This spinner sure is!


So now, I signed up for Jacey's drafting class and Jillian's plying class.  Plus, two more classes are sitting in my cart for hand embroidery and colored pencil techniques. :)  They are running some crazy sales on the Craftsy site, and it is unbelievable how exceptional these classes are for such little money.  Isn't it an amazing age we live in?  Such wonderful teachers are available at my own pace right at my fingertips.  I feel blessed. 

Farmerboy has been busy making some barn board creations for a spot he rented in Elizabeth.  You can see a small glimpse of his beautiful pieces in the last photo.  I will be sharing them in the next post.  Maybe I should switch gears and work on some stitching this weekend.  A few primitive candle mats might look nice with his furniture! ;) 

Sunday, March 16, 2014

Sweet Meadow Farm's Prim Easter Bunny Finished!

I hope that everyone had a Merry Pi Day on 3/14!  We celebrated the mathematical constant at our house with a slice of cherry.  After telling my co workers about the dessert planned for my family, my branch manager pulled out a huge apple pie that she had stored in our break room freezer.  Instead of pulling a 10 hour shift, I went home for a few hours and did some baking! LOL  So... my team at work got to celebrate with a slice of  heavenly apple pie! (For her generosity, I brought my manager a piece of cherry back, since that is her favorite! ;) )   We were talking about next year's plans, since the date will be 3/14/15 and that will account for the first 5 digits of Pi.  I am thinking that we should all bring a different pie and spend the day sampling!  LOL


I finished my darling little bunny from the Sweet Meadow Farm's pattern.  She is every bit as cute as I imagined.  Thank the heavens that she is prim, since my skill level is perfect for that style! ;)  ** Oops... the remnants of the Pi celebration are in the background! :)


She is complete with genuine feed sack bloomers.   It would be fun to do a bunny with all feed sack clothes.  For this little girl, the dress fabric was dipped in coffee, and it gave the wee outfit a wonderful vintage look.  One lesson that I learned was not to fold the fabric over a hanger to dry after dipping.  The coffee settles on the cloth that is resting on the hanger and leaves a dark line.  But if you dip the affected pieces again, squeeze them a few times while in the coffee and finish by hanging them with clothes pins; the lines will go away... Lucky for me!


Her colors go well with my living room walls.   I would like to make her a dark little boy playmate and some wool Easter toys.  It would give her arms something to do.  Now, I am off to look for another project that needs completion!

 
I hope everyone is having a lovely weekend! :) 


Wednesday, November 20, 2013

How to Make Rice & Wool Microwaveable Hand Warmers from an Upcycled Sweater

Here is a quick "how to" for an inexpensive Christmas gift -- wool and rice microwaveable  hand warmers.  Not only is it a present that is absolutely perfect for the chill ridden season, it is also a fun project to get you into that Christmassy mood!   If you don't have a wool sweater laying around your house, head to the local thrift store and give them a sale for the holiday season. :)   Purchase a 75% to 100% wool sweater that is dry clean only (the ingredients for a great felting sweater ;) ).   Next, wash the sweater with some detergent on hot.  Once the washing is done, you should see that the knitting stitches are almost lost in the intermeshing of fibers.  Finally, throw it in the dryer and get ready for a wintery project.
 
Here is an oversized vest that I felted from my local thrift store.  It came to the store with a few holes in it.  The ladies are smart enough to still put it out for sale, because us wool lovers are waiting to snatch up a deal! ;)  Just think of how many warmers a crafty seamstress could get out of one oversized vest... *sigh*


Originally, my thought was to do two different sizes of warmers.  But after getting the first set made, I decided the second size would be too big for my needs.  So, the template size for my hand warmers was 3 by 4 inches.  Four rectangles will be needed to make a pair.  Place them wrong sides together and fastened them well with pins, since wool has a tendency to shift shape while sewing.

The best thing about this project is that you simply just sew around the outside edge of the rectangle, leaving a 1/4 inch seam allowance.   Start sewing your warmers by going forward and reverse to lock your thread and start to head around each side.  Stop within a half of an inch of the starting point, lock your thread again and cut your piece free of the machine.  Using a funnel (I bought a cheap 3 pack from the dollar store.), fill your little bag 3/4 full of rice (also purchased at the dollar store).  To finish, you can either sew the hole by hand or use your machine.


How much simpler can it be?  (This project would be great for me to  use up some of those sweater remnants that are in my stash.  Yay!)  They are perfect for holding in ones hands, placing in  pockets or sticking inside mittens.  All one has to do is pop them in the microwave for 30 to 35 seconds to warm them up.  I know it doesn't seem that long, but they can get REALLY hot... Trust me.   So, be careful handling them and make sure that they are not damp- prior to heating- in any way.  These of course are not washable but can be cleaned on the surface with a wet cloth.

This particular pair is heading to the home of my younger sister for a test run.  She works for her local school system (First through third grade... YIKES) and her normal routine has her outside with the kids for short periods of time.  Similar hand warmers have been rumored to hold heat for up to 25 minutes.    I will let her put them to the test! ;)


Thursday, December 13, 2012

Large Hershey Bar Snowman (4.4 oz.) ~ A Quick Christmas Gifting How To

If you find yourself in a pinch, artist Laurie Furnell has offered a FREE Christmas print out (made possible by Aimee Asher Boutique) to create a festive holiday snowman from a large or regular sized Hershey bar.  I had read about this darling snowman a few months ago, and he has taken center stage in my house with the Christmas holiday right around the corner.  They will come in handy at work where we do a small gift exchange.  I love the idea of a little holiday stitching, some quick-time crafting, and being able to give the gift of CHOCOLATE.  Who wouldn't appreciate that!   PLUS... It gives me an excuse to use some of that 1.00 a yard fleece that I purchased from the JoAnn Fabrics'  Black Friday Sale a few years back. ;)


I started by going to Laurie Furnell's free snowman download here.  (You will have to register but will not be charged at check out.)  There is a print out for her rules, the finished product, print out for a regular size Hershey bar, and a print out for an 8 oz. bar.  I choose the 8 oz bar design and printed it to fit on a regular sheet of paper, which was perfect for a 4.7 oz. large Hershey bar.  Then, I began to sift through my stash of fleece and construct a pattern for my festive goodies.  :)


I know it is a little hard to see in the picture, but you will need to cut down the paper to the right of the design and on the bottom line.  Then, tape the seal flap on the bottom of the Hershey bar wrapper to the front of the candy.  This will keep it hidden from view.


I find that Hershey was pretty accurate with my batch of bars.  Once I flipped the print to the back side, the Hershey bar could be placed front side down on the paper.  The right side of the paper could be placed over the back of the bar and lined up on the brown line above the final vitamin line, and the snowman's face would be nicely centered on the reverse side.  After using three pieces of tape to secure the right side, the left side was placed over it... three more pieces of tape and onward to the stitching part of the project.  Yeah!! 


If you are like me and would like a snugger fit to your stocking hat, cut a piece of fleece approximately 7 3/4 inches square.   On my paper pattern, there is a dotted line 1 1/4 inches down from the top of the pattern to aid me in marking the fringe for the pom pom top. 


On the reverse side of the folded fleece, make the line for the fringe. (A Sharpie marker works great for this.)  While the fleece is still out, a strip can be cut 1 1/4 inches wide and approximately 17 1/2 inches long for a matching scarf. (This will leave you a little excess for adjustments after placement.)
 
Working on the reverse side of the fleece, a simple overcast stitch can be used from the bottom up to the tassel line.  Tie off the thread and the bottom of the hat is finished.  With scissors in hand, cut the fleece in approximately 1/4 inch increments from the top of the fleece to the tassel line, creating the fringe for the pom pom.  Now turn the hat right side out.  Starting at the center seam, use a gathering stitch under the fringe and pull tight.  I like to wrap the thread one more time around the fringe line, pull tight, and tie off.  This will create a darling little pom pom.  Folding from the bottom of the hat, there will be enough fleece to fold twice.  Now it is time to dress the snowman!!  


Aren't they darling??  I cannot wait to dive into the others!  All together, there will be 10 snowmen here at The Hollow.   And who knows... Maybe some more to follow. ;)    I even have some really funky tie dyed fleece that will fit my Manager's personality perfectly.  This project has peaked my creative senses and has immersed me in the holiday spirit.  It is such a blast!

As you can see by the photo, one of my co workers is a marksman (He is also the only rooster in our hen house!), so the camo fleece came in handy.  The candy cane stripe is perfect for a wonderfully Christmasy decoration.   And for my fellow co-worker that makes me laugh with stories of her mischeivious pooch, a red hat and scarf adorned with doggy prints. :)

It makes me laugh to think that I almost got rid of some of my fleece last summer!   I cannot wait to do some more of these little snowmen... I am sooo hooked.   Think of the possibilities.  Hmmm... Mismatched hat and scarves... Felted wool hat and scarves... Even different kinds of candy bars.  The options are limitless.


A HUGE Thank-you to Laurie Furnell for such a charming printable design.  And for those that decide to take advantage of this freebie, the design will be available to you for 7 days or 5 clicks.   This would be such an inexpensive gift for kids to create for friends and teachers, too!    If you have a little time on your hands, check out Aimee Asher's website.  It really is an inspiring place to visit.  Happy Holidays to All!!

Saturday, April 14, 2012

Primitive Black Cat & Witch Halloween Softball Bowl Fillers


This week, I have been working on some primitive Halloween softball bowl fillers.  Remember when I said that Americana themed ones were going to be next! LOL  The softballs for those got painted and mid sketching... Well, my mind started dreaming of witches and cats. ;)   I just love Halloween colors and folklore! *sigh*

This one is called "Witch's Flight".  I decided to give the moon a harvest glow, instead of the traditional blue to white finish.   The yellow/white glow makes the witch pop out crisp and clean... Silhouettes are one of my favorite things to create.  The black cat was inspired by the vintage mache cats of years gone by.  They were and are so creepy and cool... very Cheshire in appearance.  Although one does not reside in my house yet, I love viewing them on Ebay.


Next, a more homespun look was used to create "Spooky Cat".  The black cat (adapted from an old pattern that I used to paint years ago... Sorry, I cannot remember the artists name at the moment!)  has such a prim look to him...  Just like he jumped out of the sewing scrap bag!  The other side is adorned by a favorite fall treat, candy corn... Truth be told the mallow pumpkins are my favorite! ;)   


These two pieces will be taken downstairs to be sanded and roughened up.  Then, they will head to the spray booth.  I already have plans to make a set with matching spindle posts for a solitary display.  The Americana ones are just going to have to wait in the wings for a few weeks.  Halloween and Christmas items just keep popping into my head.

And just when you thought that I turned my back on my little gourds, the other work in progress on my table is a snowman gourd "make do".  I have never attempted one of these and am having a blast with this one.  It started out with plans of being a pumpkin, but the face shape called out to be a snowman.  I  am so excited to get him finished and put him up to share! :)

Tuesday, March 6, 2012

How to Make a Beeswax Taper Candle in a Mold

Do you remember when I talked about getting that candle mold in Baraboo and a couple of chunks of beeswax?  It was going to be my little adventure... not a hobby... just an adventure.  Have to repeat that, because another hobby in my hands scares my hubby aka Mr. Hollow to death! ;)   (If by chance you do not remember my purchase last fall,  you can jump over to that post by clicking here. )  Well, I finally decided to take a modern day pioneer stab at making them.

Got to give you a little prequel to what pushed me to finally trying my hand at candle making.  See the mound of beeswax in the picture below?  After I had purchased the original beeswax and candle mold, they were wrapped up carefully and set on a shelf... and forgotten. :(  Then many months later, my hubby dumped two loads of chips from our tree business at a local establishment that sells shrubs.  It just so happens this gentlemen has an apiary.  My hubby, who is always making deals, tells the owner that he would take some beeswax in trade for the loads of chips.  Where that idea came from?? Who knows.  I honestly had forgotten about the candle project, but he apparently didn't!    Hey, is this the same guy that shuddered when he saw my candle mold purchase originally??   What a guy! :)  To make a long prequel short and around 26 pounds of beeswax later (not counting my original purchases), I was stocked with enough beeswax to light up our little town! LOL 


After a little procrastination and outright dawdling, I picked up some sticks in the yard that were strong and straight, stole the old crock pot out of our motor home, and decided to spend the afternoon creating 8 six inch tapers. 

I began by breaking up a one pound block of beeswax and adding it to the crock pot set on Low.  And to be thrifty, I tore up some "garage saled" beeswax honey comb candles (the ones that people buy in a kit but never make)  and added them to the pot.   It took a good couple of hours, but they melted into a nice liquid as I stirred occasionally with a wooden paint stick.

As you can see, I set my crock pot on a cookie sheet, and my candle mold on a cookie sheet covered with newsprint.  I took the candle mold and ran a rag up and down the inside of each taper with a towel spritzed with vegetable oil on the end of a wooden spoon handle.  The tips of the mold were each covered with a little blob of play dough (Gifted to my son by a humor loving friend!), just in case of a leak.  Then, I tied my wicks to two sticks, got them centered, and tightened up the wicks by balancing the sticks on to over sized mason jars.  A little primitive... but necessity is the mother of invention, and after all I am a rustic girl at heart! :)

I used a small enamel ware pan (garage sale tag still on the handle!)  to ladle the wax into the molds.  After the beeswax started to harden, it dropped down in the mold.  So, I ladled a little more in the molds to cap the candles off.  Then, I talked to my kid for a while.    He pointed out that if there would have been ice water in the house, I could have submerged the bottom of the mold to push the process.  (They use this technique at the local historic fort.)   I opted for ten or more minutes in the freezer... but the tapers weren't budging.


So, I took the opposite approach and ran some hot water over the sides of the tapers for a few seconds and this is what I got... Eight tapers and a great feeling of achievement. :)  Pioneer primitive is my style, and these would be so rustic displayed on their original sticks until needed... possibly darkened or grubbied.  Maybe the kid could make me a barnboard holder for them.  Oh the possibilities! :)  My head is spinning with ideas...


My hubby was snooping around and checking out the finished product with a smile on his face.  He's not kidding anyone and loves this sort of stuff just like me.  I asked if he was impressed.  He just looked at me casually and said, "Didn't you buy some scent to add to these?"  Aaahh... Maybe next time dear! ;)   

Tuesday, February 28, 2012

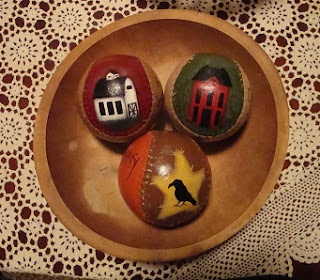
Saltbox & Farm Animal Primitive Softball Bowl Fillers Finished!

Well, I  finished the farm animal and primitive saltbox house themed softballs today.  My only regret was not having any coordinating potpourri to sprinkle around them for the photos.  Okay make that two regrets... Could have done with a little more natural light for less light bulb glare! ;)     

The softball fillers are so versatile with the paintings and prim sayings.   I fell in love with this recycling concept and knew I would enjoy creating them.   They are never tiresome in an arrangement.   And if you have a kid like mine, each day will find them rearranged in a different combination!  I won't even get into the story of when that son of mine continually switched around my laundry and cleaning supplies every night for a week.  I was beginning to think that someone was telling me from the great beyond to get off my behind and get my house in order! LOL  Do you suppose hubby paid him to do it? ;)


It was a pretty productive day today.  I managed to get these finished and some Americana ones started.  Then, something possessed me to do some cleaning of my basement shelves.  I will definitely have to do some listing on my selling blog in the next few weeks.  My goal is to downsize dramatically this year!  As this post is being typed, I am listening to the pattering of rain on our back door.  Must be the promise of Spring around the corner that has me in the cleaning out mode! ;)

Saturday, February 18, 2012

Winnie the Pooh Vintage Cross Stitch Quilt Finished!


I am so glad to post that the stitching on Winnie the Pooh is finished!  Yay!! :) 

This quilt has been such a joy to work on.  That silly old bear will bring a smile to my face every time.   I have been an admirer and collector of children's literature all of my life.  The Pooh character may have evolved from the more simplistic sketches found in A.A. Milne's original book, but he is just as endearing as ever. :)  It was fun to mix the colors up a bit, and I'm not going to complain about the larger areas of colors.  They were a nice change from constantly switching threads.  The big thrill is always in the black outlining.  It gives definition to the composition and brings all that work to life.  Such a huge payoff in one small step! ;) 


Pooh was the first of my stamped cross stitch quilts to be mounted on my standing quilt hoop.  Most of my life is spent slouching over ceramics, paintings, graphite art, and now piecing quilts with the sewing machine.  I made a decision to put together my quilting stand , so I would be forced to sit up straight and stitch.... Easier said than done. ;)  Every 10 minutes, my back would need a break!  It definitely will help me to improve my posture.  


Winnie the Pooh is one of my few over sized vintage quilt kits.  I have a few old ABC quilts from the early 70's that I will be attempting in the future, and they will require a lot more embroidery skills. Yikes!  But for the next quilt, I will go back to the bunnies on the blocks that I had originally misplaced.  There were some drastic color changes going on with that quilt.  Hopefully, I did not subconsciously misplace it on purpose, and it will come together smoothly! ;)

Sunday, February 5, 2012

Vintage Fence Post & Barn Board Birdhouse

My son has been creating birdhouses out of old barn boards for the last couple of years and mounts them on old porch turnings or fence posts.  This house was built with a cool old knotty weathered fence post.   He also added door handles, old keys, and an old rusty hand sickle for embellishments, along with a grapevine wrap.   Usually the welcome sign on the front is hand painted, but this one is burned into the wood.  On one of his birdhouse creations, he snitched some gourds that I passed on cleaning for my art and created a cross bar with little gourd birdhouses.   Each one is unique from the shape of the houses themselves to the assortment of rusty hand tools.   A few of these barn board creations have graced the front windows at the antique shop that I work at.  The sun comes from the south in that window but does not bother them, and they lend a nice rustic charm to the antiques.   This one was created as a donation for our local school raffle that my son donates to every year. :)


My son has an arsenal of old worn out tools from sales, along with keys, hinges, and knobs.  He also has earned  a reputation  around town for taking cast outs.  So... local renovations usually bring old doors, porch turnings, and wainscot his way for the hauling... or anything else that strikes his fancy.  Of course, it is a win - win situation when homeowners are worried about filling a dumpster! ;) 

I can remember back before Farmer boy was a teenager, he use to take a lawn mower and trailer to haul items. (Now he just uses a bigger tractor and trailer! LOL)  The local bank was taking down the brick building that housed their first location.  I cannot tell you how many bricks and odd items made their way to our backyard!  My hubby and I went for a walk while this demolition was going on that summer, and there was our son going under the yellow tape for another load.  My hubby informed him of trespassing and safety issues.  It  was right at that time when the leader of the demolition team came out of the building and informed my hubby that our boy had his permission to enter the area...  We should have known that kid had all of his bases covered! LOL      

Tuesday, January 31, 2012

Winnie the Pooh and SBS Quilt Blocks, Too!


Can you believe that I walked to the post office today to get the mail?  Yippee!  The weather is beautiful.  We must have been near the 50 degree mark.  I had to check the calendar to make sure that we were still in January. ;)

Here are my latest blocks from the Skill Builder Challenge...

I can now check off  block #20 Circle Appliques (bottom right corner).  It was a block that involved various techniques of hand applique.  The circles weren't as terrible to complete as I thought that they would be.  Although, I did manage to sew the block to my pants a couple of times during the hand turned applique.  Ooops!

Block #22 (in the upper right corner), the Flowering Snowball, started our introduction to curves.  Surprisingly, I really enjoyed fitting the curved pieces together.  Normally, I am not a lover of pinning fabric to death, but it was actually fun.  When time came to press the fabric, the pieces pressed down so smooth... just like magic! ;)

Block #23 was the Drunkard's Path.  I arranged mine to make a circle in the center.  The circle made me a little anxious when piecing the last four blocks, but everything worked out perfectly. :)

Block #24 was a beautiful block called the Curved Nine Patch.  (The picture arrangement cut the green boarders off that are on the left and right sides.)  I see some of the quilting blogs using a curved ruler to make this, but ours was pieced by hand.  A few more templates for this one but well worth the time.  I think it is a lovely block and would gladly do a whole quilt of them.

One more block to go to be caught up with the group.  I need to do a Rose and Tulip applique block for #21.  Why did this one not get finished?  


Because this silly old bear needed to have his darling little body finished! :) 


Sunday, January 29, 2012

Upcycled Wool Sweater Mittens & Soup!

It has been cold outside today, so I was inspired to finish up my sewing on these wool felted sweater mittens.  Here they are newly pressed and ready to be listed in my Etsy shop. :)  I have some plain sweater fronts cut for mittens, also.  They were suppose to have some wool embroidered designs added to them, but a friend convinced me that some plain mittens would be great for customers with patterned coats.  So, I'll be finishing those up this week. ;) 


It has come to my attention with various hints from my family members  ;) that we have not had fresh noodles for a while in the house.  Everyone (myself included)  is sick of eating prepackaged brands.  So... I took time away from my work to play in the kitchen.  Noodles are so fun to make, and the clothes rack that I bought is a great help in making 4 or 5 double batches.


And my reward for turning out all of these noodles?  A warm bowl of homemade chicken soup! :)


I hope everyone is warm and cozy today!  They are predicting temps in the 40's this week.  We sure can't complain.  It has been a mild winter in Northern Illinois this year! :)

Friday, January 20, 2012

Fabric Cover for My Canon Printer


My studio area shares space with the laundry room in our home.  So, I am always careful to keep my Canon printer covered to keep the dryer dust at bay.    This has been going on for a few years now.  The plastic cover is the original plastic bag that arrived with the printer.  It is way oversized and has to be tucked under and around the printer.  And since it already looks tidy and unkempt, it has become a 'catch all' for mail, scribbled notes, or those items that were easier to set around the corner of the doorway - but not put away! ;)  As I was cleaning the mounds of small items off of the poor printer last weekend (You can imagine how many small items can be stacked on this baby!),  I decided that I was sick of looking at this...


In the front room of our house was a heap of fabric to be sorted from my stash,  I found a large piece from Phillip de Leon of Alexander Henry Fabrics entitled "Conversation".  How appropriate... This machine and I have had many a conversation, although some (while learning the ropes) were not for young ears! ;)  Without having a clue to what I was doing, I decided to take a 'throw caution to the wind' approach to this project.  A sketched template was made for the top... measurements taken of the sides...  and I proceeded to dive in without thinking.  What did I have to lose?

Here are the results of my labor.  I was honestly surprised at how well it turned out.  Had there been serious thought given to sewing protocol or technique, it probably would have came out worse! LOL 


I will not embarrass myself by telling you of my 'eyeing' the positioning of the seams... LOL  Not to brag... well not too much, but I even made curves around the front and back that were smooth!  And the moment that I realized the sides were too long, I ran back to the machine and put a hemmed bottom around the whole thing!  How crazy is that? ;)  Great credit is giving to my SBS quilting challenge for making me confident enough with my machine to take on this challenge.  So a shout of thanks to Leila from me and my printer!

Friday, December 9, 2011

SBS Challenge ~ Finally Caught Up!

Can you believe it??  I am finally caught up with the group on the Skill Builder Challenge.  Sheesh!  For a minute, I was beginning to wonder if I would get here.  Keep in mind while looking at these, I am a newbie to this art.  Some are not as pretty as others! ;)

Block #12 was posted as "House and Tree".  It was an improv block.  Definitely not one of my favorites.  If I was going to attempt this again, it would be created using a paper piecing method.  (Listen to me throwing out that quilting jargon like an old pro! LOL)


Block # 14 was a "Crazy Quilt" block.  Just when I thought the last one was not my favorite...;)  I was never fond of the idea of a crazy quilt.  After finishing this one and messing around with the specialty stitches on my machine finally, I could see creating this one again and going a little "crazy" with it... using embellishments, different types of materials, and specialty embroidery.  It was interesting  to work with sewing this block on a foundation.  I struggled a little bit with the concept at first.  This block was definitely a learning experience and gave me some future ideas.  It even made me open my mind to possibilities of what could be created using the crazy quilt method.


Block #15 was the "Diamond Dash".  This was part of the paper piecing lessons.  The squares with the triangles were all paper pieced for practice.  I just LOVE paper piecing.  It gives the blocks a clean look.  This block was a pleasure to create.  It was simple yet elegant. :) 


Block #17 was "Starry Night"... Makes me think of Vincent Van Gogh. ;)  This paper piecing was a little more involved.  Isn't this one beautiful?  It is definitely one of my favorites, and not just because of the correlation with a great artist! LOL  The colors work so well together.  The shapes, lines and hidden patterns just make a wonderful overall composition.


Block #18 was the "Circle of Geese" block.  This was the last of the paper piecing series.  Do you suppose the mention of geese put me into a tail spin? LOL  If I was inclined to do this over, I would take away the outside purple piece (turning it fushia)  and change the center four triangles into purple to make a star.  Aaah... live and learn!  Don't know how I messed this up... But hey, there are no mistakes in quilting... Just different points of view and interpretation!  Are you all buying into this? LOL


Block #19, and the most current block, "Orange Windows".   This is the first block in the applique series.   It was my very first attempt at a machine applique, and the first time using a specialty stitch.  I have always loved the feather stitch and happily used it on this block.  "Orange Windows" was so much  fun to do and assembled fast.  It is amazing at how involved the finished block looks for the minor amount of time that went into it.  My hubby really liked this one and "Starry Night".  I thoroughly enjoyed stitching around the appliques, and the design on the back is just as neat and clean as the front.  Applique never interested me in the least  until now.  I think there is a good chance that I am hooked on another technique! :)


Those are all the blocks to date... Whew!   Leah has gone on a trip so it will be another week before a new block is posted.  I feel a little deflated-- ending on such a high note with nothing in the works.  I'll have to go browse through some of the cool quilting blogs and do some dreaming! ;)

Tuesday, December 6, 2011

Hunting Season... Primitive Deer Mount!

It is deer hunting season in Northern Illinois.  The weekend brought the echoing sound of shots in the distance, and deer hanging from the branches of local trees.  Although my son loves target shooting, he hasn't gotten involved in hunting deer, yet.  Well... not the four legged kind anyways. ;)

"What inspired this work of creative expression", you ask?  Let me see... A few weeks ago, my hubby had the crew out on a smaller tree removal job.  As they came back and were unloading equipment, I spied my son's friend carrying a piece of wood that he had pulled from the back of the chip truck.  When he was close enough to the window for me to see, I yelled to him that he had a nice deer head.  He smiled and looked back at my son and said, "Your Mom got it!"  It was an amazing natural resemblance to a deer mount.  They set it on the back patio, and I forgot all about it. 

The days that followed brought strange sounds from my son's workshop in the basement.  My hubby found me in my studio area one night and told me that I had to check out what the kid was up to... And this is what I saw.   


Farmer boy has been saving these antlers for the longest time.   I am not really sure how in the world he got them mounted so sturdily on the bust, and the wooden ears are just perfect.   I love it!  It is so primitive and makes me smile.  The barn board plaque allows it to fit in so well with my rustic pieces that I have been collecting.  If I have a separate studio in the near future, this guy is going to be on the wall for sure! :)

Thursday, December 1, 2011

Mini Snowman Gourds ~ Ready for the Holiday!

I have spent the week catching up on a few orders and getting these little mini snowman gourds dressed!   It was fun to make wee little hats and scarves.  They are all now snug and warm in their upcycled cashmere sweater hats and scarves.  Top of the line trimmings for these little dudes! ;)

The first snowman completed stands 8 1/2 inches tall (including his hat).  His soft fuzzy stocking cap and scarf matches the little gingerbread girl's Butter Pecan background perfectly.  His mittens are a lightened version of Olive Moss that complements his earthy tones.   


The smallest of the mini gourd snowmen has the boldest of colors!  This little bundle of winter joy stands 6 1/4 inches tall (including his hat).  A soft repurposed burgundy cashmere sweater hat and scarf complement his Holly Green mittens.   A big statement in a very small package! :)


The tallest of the trio is donned in the softest of winter colors.  He stands 8 1/4 inches tall (including his hat).  Two different recycled cashmere sweaters were used to make his attire:  one in a soft Medium Blue and the other of light Ecru with a Sage Green tint.  To coordinate with his light colored apparel, I made his mittens Medium Brown with Butter Pecan highlights.  This one may not be entirely finished...  As I look at him, the brushes may come back out and give him some snowflakes in the sky around the woolly lamb.  Snowflakes would give a little extra magic to the Christmas scene! :)


These little snowmen were so much fun to work on.  There are about a half a dozen more of their brothers waiting for paint... and quite a few larger ones, too!   These little guys should be making their appearance in my Etsy store sometime this weekend. I'm not sure how many more will get completed for before the Holiday... But, I look forward to adding to my inventory after the first of the year.  Can you believe it?  2012 is not that far away! 

Thursday, November 10, 2011

PAFA Winter Wonderland Giveaway ~ Hand Painted Wooden Christmas Ornaments

The Etsy Team -- Primitive and Folk Artists (PAFA) is hosting a Winter Wonderland Giveaway.  If you are interested at a chance to win some fabulous Christmas decorations, this is the giveaway to enter.  You do not need to be a blogger to participate.  Just leave a comment with your email address!  One lucky participant is going to win ALL the handcrafted items that are available.  CAN YOU BELIEVE IT??  Talk about getting a Christmas present early!  So... what are you waiting for??  Click HERE.  :)


I donated a trio of wooden Christmas ornaments as part of the giveaway.  Here are some of the extras that will be making their way to my Etsy Store.   If one my followers would like to purchase any of these ornaments now, just send me an email for price list. :)   All of these ornaments can be personalized with a name and year if desired!

This snugly snowman  has a place for a photo of your favorite someone.


How about a warm snowman greeting?


And here is something for the teddy bear collectors out there.  This darling little bear is holding a star that can have a special someone's picture placed on the center!


This little bear reminds us all to sing the praises of the season. :)


Anyone celebrating a first Christmas?  This sock will proudly display the photo of the new baby in your household.


I just love gingerbread men... This little guy would look darling displaying a picture of that special little one!


Mini snowman sled anyone? ;)


I have to throw in a recycled piece.  This rolling pin recipe card holder has been decorated with an original design of mine.  It makes looking at those recipe cards a little easier during the holidays! :)


Remember this teddy bear sled?  I will be listing him on my Pumpkin Hollow Flea Market blog for anyone who might want to add him to their Christmas decor. :) 


Thanks to the wintry weather that we received yesterday, we have a light snow on the ground.  My teeth will surely be chattering as I haul some hay to the rabbit hutch this afternoon!  But the fun will come after chores are finished... I get to sit down with my paints and a large cup of hot chocolate... Aaaah!!