Whimsical and Homespun Art Creations with a Little Rural Living Thrown In


Friday, December 31, 2010

Thrifty Friday Find~ Vintage Cast Iron Griddle/Pizza Pans

These were some treasured finds that get used quite a bit in this household. They are flat cast iron breakfast griddles. They can be used over a flame or burner and were manufactured by Piqua and Wagner. They are excellent for making pancakes in the morning. While watching the dvd "Frontier House" from PBS, I noticed that Adrienne Clune got creative in her cooking. In one scene on her wood burning stove, there appeared to be something similar to pizzas formed on similar cast iron pans. The light bulb clicked on... I had those griddles. I am happy to use my cast iron whenever possible, and I love to make homemade pizza. This was a match made in heaven...

This New Year's Eve, our family had homemade pizza and garlic bread. I made it with a thick Chicago style crust (can be found at King Arthur Flour on side bar.). I just use any leftover dough to make cheesy garlic bread. A word of caution... spread the dough thin as it rises more in the oven. I always coat the griddles with a little Crisco before spreading the crust out. It helps to keep the pans seasoned. The griddles are placed two settings up from the element to get a crisper bottom to the crust. Be careful if you have the large Piqua griddle with the wire handle. I was taking it out of the oven a few months ago and lost my grip on balancing the cast iron bottom. The pizza flipped onto the floor! Yikes!! :( They slide easily from the cast iron surface. The pizza is cut on a wood board. I would rather not have the tomato sauce to come in contact with the griddle. It can be rough on the seasoned surface. I highly recommend cooking pizza in this way. I suppose it would be effective in a cast iron skillet as well. Maybe even better if one was making a deep dish pizza. Hey... now there is something to try in 2011!!

As I wrap up this post, the year 2010 is coming to an end. It has been a wonderful year. I am happy with my accomplishments... thrilled that this blog is up and running. I look forward to sharing more endeavors, setting aside more time for creating and blogging, and designing a page to sell items on this blog and on Etsy. I raise my glass of spiced cider to the arrival of 2011. May everyone be blessed with good health, happiness, and prosperity in the New Year.


HAPPY NEW YEAR!

Sunday, December 26, 2010

Danish and Wassail Recipe

I probably should have listed this before the holiday, although this is a wonderful treat throughout the year. Here was a simple but delicious... easy yet full of flavor breakfast my family enjoyed on a beautiful Christmas morning (to be honest it made a great dessert for that night, too!). I was lucky enough to get this recipe from my Aunt Barb a few months ago. It is adapted from the Pillsbury Danish recipe (that are made in individual servings). This recipe is constructed in a 13 x 9 pan. The beauty of this recipe is that my whole family can cut their own size portions (less waste), and it can be made the night before and refrigerated. Yay!!

Here is the Danish recipe:

2 pkgs crescent rolls
1 cup sugar
1 egg yolk
1t vanilla
2 (8oz) cream cheese (easier if softened)

Unroll the first package of crescent rolls, keeping the dough in a sheet, and cover the bottom of a 9 x 13 inch baking dish.

Make filling by mixing cream cheese, sugar, egg yolk, and vanilla. Spread the mixture evenly over the crescent roll dough in the baking dish.

Unroll the second package of crescent rolls and place over top of cream cheese mixture.

Topping:
1/4 c. sugar
1t cinnamon
1/2 c. chopped nuts (Optional)

Sprinkle this over the top layer of dough. You can cut amount if you do not like a lot of sugar (or use a vanilla glaze drizzle after the danish has cooled).

Bake in a 350 degree oven for 30-35 minutes.

Note: I prefer Pillsbury Crescent rolls for this recipe. Some of the off brands are just to greasy. I also prefer the name brand cream cheese. If you are a sale shopper like me, these items are constantly on sale at holiday time!

**Note:  Want to give it a little more pizzaz?  Top it with your favorite pie filling... Yummmmm! :)  ***


Do you want an easy drink that can be made ahead of time and heated up in the microwave? (Although if you make it during a holiday, the smell is just wonderful!) Here is a great wassail recipe that I have used through the years.

Wassail Punch Recipe:

2qt. apple cider
2c. pineapple juice
1/2 c. sugar
4 sticks of cinnamon (if they are short you can add a few more)
2 c. orange juice
1/2 c. lemon juice
12 whole cloves (I've been known to throw in a half a dozen more)

In a large kettle, bring all ingredients to a boil. Reduce heat; simmer 10 to 15 minutes. Remove cinnamon and cloves. Serve warm. Makes about 3 1/2 quarts.

Note: I usually halve the recipe for my family. Make sure you get the good apple cider that is cloudy with pulp. It is sooo much better. I've been known to freeze half gallons of cider during harvest time to save for the winter months!

Friday, December 24, 2010

MERRY CHRISTMAS!

May the wonder and excitement of the season fill your heart with joy!


Merry Christmas from my family to yours!

Wednesday, December 22, 2010

Pecan Pie in a Jar

I love pecan pie (almost as much as I love pumpkin!). Many times I have enjoyed a slice, but I have never took the time to actually make this pie. Since I am the only one in my family that likes pecan, I thought, "Why not make it in a jar?" I found a southern recipe that sounded good, cracked some pecans our neighbors gifted us from Missouri, and created my mini pies. A standard 10 inch pie crust worked well for this project along with a recipe for a 9" pie filling. The pic is a little dark, but I must say they turned out well. YUM!

As everyone knows, pecan is a super rich and sugary pie. (Gelled syrup and nuts? What would you expect!) So, controlled portions is always good. One thing I would change is to make six or seven jars instead of five and make the pie more shallow in the jar. Doing five jars made the pies way to thick and caused the baking time to go quite a bit longer than the recipe called for. Now granted baking longer is no big deal, but a bubbling and rising pie that threatens to go over the jar is not a pretty sight. Also, the less time cooking... the less time the pecans are browning. (Foil can only protect them for so long!) Plus, I could only eat half of the pie for a dessert. Thank heavens for a sealed lid to save leftovers, but I think a more shallow pie needs to be created. Something more similar to the depth of the mini pecan pies that can be found in the stores would be nice.

Even with the future changes, I consider this kitchen experiment a success. I will never again have to wait for a special event to have a slice of this great pie. Which reminds me... I better go walk the dust off my treadmill. I think that I could use the exercise! ;)

Friday, December 17, 2010

Thrifty Friday Find~ Reed's Rocket Nut Cracker


I can remember, way back when I was a kid ;) , Santa bringing us a fruit basket at Christmas, and there was always mixed nuts sprinkled through out. My Dad would always carry a pliers in his pocket and could crack any kind of nut without dropping a shell or ruining the contents. What was his secret? He was gifted in being able to cup his hand around the pliers without pinching himself in the process, when the nut finally cracked. This was NOT a talent of mine, and let me tell you that pinch that followed the loud (or was it fear that made it sound loud??) crack hurt like the devil. (Did anybody else get a nasty blood blister from trying something so stupid??) Not to mention, it was no thrill to try and sort minuscule nut meats apart from pulverized shells. And just in case you were wondering... stealing Dad's hammer was no better. Over the years, I graduated to a meat tenderizer (to my hubby's horror) for my bludgeoning tool. Ahhhh the memories, but those days are gone... my counter is now safe from being marred. There is a new tool in my arsenal...

This is a Reed's Rocket Nut Cracker, and it was found at a garage sale unused in its original box. My Dad found me this... well, actually he found two... lucky me!! This little gem was manufactured in Arkansas, which is no surprise, since it works brilliantly on pecans. Okay to be honest, the pecans I am cracking were brought back up from Missouri! It is easy to get the pressure just right to produce beautiful pecan halves. I only wish my recipe called for halves! :( LOL This by far is the best nutcracker that I have ever used. Christmas morning is going to find me trying out some hazel nuts in this baby!!

Saturday, December 11, 2010

Painted Reindeer Gourd

Here is a little guy to get us into that holiday mood! This North Carolina gourd appeared to be the perfect shape for a reindeer. I love working in the earth tones and used a design that lends itself to the primitive side of Christmas. His antlers are done with twigs, and some rusty jingle bells strung between them to add to the festive feel. He sits so nicely at 13 1/2 inches tall.

How do you like that hat? I love the long hats with tassels, and this gourd was perfect for one of this length! The plaid hat and scarf were chosen to accentuate the earthy, outdoor theme. I did have to add a smidgen of hot glue to keep his hat out of his eyes.


It wouldn't be Christmas without Santa. Isn't this a lovely scene? It has such a simple flair to it, and the browns come across with a very gingerbread feel to them. For being such warm tones, the white pops out and gives a wintry chill to this whimsical scene. This little guy is one of my favorite gourds so far... :)

Sunday, December 5, 2010

The Mouse Caught the Gingerbread Man!

So what have I been up to this past week? Decorating for Christmas! We even had 6 inches of snow to add to the merriment. I love to collect decorations for Christmas throughout the year, but my favorite pieces are the ornaments that my son has made me over the years and taking them out each winter always brings a smile to my face. At the end of the season, I carefully pack them away and store them in my upstairs side closet. Each year went along smoothly as the one before with its new handmade ornament added to the group... That was until that fateful year... Oh yes, the dreadful year when a mouse found his way into our house! And where do you think he decided to set up residence? Yep, in our side closet!

It has been some years since the incident, but I remember the time well. It was an early fall. As I began to doze off in bed, I heard a scratching at the wall behind me. No way! My cat raised her head up, and sure enough, the scratching of little paws could be heard again. Then, our little friend raced up and down the length of the closet, having a gay old time for a good part of the night. At the time, I thought he was a little to jazzed up even for a mouse. Little did I know, he was on his own personal sugar high!

It took a couple of days, and the intruder was caught. I did not think much more about our unwanted visitor until a few months later when decorating for Christmas. I was unpacking decorations for our main tree and pulled out my son's handmade gingerbread man. Now in my defense, this gingerbread man had been stored without incident in the closet for three Christmases prior, but unfortunately, that record was about to be broken. The photo you see below is the repaired ornament. At the time, he emerged from the box missing his M&M eyes/nose and chocolate chip smile. (Thankfully, I am a chocoholic and that was quickly mended!) But as you can see, this mouse lacked a fondness for clean fresh peppermint breath, and he left a good portion of them behind. Instead of ruining the little man by pulling off the starmints (this candy hoarder had some of those on hand too!) I chose to leave those 'as is' as a reminder of the adventure this ornament had.

I must add that now this ornament is kept in a drawer in my front room. I laugh every year when I see him. Some people may not like the idea of half eaten peppermints, but maybe it is the Beatrix Potter in me that thinks it is a story waiting to be told every year.

Just an interesting side note... In the same box of Christmas decorations, there was an ornament that my son made out of a dog biscuit. Oddly enough, the mouse left that untouched. I guess, I really don't blame him. My preference has always been for sweets, too!

Friday, December 3, 2010

Thrifty Friday Find~ Chenille Bedspread

I love going to resale shops this time of year, when the flea markets and garage sales have finished for the cold months. My favorite stores sell for charitable organizations. This gives me the benefit of finding a few nice items for myself, some interesting pieces to recycle, and make a charitable contribution at the same time. Yay! Here is one of my latest finds... a aqua chenille bedspread. Isn't it lovely? As you can see from the photo, there is a rust stain on a little bit of the spread and fringe, slight fraying to one of the finished (non fringed) corners, and a few fringe that found their tips in mauve paint at some point in their existence. Other than that, this bedspread is in great shape for its age.


I do not see chenille bedspreads as often as I used to at sales. This might be due to the fact that they have become a popular crafting media. Plus, they make a beautiful bed covering in a vintage accented room.

I am not sure what I will do with this find. If my memory serves me correct on visual inspection (I worked in linens and window coverings for 2 1/2 years.), I believe this is a twin bed size which is not a bed size that I own. It may end up being a wealth of material for some projects that I would like to do. I will put it away, for now, in my blanket chest and decide its purpose later.

I have been coming across some very interesting treasures lately. You never know what you will find as new donations keep pouring in to these stores. I am very happy with this piece. Oh and by the way... I thought it was a pretty thrifty buy for $1.00! :)

Tuesday, November 30, 2010

Painted Large Snowman Gourd

I will be getting to the Santa sled later on in the week ( took a break for the Holiday!). Here is a snowman gourd that I painted for the season. His eyes are a lot different from the one posted earlier. This thick Carolina gourd is 15 inches tall (without his hat) and very large around, so larger eyes were called for. (All the years of putting in various shaped eyes in ceramics is coming in handy!) He is a very popular size gourd, since the body leaves plenty of room for painting.


How do you like that profile? :) He is sporting a nice sized carrot nose that I think he carries off pretty well! And look at how he sits. On some of my bigger gourds, (handmade) boots are needed to keep them sitting upright and solid, but this guy sits tall and proud on his own. I will be doing some gigantic gourds in the near future, and some of those will be sporting boots. The addition of boots can sometimes add another dimension to the piece that works even better with the design.


Renee Mullins is a fantastic tole artist, and this design is no exception. A chilly winter's night scene. The design has characters presented on a large scale which is accentuated by the size of the gourd. The colors were picked to match the scarf and hat. The hat and scarf are not glued to the gourd, so ... the new owner can "re dress" their gourd if he or she ever tires of the pattern!

Friday, November 26, 2010

Thrifty Black Friday Find~ KitchenAid

I hope everyone had fun on Black Friday. Some of my sisters got up before dawn and ran to get deals. This dedication is not shared by this shopper. My hubby and I got up around 6 o'clock and were to the store by 7. We missed the craziness but found some nice left overs to pick through. Hubby got his dream TV for the bedroom. (I personally hate watching TV in bed. Makes me feel like I am sick!) But, the plus to his find is that he went to bed early tonight, and I got control of the large TV downstairs for awhile. Yahoo! We both found some presents for my son and have him near to being finished for Christmas. Yay! But what was the best find of the day? I can scarcely believe it is true... A 5 quart Artisan KitchenAid in metallic chrome. What a beauty! And I am the new proud owner!! I have wanted one of these for years now. As many know, this is no ordinary kitchen gadget-- this is a kitchen appliance. I know many of my readers may already own one, but this little slice of heaven is a new experience for me: 10 speeds, tilt-head design, unique planetary mixing action, durable all-metal construction (translation- it's heavy!), and powers over 12 (yes, 12) optional attachments while sporting a flawless paint job. But the most important feature... I won't have my wrist hurt from kneading bread any more!!

I look at the box imagining the possibilities. The wonderful culinary creations that we will make together. The new attachments that hopefully will find there way to my stocking! (hint, hint Santa!) The lovely afternoons of me filling the bowl and this machine doing all of the labor. (Okay, a little one sided of a friendship, but I promise to keep it cleaned and polished! :0) Can you smell the bread baking? *sigh*

I found this one on clearance at Lowe's. KitchenAid is running a 30 dollar rebate, and I had a 10 dollar coupon for the store. With some money kicked in from my hubby (gets him out of having to shop for me himself for Christmas!), I had enough funds to make up the difference and bring this dream machine home! If I wasn't so darn tired from shopping all morning, I would play with it tonight!!


Thursday, November 25, 2010

HAPPY THANKSGIVING!

I wish everyone a safe and Happy Thanksgiving!!

This is my little angel Mew. She looks how I felt today after dinner! Lucky for her, I didn't even have the energy to cross stitch!

Tuesday, November 23, 2010

Cooking Home Made Salsa

What do I do when I need more freezer space? Make salsa. During the tomato harvest, I blanch my tomatoes, cut them up, measure them, and freeze them. The summer temperatures are always to balmy for me to stand over a boiling pot, so I got in the habit of freezing my tomatoes for cooking salsa in the winter. The plan did not include making salsa a few days before Thanksgiving, but the sale on turkeys was too good to pass up... Time to make some space in the freezer!

Unfortunately for my son, my hubby was home while the cooking was going on, and he likes his salsa hot. (The taste tester always wins!) I didn't have all of my ingredients for the impromptu session, so I just threw in what I had on hand.

Salsa

15 cups skinned tomatoes chunked
4 cups chopped onions
2 cups chopped green peppers
2 jalapeno peppers chopped (seeds removed)
2t crushed red pepper (dry)
1 1/2 teaspoon cayenne
1/4 cup sugar
2 Tablespoon salt
1/2 cup white vinegar

Set aside 1/2 cup tomato juice. Mix everything together in a large pot. Bring to boil, cook for 25 minutes stirring constantly, so it doesn't stick. Mix together 1/4 cup cornstarch with the reserved tomato juice. Slowly add (until desired thickness) to mixture, stirring well. Remove from heat. I just freeze any extra in serving size containers.

Yes, it was very hot. So to keep peace in the family, I added a can of stewed tomatoes (with juice) to a quart of salsa and that brought it down to edible for my son.

Here is the recipe that this was adapted from. Above, I used more tomatoes due to mixing up my measurements before freezing! :)

Salsa

11 cups skinned tomatoes, chopped
4 cups chopped onions
2 cups chopped green peppers
3 jalapeno peppers
2 red chillies (I usually skip them due to heat level!)
1/4 cup sugar
2 tablespoon salt
1/2 cup white vinegar
1 1/2 teaspoon cayenne (if you want it to burn!)

Just follow the instructions above to mix. The jalapeno peppers, chillies, and cayenne can all be played around with to the desired amount of hot. I have made the recipe with 2 jalapeno peppers and no chillies or cayenne, and it was a very nice mild salsa.

Friday, November 19, 2010

Thrifty Friday Find~ Pampered Chef Apple Peeler, Corer, & Slicer

Peeling apples has never been a problem for me but cutting the apple into even slices... well, that's another story. I'll just say that I have always had a rustic look to my pie filling! Nothing commercial looking comes out of this kitchen, and that's okay with me. :) But for pies in the jar, I needed a uniform even cut to assure better cooking time. So, I went on the hunt for an apple peeler, slicer, and corer. After a few days of reading different reviews on blogs, store sites, and cooking forums, I decided to purchase a new Pampered Chef slicer.

I was aware that there may be a problem with my apples being to soft to peel, since they were from the McIntosh variety. The apples were in the refrigerator when the unit arrived. I think the chill made them a little tougher, and they peeled, cut, and sliced beautifully. Although the instructions could have been a little clearer (for someone who had no idea what she was doing), it was an easy device to figure out and to clean. No more fingers turning brown from apple juice! Yay!!

You will notice that this apple was not peeled by the machine. I turned the peeling apparatus back and locked it to the left side (nice feature). This apple was done a few weeks after the machine arrived and was very soft. The peel would have gotten stuck in the knife, because the flesh was not firm. Most of the reviewers warned about this potential problem in regards to all the different peelers. The harder the variety- the easier the knife can cut over the outer edge and not gouge into the apple.

**See in the measuring cup to the right... I could cut my slices into little stacks! It went so quick. I flew through the filling preparation. :0)

Here is a friendly tip when using the corer... When skewering the apple with the tines of the machine, think of an imaginary line from the top of the stem to the bottom core. Then, line the center of the tines up to be a part of that line and push the apple on. You may not get perfectly symmetrical slices (remember we love rustic anyways!) , but you won't get any of the seeds or casing. I didn't have one apple that would have worked if it had been put straight on by lining up the outside of the apple.

I remember seeing one of these simple machines back when my son was a baby. All I could think was, "Who would need a gadget like that?" Well, now I have my answer...Me. If you are a person that does a lot of pies in an afternoon, this machine is truly magic. It cuts preparation time down dramatically. It even cuts down on waste by not leaving much left on the core. (I am sure our chickens were disappointed!) I recommend the Pampered Chef brand that I purchased and am sure some of the others would have done wonderfully as well. This little gem is a fabulous find for me and will be indispensable for saving me time in the harvest season.

Monday, November 15, 2010

How to Make Pie in a Jar

In past years, I have used up orchard apples by making and freezing 8 inch apple pies. They were so nice to be able to take out of the freezer and enjoy all year long, but with my son getting older and being gone most of the day, left over pie began to be a problem. I have a terrible time with tolerating waste, so I found myself eating more than I normally would. ~Which in turn, meant more hours on the treadmill later! :( So, I was on the hunt for a solution to my dilemma.

While on vacation in Kentucky, I purchased some single serving baked pies from the Amish that were very good. They made a circle out of the pie dough, added filling, closed the dough making a half circle, and baked. This idea was great! I was excited for the apple season to begin. The only possible problem would be storage. I figured... I would flash freeze, throw them into a bag, and hope they wouldn't find there way down into the bottom of the deep freeze! It was a great plan, ready to go into action, until I read an article about pies in a jar on http://www.ourbestbites.com/ . I was sold completely on this idea. Over to Amazon I went, and three days later my 36 half pint Kerr jars arrived!

This process is so smart and practical! You simply make a pie in a 1/2 pint wide mouth Kerr jar and freeze. The best part of the whole process is that you bake the pies in the same jar! You heard me... WOW! No more waste!! And better yet, everyone can pick their own favorite flavor. Genius!


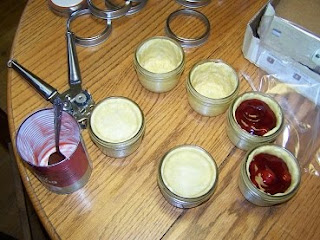
Here is the beginning of my pies. I mixed up a two crust 10 inch pie dough from my favorite recipe. (It gave me enough to do six jars with a little left over.) I took a piece of dough and pressed it onto the sides of the jar and bottom. I spread the dough pretty thin, since my family is not big on lots of crust.


I rolled out the remaining dough and used the band from the jar to cut the top for my pie. The dough was rolled thin but easily movable.


Okay, I cheated and used cherry pie filling! One can made four individual pies. I set the crust on top of the jar and gently pushed it down onto the filling. It naturally formed a bowl with the dough of the top crust circle joining the dough on the sides of the jar. I pinched the dough sides to form a good seal and removed any excess above the jar mouth. And they were ready to be frozen.


Here are the peach pies that I made. Okay, I cheated on them too! I used peaches from a can and this recipe http://hillbillyhousewife.com/deepdishpeaches.htm . The only changes I made to the recipe was to halve it, cut the peaches into small chunks, and use a little more nutmeg to taste. It worked out wonderfully.
One word of caution... Make sure to set your different flavors in their own area for identification or work with one flavor at a time. Once the crust goes on, it gets tough to identify. (I do not put slits or air holes in my pies to be frozen.)

I put my finished pies on a cookie sheet and set them in the freezer to flash freeze the top. Then, I put the lids (with a flavor label) and bands on them, set them back into their card board box, and stacked them in the deep freeze. (Before baking them, I let mine sit an hour to adjust to the climate with the lid on, and then remove lid and bake.)

I will be working on apple, apple/cranberry, and pecan this week. I'll throw some pics up when they are finished. Pies in a jar are a practical solution for individuals living alone, families with picky kids, or families that just can't seem to finish that 8 inch fruit pie. ;)

And just think of the possibilities. I make my own pot pies from scratch all the time. Why not in a jar?

Friday, November 12, 2010

Thrifty Friday Find ~ Measuring Spoons & Cups

One of the main things that I look for at a garage sale or flea market is kitchen utensils. Not only are vintage pieces beautiful to decorate a kitchen, but they have a tendency to be manufactured with sturdy construction for longevity and can be more practical.

Here are some measuring spoons and cups that I found at sales. The measuring cups range from 2 cups down to 1/4 cup. I had seen a set similar to these in a magazine for $18.95. (Many new fangled items are repros of vintage counterparts.) So, they went on the 'search for' list. (Steel is so much nicer to work with than plastic!) My search ended at a town garage sale where a lady's mother-in-law was down sizing her kitchen. She had them marked at $1.50. I was so happy that I didn't even haggle on the price!

The measuring spoons were found at a flea market. My hubby and I like to go to the cheap sale booths that are outside the sale buildings on the lawn. It was there that I found a lady with two blankets spread out on the ground full of kitchen items. She had five sets of these measuring spoons. I fell in love at first sight! As you can see from the pics of my kitchen, I love to store my seasonings and baking supplies in canning jars. These long handled measuring spoons work perfectly for reaching down to the bottom of the jars. No tilting or shaking the contents for a better scoop in this house! Even better, I got all five sets for $2.50 (Yep, 50 cents a set!!).

Monday, November 8, 2010

Painting Santa on a Vintage Sled


Here is my next work in progress from a pattern created by Shirley Wilson entitled A Merry Little Christmas. I love the use of contrasting colors on this piece. They accentuate the glow of the candle. It might get a little snow on the black background. (The sled will get sealed first and then the snow applied. That way, I can wipe it off if I do not like it!) I'll post the finished piece when the wood at the top gets its paint and lettering. A catchy name for the top has not transformed yet. Hopefully, it will come to me in the next few days! ;)

Friday, November 5, 2010

Thrifty Friday Find ~ Jar Lids

Canning jar lids and rings can be expensive to replace. Imagine my surprise when I walked into a flea market, found a beautiful booth with hand crafted lamps, and under one of the tables spotted two enormous boxes filled with bags that consisted of 12 canning bands & lids in each. She had both wide and regular jar sizes. So why would one person be selling so many? Well, this particular crafter makes lamps out of Ball jars. The Ball jars come with new bands and lids that she has absolutely no use for. So she thought, why not try and sell them? And at $1 a bag, who would pass them up? (or at least anyone who would be canning!) My husband wanted to make a "how much for all"deal that would have taken me to the next millennium in canning, but I decided get 12 of each size. The hubby of the crafter threw in some extra bags. What a deal! It never hurts to be on the look out for 'by products' of a craft. I had never thought about that with jar lamps. This couple was happy to get rid of (what they considered to be) a nuisance/space taker, and I was absolutely thrilled to have a good supply of bands and lids! :)

Wednesday, November 3, 2010

Snowman Painted Gourd

The weather outside will be getting 'frightful' relatively soon. I think, it is time to get my newly painted snowman gourd dressed for the cold weather! Doesn't he look snugly in his tye dyed blue fleece stocking cap and matching scarf?


These dried gourds are a relatively new passion of mine. They combine the art of painting and sculpting (which is a new medium for me) into one project. Plus, I get the added fun of ordering all types of printed fleece to make miniature snow apparel. I have spent hours looking at gourds and carefully picking desired shapes. Everyone of them is a little individual waiting to take form. These creations put my imagination to the test. The options are limitless from the little being it will be... to the art... to the apparel.

This little guy is a thick North Carolina gourd. He stands approximately 13 inches tall without his hat. His nose, arms, and mittens are hand sculpted. As you can see, he sits up very proud awaiting those first snowflakes!


Not only do I have the fun of picking out the outfit for these little gourdations, but I also get to select the art to sit center stage on their bellies. Oh... there are so many wonderful books and patterns to thumb through and choose from!! (I have even been sketching a few of my own lately.) The snowman and gingerbread pattern for this gourd is from Renee Mullins. I simply love her whimsical style.

I have been busy setting up an Etsy store. I hope to get it up and running in the next week, so this little guy will be for sale in time for the holiday season!

Saturday, October 30, 2010

All Hallows Eve

My purple popcorn balls are ready...all 60 of them. My black cat with the glowing eyes (thanks to the camera flash!) is all set for her holiday.


As the Peanuts Gang await the arrival of the Great Pumpkin, I would like to wish you all a Safe and Happy Halloween!

Friday, October 29, 2010

Thrifty Friday Find ~ Floss Storage

This fabulous Friday find is a combination of two. These storage bins are plastic bolt and washer bins. My husband found them at our local hardware store. They were updating to a new display wall, and my hubby asked what the store was doing with the old bins. The owner had someone else interested in them, but they never came back to get them, so we got them all! I took a few of them to make a storage unit for my embroidery floss. The bins are five to a row, and each one can tip and lift out of its holder with ease. The rows interlock with the one above it and mount easily onto the wall. There were stickers on each of the bins describing the bolts and washers that were inside. I removed the stickers by soaking them with a layer of Goo Gone. They cleaned up like new!

The second part of this find is the contents. I love to pick up cheap embroidery kits that are reduced do to missing colors. It gives me a reason to personalize a project with my own color choices. So, I need to have individual colors of floss on hand to complete these projects, and it never hurts to have older colors, too. Floss is getting harder to find in stores without a long drive from where I live, and it is going up in price. So, what better to look for at garage sales? To be honest, I haven't been that successful in finding many skeins, but as you can see, my Mom knocked this one out of the park. She kept finding bags upon bags of floss and at a cheaper than cheap price! When my husband came home with the bins and asked if I could use a few, the light bulb went on, and my floss had a nice, neat, organized place to live!

Thursday, October 28, 2010

Freezing Butternut and Acorn Squash

Here are my butternut squash. I cut off the stem end, halved them, scooped out the seeds, and turned them upside down on a cookie sheet that was covered in aluminum foil and sprayed with cooking spray. I poured a half a cup of water around them and put them in an oven at 350 degrees. It took about 1 hour and 20 minutes when my fork could go throught the skin and flesh easily. This is what they looked like pulled out from the oven.


This is the finished product. I found that using an ice cream scoop was pretty effective in getting the flesh from the skin. I mashed the flesh and whipped it with a beater until it was smooth. I measured it into 2 cup servings, put it in a Ziploc freezer bag, squeezed out the air, and stuck it in the freezer. Finished!

Did you wonder if I tried any of this? The answer is yes. It was nothing like I thought it would be. Of course, there was no other flavors or sugar on it, so I could get a true assessment. It tasted like a sweet potato -minus the sweet with a touch of stewed pumpkin -minus the sweeteners. I can see why this squash has been used in so many recipes to fill in for pumpkin. The taste is so very similar. It will be interesting to experiment with in the kitchen!


Here are the acorn squash. To keep them nice and mashable, I cut them in half, scooped out the seeds, put the flesh side down (flipped them over for the pic to cool), poured a half a cup of water around them, and baked them at 375 degrees for about an hour on a cookie sheet that was lined in foil and sprayed with cooking spray. I must say, these were very small in size, so I think that is the reason for the quick baking time.

Just wanted to add~Some of these little gems had a very tough skin, so thanks to a tip from the Internet, I scored a line from stem to tip on both sides, where my cut would be, and microwaved for 1 1/2 minutes. It heated them up enough to make for an easier cut. A word of caution, they are hot when they come out of the microwave, so be careful!

Here is the cooked product. With the rind being so tough, it was a whole lot quicker to use the ice cream scoop. It went faster than the butternut. Then, I proceeded to mash and blend until smooth. (I read a tip that a blender will pull any stringy pieces out if you didn't get the squash scooped out correctly before baking.) One could also use a hand puree blender, but my squash seemed to do well with the regular hand mixer. I packed them the same as the butternut for freezing.

I tried the acorn, also. Quite a difference from the butternut. I can see why my friends like this particular squash. It is a lot sweeter than the butternut, and the taste is strongly similar to the sweet potato which shocked me, since I am a huge fan of them. Just an interesting side note~ I read in more than one article that the more orange color on the acorn squash the sweeter the taste. Hmmm. I will have to test that info next year. I am sure all of these veggies (and squash are considered fruits as well due to their seeds) will be in my garden.


Here are a few bags of my frozen squash getting transferred to the deep freeze. The camera does not do the beautiful colors justice. Like I said in an earlier post, I want to go 'greener' in my life and more natural. It's time to open the door to some new flavors!


How to Freeze Zucchini

Here is my produce haul from my local stand: 7 zucchini, 8 butternut squash, and 12 acorn squash. I threw in a snake gourd to round it out and drove away with $10.00 worth of produce. This is a new food to my home. Yes, you heard me right. In 42 years of life, I have never tried any of these three home grown foods. Can you believe that? Me, the lover of the pioneering spirit, forager of natural sources of food, the woman that nearly choked off her flower bed with an incorrect placement of spearmint, has turned her back on this popular veggie source all of these years. (Of course, I cannot account for the Gerber years of 1968-69.) So what was the final push to make me buy?? A simple trip to the post office.

You can learn a lot in a small town post office, and the lady who fills in for the post master is a wealth of farming knowledge. Oh and by the way, she has a local produce stand at her farm! I have had people in the past tell me the glories of eating squash and zucchini bread, but the clincher was when this kind lady told me that butternut squash could be made into a pie similar to pumpkin. I do love pumpkin pie! How could that be? I would have to give it a try. Then she informed me that she still had a few left for sale. How lucky is that? I ran out to her farm and bought all of her butternut squash for 50 cents a piece. Then I spied the zucchini in a crate, I took all she had at 25 cents a piece. I moved on to the acorn squash that has been praised by many of my friends. I bought those for 3 for $1.00. Not bad! Off I went on my merry way with my bounty.

Now I must say that I do can and freeze other fall veggies and fruits, so time and space is always limited at this time of year. The answer was to store these items for use in the future. After checking the Internet and questioning the locals, I picked the most popular way of storing each item. I also picked up some new recipes to use them in!

Maybe I should ask for a food processor for Christmas? LOL The zucchini's were very large. I chose to grate them for use in bread. After some research, there is debate over blanching and freezing or just straight freezing. The unanimous vote from the preservation pros around here is grate, pack in Ziploc bags, and freeze. I made sure to squeeze the air out of the bag and made a note that many of my favorite food preservation bloggers praise Food Savers for keeping items fresh. (Another item for the Christmas list!) I also froze them in 2 cup measures which seemed to be common in many zucchini bread recipes. With this task done, I look forward to trying my new recipes and sharing them when the harvest season slows down. :)

Tuesday, October 26, 2010

My Primitive Kitchen

Here is my kitchen. I finally have it organized for efficiency in my cooking endeavors or experiments! In the past, storing spices, flour, and sugar was a struggle. It seemed like I made too many trips to the pantry for supplies. I finally decided to get some use out of my vintage canning jars. It didn't take long to fill them up. So, out to the store I went for the little squat Ball jars on the shelf to store my yeast and other spices that are kept in smaller quantities. The large apothecary jars are so handy for sugar and flour. (They need to be filled soon, but I like to let them run down every once and a while.) People often ask if it is a problem having so much flour out at room temperature, but I make my own bread and bake a lot which uses it up pretty fast. The sugar takes a little longer to go down, but it keeps fine and bug free. I found two scoops (one green and one red handled) to go in them. One of my favorite things is the copper measuring cups that my son mounted for me on the wall. My Dad picked them up for scrap metal but brought them to me instead. How lucky is that? On the stove you can see the cast iron dutch oven that my Mom found at a garage sale. It is a size 9. I love the old cast iron to cook with. I cannot believe she stumbled on that treasure!

Here is a full view of my kitchen. I like having some of my older pieces up above the cupboards, but I tried to keep it simple for cleaning reasons. ;0)


The old fruit crates came in handy to give me some height which makes the walls seem not so tall and blank. The wall color lends itself to the orange side of the color wheel. It works well with the vintage pieces.

This piece was a gift from my son, who knows I love the more rustic primitive look. (hubby loves oak) Not only is it a nice stand to put my snack bowl and Hamilton Beach shake machine, but it tips out in front and holds my tall (concealed) garbage can. COOL! It is made from old barn boards and hinges that he salvaged. Even the handle is a salvaged piece. I just love the old wainscoting with its original white paint. I'd have my whole kitchen done like this if we ever build a new house. (Heaven knows my kid has enough boards stored up and then some!) This piece was a complete surprise, but after seeing his skill level, I have had him build some other pieces to store fabric.

My kitchen is finally a warm and inviting place, reflecting my love of the pioneering spirit. I might have a few small things to add in the future. For now, I look around and every piece has a memory for me on how it was found, and a story behind it on how it fit into history.

Sunday, October 24, 2010

Painting on an Ostrich Egg

I had a friend bring me two hollow ostrich eggs. They were enormous eggs that her grand kids use to take to show and tell, and with the kids grown, she was in possession of them again. My friend really did not want to display them in their natural state, so she came to me one day with the idea of having one painted with a fall scene and the other with a winter scene. Unfortunately, I forgot to take a pic of the winter scene. :( It was a Cardinal on a branch. But thankfully, I did remember to take a pic of the fall egg. The design is from Maxine Thomas of the "Country Primitives" series. This little scarecrow fit the egg perfectly, and the owner was thrilled with it. Initially, I was a little hesitant to take on the eggs, but they actually made for a very nice surface to paint on once they were primed.

This customer made me work on items that I would not have even considered painting on. (Although, I have enjoyed others ostrich creations.) It makes me happy to give 'cast out' items a new life. There is an art movement for renewing (or repurposing) many items that would, more than likely, end up in a landfill. I am happy to be a part of that movement and am looking to go even 'greener' in other areas of my life also. There is so many new projects that I am working on and will post on in the future. If only the days were longer!! ;0)

Friday, October 22, 2010

Thrifty Friday Finds ~ Old Milk Box

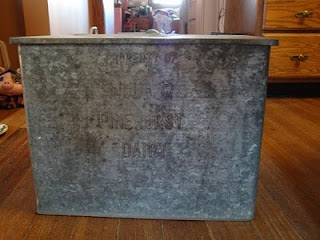
I stumble across some of the neatest finds at flea markets and garage sales (at least to me anyways!) , so I thought that I would do a blog on Fridays to share my treasures. Some of these finds will eventually end up for sale with my crafted items. Here is one of my favorite finds of this year... an old milk box. I have collected a few milk boxes with familiar names and locations, and ones without names to decorate. Now be honest, how many of you remember having one of these? I do, but for those of you who did not have the chance to witness this era, these were set outside the door for the milk man to put his deliveries in.


This particular one is 13 inches tall, 16 1/2 inches wide, and 11 1/2 inches deep. The largest box that I have ever seen. The box was provided by Muller Pinehurst Dairy for their customers. The name and size was what initially grabbed my attention, but the one detail that won me over was under the lid.


How cool is that? A customer could order: cottage cheese, milk, eggs, cream cheese, sour cream, orange juice, and butter. Okay, now it made sense why this box was so unusually large. A whole area of the grocery store dropped off at your front door, and it happens to be those fragile items that we rush to get home to the fridge. I marvel sometimes over the way that life use to be. **sigh** ;0)


Sunday, October 17, 2010

Painting a Bear on a Vintage Sled

I would like to begin this post with the confession that I am a flea market and garage sale addict :0) , and this post will show how I channelled this addiction to do good in my life...

I have found that both of the venues mentioned above are great sources for a variety of surfaces to paint on inexpensively (and with an earth friendly twist!) . I soon created a list of paint friendly items to hunt for and, along with the efforts of my parents, began to stockpile all kinds of inventory. At the same time, I was filling sketch books with roughs of original decorative ideas and began to collect books from various tole artists. I dreamed of the day when I would turn the items into 'recycled' collectibles. The only problem that I had was stopping long enough to put the plan into action. I am happy to announce, that with the creation of Pumpkin Hollow, my dreams are finally seeing the light of day. Yep... It's time to pick up the brushes! But where to start first? Hmmmmm...


SLEDS!! Cold weather is coming, and as you can see by the rafters in my garage, I could spare a few! I will try not to rant to much about my fascination with sleds (or vintage items in general). Okay, give me a little moment here...I can't help but think about all the different models and manufacturers over the years... Not to mention, all the generations of children that have enjoyed them... But what does one do with them when they have run out of use?? Well... give them the honor of being the decorative centerpiece throughout the season, of course!

For my first sled, I was excited to use a pattern from a favorite artist of mine, Shirley Wilson of Ladybug Art (see side bar). Her holiday art has that mystical nostalgic warmth that makes me feel like a little kid on Christmas morning. I armed myself with her book, enlarged and transferred the pattern, and created my own rendition of "Naughty or Nice". (I was never good at sticking to instructions!)


It may not be as expressionistic as Shirley's original, but I couldn't be more thrilled with the results!


I can't help but be reminded of a Chow Chow that I used to have when looking at it. (Her face resembled a teddy bear!)

I do really like this sled. It is hard not to become attached to a finished piece; even though, I know that I can make another. **sigh** The idea is to get enough pieces finished to make a new page of my blog or open an etsy store to sell the collectables that I create. So if there is an item that you are interested in, just email me at pumpkinhollowprimitives (at) hotmail (dot) com. I already have the next sled in progress, and a couple of gourds that would like to get dressed for the season!