Whimsical and Homespun Art Creations with a Little Rural Living Thrown In


Friday, January 28, 2011

Thrifty Friday Find ~ Woven Basket

I was actually able to get out thrift store shopping this week. Yay!! It is a great way to make a charitable donation, drop off excess clutter from my house ;), and find recyclable items. At this time of year, my shopping is infrequent and depends on the weather and road conditions.

As I walked through the door, this basket was sitting on top of some old suit cases. It is a nice large size at 14 inches tall and 17 1/2 inches wide. The color is not exactly what I would have wished for, but it is actually growing on me. And if I tire of it, there is plenty of paint down in the basement. ;)


Upon arriving home with my treasure, my cat gave it her seal of approval by jumping into it. She loves to be carried around in baskets. I must say, I was a little nervous that it wouldn't take the weight, but her chubby body didn't phase it a bit.

I will use it to keep some of my wool stitching items in. It will be a nice size for that. I cannot wait to see it filled up. Not a bad investment for $2.00. Aren't thrift stores great? :)

Thursday, January 27, 2011

Stihl Chainsaw Blanket

Nothing like starting a 2010 Christmas present a month after the holiday! The only plus is that I finished it in one day... one long day. I am so happy to report that the task is done! :)

Let me start by explaining the reason for the gift. My husband is an avid Stihl Chainsaw user. He has worked in the tree care service for 28 years. Although his day job is a plumber/electrician, we have a tree trimming and removal business on the nights and weekends. (Yes, believe it or not, there are quite a few days out of the year that you can find me dragging and chipping brush.) At holiday time, I am always buying him Stihl memorabilia. And let me tell you, it is getting harder and harder to find something new.

When the cold weather arrived in early December, my husband began hinting that he would like to have a fleece blanket to use while watching television. That seemed a reasonable and useful gift. I have one... my son has several with his favorite teams on them... even the cat has one of her own that she would love to share with her beloved owner... BUT


for some reason hubby doesn't want to use it?? Can't imagine why? ;) LOL

So with absolutely no quilting experience, I took the task at hand. I was determined that he would have no ordinary blanket. It would definitely be orange and black, but how could I punch it up a little? It was then my eye fell upon a magazine with the all to familiar logo on it. Well... they were block letters. And lets face it, you really can't screw up with fleece. Okay, well maybe I could... but the odds were in my favor. So, I sketched and figured some rough dimensions, ordered the fleece, and proceeded to get too busy to even think of doing the project! :( AAAgh!

But now I can finally announce that on this day, January 27th, the task is complete. Mew and I worked tirelessly... anyways, I did while she slept! My husband was very surprised. Even though there will be no quilters award for this first attempt, it didn't turn out too bad for a newbie! The only problem?? My husband is not sure if he wants to use it... he's afraid it might get dirty. AAAAgh! You know what I think...


HE CAN SHARE WITH HIS CAT! LOL ;)

Sunday, January 23, 2011

A Quiet Sunday

Just taking it easy this Sunday doing some light cleaning. Made a loaf of bread with my Kitchenaid on its wood base. It was so nice to slide it out of its cubby hole and take a break from kneading. Although, I am not saying that I will not knead bread at times in the future. It is truly a relaxing process... when I'm not overworking my wrist.


You just can't beat the smell of fresh baked bread. Pass the butter please! :)

Friday, January 21, 2011

Thrifty Friday Find ~ Picnic Baskets & Painting on Baskets

I love picnic baskets. If a vendor has a good deal on a basket, odds are in its favor that it is coming home with me!


Picnic baskets are sturdy enough to stack and use in place of end tables. They are great visually and make a super place for storage (more of my fabric stash!). :) Each basket represents a leisurely feeling of bygone days and can come in an amazing array of colors, shapes, and weaves.

Imagine the work that goes into each basket. Weaving and caning are two arts that I have never tried my hand at. (Bless the wonderful people that are still keeping the art alive!) One of my friends offered to teach me to cane, but my husband informed him that I have enough hobbies. I must admit... my hubby is right! But don't tell him that I said so. ;)


The different weaves and textures can break up the monotony of a room. I use them a lot in my front room; even though, my husband designed the room with a more Victorian feel. My early Americana/primitive style doesn't seem to fight it too much. :)


I also like to use picnic baskets in my tole art. Here is one painted with a design from Chris Thornton. (The pic makes it a little brighter than it actually is.) It was done in wonderful rustic colors, and the basket itself has a wide woody primitive weave. The flat wooden top makes for an excellent painting surface. I will be listing some of these in my Etsy store. You know... the store that was suppose to be up and running over a month ago. *sigh* ;)

Tuesday, January 18, 2011

How to Move that HEAVY Kitchenaid Stand Mixer

I was so excited to get my Kitchenaid mixer for the holidays. It is such a wonderful appliance, but you know what else it is?? It is extremely heavy! This fact would not be a problem if the counter fairies would happen upon my kitchen and bless me with some extra space to put a non-movable item. But since I am pretty sure that will never happen ;), I had to come up with a storage solution that would not involve a lot of lifting.

If you click "kitchen" on my sidebar and scroll down to my counter top pic, you will see that there is an appliance garage next to my sugar jar. It is tall enough for my Kitchenaid to fit through the door. But unfortunately, one must lift the Kitchenaid slightly, angling for the closest corner, and without losing your grip set it down. This may not sound that bad, but the forward motion controlled lift is like a 3 minute workout and worse than kneading bread on my wrist (which was why I bought the Kitchenaid in the first place!). Oh... and let's not mention the fear of knocking the top of the mixer on the door of the garage... What to do?? Well as Plato once penned, "Necessity is the mother of invention." I decided to create a skid for my appliance. (To be honest, I was going to push it off on my son, but it ended up falling back onto my "to do" list. But, that was okay. It was nice to do a little woodworking again!)


Here is the cut out skid. I used some thin veneered wood that is used for constructing kitchen cabinet sides. I have acquired a little stock pile from a local business that is inundated with scraps. (This recycling comes in handy when making ornaments, too!) Here is the newly cut out "wrist saving" platform in the raw and ready for the sanding disc!

Here it is all smooth. I didn't stain the wood, since it would not be visible to the public. It was finished with some sealer, just in case it came into contact with liquids or required a wipe down.


In my fabric stash, I have acquired some super thick tool drawer felt. I cut a piece out for the bottom of the skid. I covered it with glue and adhered it to the underside of my finished piece of wood. No need to mess with clamps... I simply flipped this over and set my mixer on it for weight while drying!


Here it is ready to go onto the counter and be slid (How heavenly does that sound to my wrist?) into place. I have given it a trial run, and it works like a dream. "Slide in--Slide out!"
I do wish my counter was large enough to have this mixer out all the time. It really is a beautiful appliance. But I must say, I had fun working with my scroll saw and sander again! On to the next project...

Thursday, January 13, 2011

Homemade Vanilla Extract Recipe

Here we go... I do not even know what got this started in my head (maybe it is all the winter baking), but this is the latest experiment in my kitchen. After days of research on the web and mulling the idea around for a month, I decided to take the plunge and make my own vanilla extract. It sounds weird, but it really bothers me when I have to buy vanilla . That little 2 0z. bottle is like liquid gold. The last time (stocked up so its been awhile) that I purchased pure vanilla, the cost was $2.99 for a generic bottle at Aldi. It doesn't take long to empty one either... at least not for me. (You can imagine my horror when I knocked an open bottle over while making popcorn balls. Argh!)

Making vanilla extract is easy in the sense that it takes vanilla beans, vodka, and time...

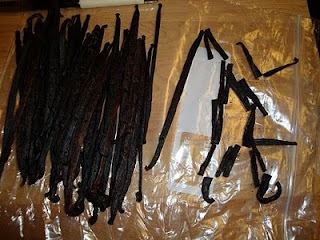
After much research, I ordered my beans through eBay from vanillaproducts (great info in their listings if you click on one of their items). They also have a website http://www.vanillaproductsusa.com/ . From my research, they are noted for the best prices with quality beans. (Another notable seller is http://www.amadeusvanillabeans.com/ .) This photo shows how they arrived. They were in vacuum sealed bags. I purchased 1 pound of Tahitian Organic Extract Beans 5-7" for $12.98 and 1/2 pound of Madagascar Bourbon Extract 6-7" beans for $15.59. Vanillaproducts is running a sale right now, so they gifted me an extra 1/4 pound of Tahitian Grade A Beans 5-6". The grade A were nice, but the consensus from the companies is save your money. Both agree that the drier bean works well for extract... so grade B beans will work out just fine. While I am thinking about it, another great site to check out is http://www.vanillareview.com/ . It has lots of great info too.

The Tahitian beans smelled very fruity. It reminded me of a new bottle of children's chewable vitamins (odd the things that the mind thinks of isn't it?) with a hint of tobacco. They were a little drier of a bean than the Madagascar but still very pliable. A few were a challenge to cut, but most cut easily and were full of exposed seeds.

The Madagascar beans were more oily of a bean. They had the familiar vanilla smell with a hint of tobacco (which I am sure is due to being a dried bean). I found them easy to cut and loaded with seeds.

Here is the first step - splitting the vanilla bean in two. (I am sorry it is hard to see. It is the top bean that is split.) The little flecks on the plastic are tiny seeds. This may sound crazy, but a vanilla bean reminds me of a mini skinny dried out banana. Once you start your cut right under the hooked end, the knife naturally follows the fibers to the bottom. (You might need to hold the bean on your way down.)

Some recipes call for scraping out the caviar (or seeds), but the majority of recipes do not. I found that with both variety of beans some of the seeds were falling out, while others were nicely exposed in their pod. Since they will be covered with alcohol and shaken on occasion, I didn't see a need to scrape.

Here is another decision one must make. Some cooks add the vanilla bean whole, while others chop the beans into segments. I found, while working on the first bottle, that it would work better to chop up the vanilla bean. I didn't want any of the bean to be exposed to the air in the bottle and figured it could only help with the flavor.


**Another tip from Amadeus Vanilla Beans... buy the cheapest vodka. The more expensive brands add their own touch of flavor. This is not needed when vanilla is the only flavor that is wanted. So, why not save some money? ;) ***

So the golden question is the ratio of vanilla beans to vodka. Well if you jump to the above websites, they will tell you it is regulated by the federal government. The only problem is that homemakers are working with far less advanced methods of extraction, so the leading sites seem to agree on 1/4 pound of beans to a quart. If you want a strong extract... add more. Most chefs work with 2x vanilla. This is a case of the more the merrier!


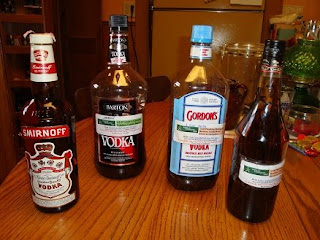
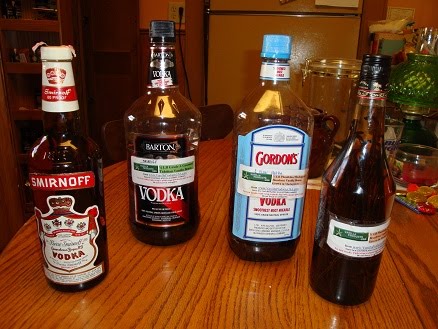
Contrary to how this looks, I haven't touched a mixed drink in about...let me see...at least... oh, one kid ago. I actually had the Smirnoff bottle (that was gifted to us), but the seal was broken (by my brother in law 18 years ago!). It was way back in the pantry, and I dumped it out to have the bottle. My husband insisted the liquor was still okay, but it had evaporated and had white flecks in it. Hubby wasn't willing to take a drink... so down the drain it went! Off to the store I went to buy my new vodka. Talk about being out of my element, but I managed to find a few of the cheaper bottles. ;)

My two bottles (I am planning to gift vanilla to friends!) that I purchased were 1.75L (roughly 7 1/2 cups). (If you start out with the smaller bottles that are 750ml (roughly 3 1/4 cups), you will have to remove 1/4 cup to get your beans in and still have some room for shaking. If your frugal, store the extra in a small mason jar and add after extraction process is done.) I put three cups into the extra glass bottles that I had and left the remainder in their original large plastic bottles. I might change out the plastic bottles for sterilized ball jars to conserve on space. They need to be kept from light (or made in dark glass) so to the back depths of my pantry they went. The bottles get shaken every day for a week, and a few times a week after that. The vanilla should be good enough to use in 4-6 weeks but the longer the better. The Vanilla Review stated that full strength (and slight syrup consistency) is achieved after 6 months, and at that time, the beans can be strained out. The vanilla can then be put in their final jars. A fresh bean or two can be added at that time to dress it up for shelf appeal or gifting! ***Shelf life, due to the liquor is stated to be indefinitely.***

The alcohol used in the extract must be 35% to 40% in volume. Vodka is 40% making it 80 proof. Rum, Brandy, and Whisky fall in this category also. Vodka is the go to guy do to its lack of flavor. If one wants vanilla with a twist, there have been favorable reviews with Rum. I had a bottle of Canadian Whisky that was gifted to us and never opened. It smells rather medicinie to me, but I added some beans to see what would happen. The bottle would have never been used for anything else, so why not? :)

So should I bore you with my money crunching?? Here we go... With shipping and over buying ;) (larger amounts are cheaper, so share with a friend or in my case my sister!), my total cost for beans was $34.00 for 1 3/4 pounds. I purchased 2 bottles of vodka in 1.75L bottles (this was before I read the Amadeus hint) for $26.17 (there were even cheaper bottles on sale for $9.49 each, so I could have saved another $4.50... oh well!). So roughly speaking it will cost me $17.95 for a liter of vanilla. So on the rounding side, if I get even 7 cups of vanilla that equals to 56 ounces. The shelf price would be $83.72 before tax. (And lets face it, I am sure this will be a more potent grade as I threw in a few more beans than asked for.) So even making vanilla using the smaller bottle of vodka with a smaller batch of beans, a homemaker can save some serious money while getting a healthier vanilla. ***Just a note worthy fact... the store brands contain sweeteners to help cut the smell of the alcohol and artificial colors.***

Kind of a lengthy post, but as my hubby will attest, I research my purchases and experiments to the ends of the earth. (This was actually the shortened version!) If you have some free time and would like to give this a try, check out the other sites for additional info. I will add updates to my vanilla in future posts. I will also be making some vanilla sugar that I will post about later. (This post is long enough!)

Working with vanilla beans has been exciting. The amount of money saved is (or hopefully will be ;) ) incredible, the product will be of better quality (minus the added preservatives!) , and the smell in the kitchen is heaven!! :)

Sunday, January 9, 2011

Pies in a Jar Baked Assortment

I was rearranging my freezers yesterday. :( You may ask why I would undertake such a task at this time of year. Well... my son (aka Farmer boy) made a deal with a friend of his and raised two pigs. He had one taken to the processor a week ago and didn't have anyone lined up for the meat. YIKES! (This is the time of year that my freezers are maxed out until spring.) Luckily, we thought of two families that would take a quarter each. But we were still left with half a pig and 80 pounds of meat that I wasn't planning on adding to my chest freezer! Luckily, I am the queen of pack rats (or at least my hubby says so!), and after a whole lot of moving from one freezer to another, the meat is now safely on ice. Whew!

Now where was I going with this? ;) Well... in order to get some of the pork to fit into the freezer, my menus for the week were planned and the coordinating meat moved to the fridge. It was then that my pies in a jar caught my eye. Hmmm. All the Christmas candy is gone. Yay! The misery of being over stuffed by large meals is just a memory... Time to break out the desserts again!
How handy is that? I wanted peach, my son wanted cherry, and hubby wanted apple. It is so nice to be able to choose!

See the apple in the upper right corner. I know it is hard to see in the pics, but the top half and crust raised above the jar line more than the other two. I suppose, it was due to the fact that it was made with fresh fruit and more juice built up. They looked puffed up and perfectly contained coming out of the oven.

I took them out of the freezer this morning and let them sit on the counter with their lids on. (Okay, I forgot them on the counter.) By the time I spotted them, they were pretty much thawed out. I took off their lids, cut three slits in each crust, stuck them on a cookie sheet, and popped them in the oven at 350 degrees. That got me thinking about space, I could throw a few in while making bread in the afternoon and save on the oven use. (Lower that electric bill!) Now there is really nothing else left to do for dessert but try to find out which freezer I put the vanilla ice cream in!! :)

Friday, January 7, 2011

Thrifty Friday Find~ Chilton Ware Coffee Pot

Vintage coffee pots are another fascination of mine. I have purchased many with the intentions of doing some painting on the outsides of them. But, there are a few that paint will never grace. Here is one such coffee pot. (My Mom was the lucky finder of this one.) Now... I have some large enamelware pots in my arsenal, but this has to be my biggest metal one. It is 7 1/2 inches high (not including handle) and a whopping 30 1/2 inches around. The markings on the inside indicate that it can be used to make 20 or 30 cups. (I just had to take a pic with the guts.) It must have been amazing to smell such a huge pot of coffee brewing on the stove! The sturdy handle is well constructed to withstand the expected weight and wonderfully designed. Can you imagine picking this one up and pouring it at the 30 cup level? I glance at it occasionally and imagine where, when, and how it must have been used. If only these vintage pieces could whisper to us the stories of their lives. **sigh** Their tales would make for one enchanting evening!

Tuesday, January 4, 2011

New "Vintage Style" Barn Board Pie Safe

What to do with the fabric stash? My main way to hide all of my accumulating fabric (from my hubby ;)) was to put it in my collection of picnic baskets. It is amazing how much you can fit in those babies! Not to mention they are beautiful (or at least I think) stacked to make plant stands or side tables. But my stash outgrew their containers, and I wanted to eliminate some of the 'search and find' missions that had to be put into action when looking for a particular piece. (I suppose this also constitutes a Fab Friday Find, since most of these fabrics were bought in new condition at various yard sales.) I fell in love with an English cupboard at a local antique shop, but it was way to big for the space that was available, so the next thing that popped into mind was a pie safe. I have seen a few at sales, and they were pretty pricey. My son was with me on one of these excursions and rolled his eyes proclaiming that he could make them for a fraction of the price. Like that would ever happen! But imagine my surprise when he made me this one for a gift!! It even had the chicken wire front (that was salvage) that I wanted! I fell in love with it immediately. (I am truly a blessed Mom!) It was made out of barn board that my son salvaged himself out of a nearby location. The barn hinges were too big for the project, so he used some hinges that my Dad bought for him at a yard sale. It will forever be one of my favorite pieces, along with the garbage can holder (that can be viewed in my "kitchen" posts). The dimensions to this one are 32" x 37" high. He built this for me a few years ago, when he was eighteen. Salvaging barns is kind of an odd hobby for him to break into on his own, but we are all heavily into recycling in our family, so it was not a surprise either!

Here is a larger matching piece that I had him build me a year later. The dimensions are 34" x 65". The fabrics look bright in both pics, because I needed to employ my flash to get a clear image. Both pieces make a beautiful focal point in my sitting rooms. Not only are they handy for retrieving fabric, but they are quite the conversation pieces as well. I always tell my son that I will have a studio filled with his barn board furniture some day, and he tells me that if he keeps getting more barns, he will build the studio out of it too!! ;)