Whimsical and Homespun Art Creations with a Little Rural Living Thrown In


Thursday, October 20, 2022

Follow Up: Dehydrated Mini Marshmallows in a Magic Mill Dehydrator

 Did you think I forgot to update my previous post? lol  I wish it was that simple.  No, I have been spending the last two days learning a few interesting facts regarding the dehydration of marshmallows... completely by accident. 

First, my guessing for processing the marshmallows was way off.  Waaaaay off!  In trying to double check this error, a trip to a local DG was necessary to purchase more marshmallows.  Instead of getting the store brand, they had Jet Puffed on sale.  So, two bags were thrown into my cart with hopes of pinning a correct dehydrating time down.  All internet info suggests dehydrating at 151 degrees.  The Magic Mill has 149 or 159 degrees.  I have been going with the closest at 149 degrees.  Knowing this would throw off the time, the suggested time of 3 to 5 hours probably wasn't going to hold true for my minis.  Which is fine.  Interestingly enough, mine keep coming in at 9 to 10 hours.  I wish I could tell you the second run confirmed my results to 9 or 10, but an interesting issue arose to keep me from pinpointing an exact time.  Either way, my earlier guess was wrong.  Although I can unequivocally say this, 9 to 10 hours works for my Magic Mill.  Honestly, I would try another around, but my house is overfilled with these crunchy puff balls right now.  lol  

This brings me to my second discovery; A fine wine may get better with age... not so with a sugary marshmallow.  My observant spidey senses were taking a brake during my shopping excursion.  The sale was a "two for", and I grabbed two bags only looking at the top bag.  Ugh!  When I got home, the first bag had bouncy marshmallows.  The second bag had sticky, going yellow marshmallows.  In fairness to the DG, the best buy date was October of 2022, but I am here to attest... They were past their prime.  I loaded the dehydrator anyways, after physically pulling most of the marshmallows apart in the second bag.   The dehydrator was loaded with 20 ounces (2 bags).  My time test was ruined by spot checking marshmallows from the bottom three shelves.  The shelves which held the October marshmallows.  Their decomposing state (I was soon to find out. Insert smacking of forehead.)  threw off any possibility of dehydrating properly.    At any rate, I kept extending the time, got tired (for real, it was after my bedtime... lol), and on the last round jumped 2 1/2 hours making the full dehydrating time 10 hours total.  In the morning, I awakened to the process being complete...   But now, let me show you the finished marshmallows...

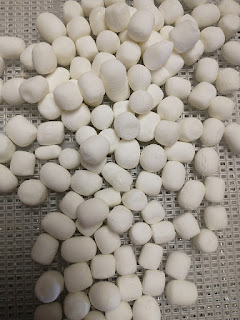
Exhibit A:  Look at the fresh marshmallows once finished.  They literally burst with crunchy exploding flavor.  Seriously, if you're on a diet, a few of these would calm any sugary craving.   Look at their dusky yet puffy exterior... Dehydrated perfection!


Exhibit B:  (Brace yourself) It was hard to get the right angle on these, but this is what the others turned out like.  They had a glassy, wavy, bubbly exterior.  I am assuming was caused by the sugar becoming more hydrated in the breaking down process.  Am I picky about outward appearances?  Absolutely not.  The problem came when they were bit into.  Slightly underdone crunchy turning into major teeth sticking chewy.  Nasty!  They tasted like old marshmallows.  Not all of marshmallows on the three bottom trays were bad.  Those handful of marshmallows in the bag which had still retained a soft powdery exterior were perfect.  So please, learn from my purchase, watch the dates and make sure you shake the bags you buy.  Loose, powdery dull, white marshmallows are the ones to dehydrate.  Just because the date is within selling fresh doesn't mean the product is viable.   It is a taste test you don't want to endure... Trust me!  Blaaaah...


So, what have I learned from this experiment?  First, my hubby thinks I am nuts after dehydrating so many marshmallows.  Well, nothing new there!  lol   Second, marshmallows for sure take about 9 to 10 hours to dehydrate in a Magic Mill at 149 degrees.  Third, a six shelve Magic Mill will hold 2 bags (20 ounces) of marshmallows easily using mesh underneath.  And finally, the resulting dehydrated marshmallows can be vacuumed sealed in 7 pint jars... Well, more likely 7 1/2, but they were rolling everywhere, and I kept eating the stray ones!  ;) 

Onward to the 20 pounds of potatoes I just bought.  :)

Monday, October 17, 2022

Dehydrated Mini Marshmallows with Magic Mill

 Dehydrated mini marshmallows have been on my "to do" list for a while.  Why might you ask?  Well, I love hot chocolate.  (Not so much the store bought, but the kind made from the recipe found on my blog here.Marshmallows are so tempting to buy shopping.  Even more tempting during the holiday season when all brands can be found at rock bottom prices.  My problem lies in the inability to use them up fast enough.  They eventually get a funky color and start to stick together... even before the best buy date. :(    About a month ago, I came across prepper post regarding dehydrating marshmallows.  The prepper dehydrated them at 115 for over 10 hours.  Unfortunately, it didn't work for me.  Instead of wasting the partially dehydrated marshmallows, the Magic Mill got turned up to 151 degrees for 4 hours, and the marshmallows turned out nice and crunchy.  Not quite as sugary as Lucky Charms Cereal but having the same texture.  Score!

The dehydrated marshmallows do a slow melt in a steaming cup of hot chocolate.  Perfect for me!   I purchased three more bags of minis to dehydrate and put in pint ball jars and vacuum seal with my food saver for the possibility of long-term storage.  My Magic Mill with its 6 shelves can hold 2 bags of minis with little effort.  A third bag probably could've been squeezed in, but it was MIA when I started the set up...  So, it will go in the next round!  ;)  

The Magic Mill has been set for 151 degrees at 4 hours.  It was tempting to set it for 5 hours, but if four works, energy has been saved.  

Noteworthy:  The Magic Mill has a square grid on the shelves.  Quite a few of the minis found their way through during the loading process. Knowing that the minis will get slightly larger during the drying process, there is also the possibility of them wedging between the grids.  With this in mind, I decided to use my mesh and honey combed plastic covers on the shelves.  The marshmallows want to roll all over, but this extra effort is a necessary step.  

More tomorrow with the final outcome!  :)


Sunday, October 2, 2022

Dehydrating Sweet Corn with a Magic Mill Dehydrator

Preservation madness has been going on around our homestead as of late.  I have so much to share and am going back to the beginning to tell my adventures.  While finding various ways to preserve plums, the sweetcorn in our area was ripening.  A combination of great farming friends brought some of the best tasting corn into our home with open invitations to pick more.  How wonderful is that?  After eating sweet corn at dinner for two weeks straight and filling the freezer with small, portioned Food Saver bags, I decided to try my hand at dehydrating sweet corn.  From all of my studies, the dehydrated corn, stored properly, will last for years.  (Not that I intend on holding it that long.)  I was equally intrigued by some adventurous souls milling some of their corn and making corn bread.  You know that Mock Mill will be coming soon! ;)  

After eating and freezing the sweet corn gifted to us at each of our places of work from some awesome farmers, Mr. Hollow was kind enough to take up an offer to go pick at one of his friend's farm whose family had already harvested what they needed.  Once I started processing that haul, hubby's bosses' field ripened, and he was given the opportunity to pick even more.  (So many wonderful people to be surrounded by on a daily basis. We are truly blessed.)  Both of my fridges were constantly filled with corn on a rotating schedule.  lol   The dehydrating of the corn was a little bit easier for me to put together and was easy to manage after a full day at work.

First, shuck the first dozen or so ears of corn, get the smaller corn pot boiling with water, blanch the corn for approximately 8 minutes, and slice the kernels from the cobs.  I found working with the smaller pot allowed the first batch to cool before the second batch was blanched.  Then, I could begin the slicing with the first ears out of the pot, allowing the second batch to cool as it waited, and not hold up the assembly line of slicing.  **Additional note...  If you decide to blanch a larger batch and refrigerate, make sure you break up the slabs into individual (or close to it) kernels.  Once they are cold, it is a real bugger to try to pry the slabs apart.   Ask me how I know! ;) 


My Magic Mill dehydrator has six shelves.  It arrived with two plastic screens to aid in the dehydrating of smaller items.  I ordered some BPA free dehydrating mesh to cut and fit for the remaining four shelves.  After the corn kernels were broken from the slabs, the process of loading the trays lined with mesh began.  I didn't get to freaked out about individual kernels touching, but I did not mound the corn either.  Each level of the Magic Mill held approximately 2 medium ears of corn.  After researching the internet for temps and times, I found my corn took a bit longer to dry.  So, in case you are using a Magic Mill as well, it took my corn 11 hours at 131 degrees.  If you go shorter and it doesn't feel dry, just turn the dehydrator back on and give it a few more hours.  No worries.  You can't mess this step up!  


How do you know when it is done?  Give it a pinch.  If the kernels are as hard as candy, you are done.  They will break when you try to bend them and will have a non-tooth-breaking crunch when you chew them.  Yes, I did say chew it. lol  Actually, a nice flavor as well.  

Each level was left to sit in the dehydrator for a few hours to cool and produced slightly less than a cup full of dried corn.  I was very impressed with that!   The corn was moved into a gallon Ziploc where it remained until all the corn was processed.  Then, I took some clean pint jars, some used ball lids reheated in water, and tried out my Food Saver vacuum ball jar sealer.  And guess what?  It worked wonderfully!  Plus, it was another great way to keep using the spent jar lids!  :)   I was accidentally lucky enough to have purchased a Food Saver with the extension for one.  Our combined effort put 11 pints of dehydrated sweet corn on the shelf.  I couldn't be happier.  Plus, it was an effortless and non-taxing project for during the work week.  It will definitely be an annual event should the supply chain present itself again.


At the beginning of the week, I made some beef stew and almost forgot my stash of corn, since this was my first year attempting it.  It was added in the broth stage and took approximately 20 to 30 minutes to rehydrate as the stew simmered way beyond that.  The corn tasted and had the texture of having just been sliced off the cob.  Even my hubby was impressed!  Now that is saying something!!  Also, one extra bonus...  Opening a jar is like smelling fresh sweet corn in the middle of summer.  A definite pick-me-up on a chilly fall or winter day.  :)