Whimsical and Homespun Art Creations with a Little Rural Living Thrown In


Saturday, October 30, 2010

All Hallows Eve

My purple popcorn balls are ready...all 60 of them. My black cat with the glowing eyes (thanks to the camera flash!) is all set for her holiday.


As the Peanuts Gang await the arrival of the Great Pumpkin, I would like to wish you all a Safe and Happy Halloween!

Friday, October 29, 2010

Thrifty Friday Find ~ Floss Storage

This fabulous Friday find is a combination of two. These storage bins are plastic bolt and washer bins. My husband found them at our local hardware store. They were updating to a new display wall, and my hubby asked what the store was doing with the old bins. The owner had someone else interested in them, but they never came back to get them, so we got them all! I took a few of them to make a storage unit for my embroidery floss. The bins are five to a row, and each one can tip and lift out of its holder with ease. The rows interlock with the one above it and mount easily onto the wall. There were stickers on each of the bins describing the bolts and washers that were inside. I removed the stickers by soaking them with a layer of Goo Gone. They cleaned up like new!

The second part of this find is the contents. I love to pick up cheap embroidery kits that are reduced do to missing colors. It gives me a reason to personalize a project with my own color choices. So, I need to have individual colors of floss on hand to complete these projects, and it never hurts to have older colors, too. Floss is getting harder to find in stores without a long drive from where I live, and it is going up in price. So, what better to look for at garage sales? To be honest, I haven't been that successful in finding many skeins, but as you can see, my Mom knocked this one out of the park. She kept finding bags upon bags of floss and at a cheaper than cheap price! When my husband came home with the bins and asked if I could use a few, the light bulb went on, and my floss had a nice, neat, organized place to live!

Thursday, October 28, 2010

Freezing Butternut and Acorn Squash

Here are my butternut squash. I cut off the stem end, halved them, scooped out the seeds, and turned them upside down on a cookie sheet that was covered in aluminum foil and sprayed with cooking spray. I poured a half a cup of water around them and put them in an oven at 350 degrees. It took about 1 hour and 20 minutes when my fork could go throught the skin and flesh easily. This is what they looked like pulled out from the oven.


This is the finished product. I found that using an ice cream scoop was pretty effective in getting the flesh from the skin. I mashed the flesh and whipped it with a beater until it was smooth. I measured it into 2 cup servings, put it in a Ziploc freezer bag, squeezed out the air, and stuck it in the freezer. Finished!

Did you wonder if I tried any of this? The answer is yes. It was nothing like I thought it would be. Of course, there was no other flavors or sugar on it, so I could get a true assessment. It tasted like a sweet potato -minus the sweet with a touch of stewed pumpkin -minus the sweeteners. I can see why this squash has been used in so many recipes to fill in for pumpkin. The taste is so very similar. It will be interesting to experiment with in the kitchen!


Here are the acorn squash. To keep them nice and mashable, I cut them in half, scooped out the seeds, put the flesh side down (flipped them over for the pic to cool), poured a half a cup of water around them, and baked them at 375 degrees for about an hour on a cookie sheet that was lined in foil and sprayed with cooking spray. I must say, these were very small in size, so I think that is the reason for the quick baking time.

Just wanted to add~Some of these little gems had a very tough skin, so thanks to a tip from the Internet, I scored a line from stem to tip on both sides, where my cut would be, and microwaved for 1 1/2 minutes. It heated them up enough to make for an easier cut. A word of caution, they are hot when they come out of the microwave, so be careful!

Here is the cooked product. With the rind being so tough, it was a whole lot quicker to use the ice cream scoop. It went faster than the butternut. Then, I proceeded to mash and blend until smooth. (I read a tip that a blender will pull any stringy pieces out if you didn't get the squash scooped out correctly before baking.) One could also use a hand puree blender, but my squash seemed to do well with the regular hand mixer. I packed them the same as the butternut for freezing.

I tried the acorn, also. Quite a difference from the butternut. I can see why my friends like this particular squash. It is a lot sweeter than the butternut, and the taste is strongly similar to the sweet potato which shocked me, since I am a huge fan of them. Just an interesting side note~ I read in more than one article that the more orange color on the acorn squash the sweeter the taste. Hmmm. I will have to test that info next year. I am sure all of these veggies (and squash are considered fruits as well due to their seeds) will be in my garden.


Here are a few bags of my frozen squash getting transferred to the deep freeze. The camera does not do the beautiful colors justice. Like I said in an earlier post, I want to go 'greener' in my life and more natural. It's time to open the door to some new flavors!


How to Freeze Zucchini

Here is my produce haul from my local stand: 7 zucchini, 8 butternut squash, and 12 acorn squash. I threw in a snake gourd to round it out and drove away with $10.00 worth of produce. This is a new food to my home. Yes, you heard me right. In 42 years of life, I have never tried any of these three home grown foods. Can you believe that? Me, the lover of the pioneering spirit, forager of natural sources of food, the woman that nearly choked off her flower bed with an incorrect placement of spearmint, has turned her back on this popular veggie source all of these years. (Of course, I cannot account for the Gerber years of 1968-69.) So what was the final push to make me buy?? A simple trip to the post office.

You can learn a lot in a small town post office, and the lady who fills in for the post master is a wealth of farming knowledge. Oh and by the way, she has a local produce stand at her farm! I have had people in the past tell me the glories of eating squash and zucchini bread, but the clincher was when this kind lady told me that butternut squash could be made into a pie similar to pumpkin. I do love pumpkin pie! How could that be? I would have to give it a try. Then she informed me that she still had a few left for sale. How lucky is that? I ran out to her farm and bought all of her butternut squash for 50 cents a piece. Then I spied the zucchini in a crate, I took all she had at 25 cents a piece. I moved on to the acorn squash that has been praised by many of my friends. I bought those for 3 for $1.00. Not bad! Off I went on my merry way with my bounty.

Now I must say that I do can and freeze other fall veggies and fruits, so time and space is always limited at this time of year. The answer was to store these items for use in the future. After checking the Internet and questioning the locals, I picked the most popular way of storing each item. I also picked up some new recipes to use them in!

Maybe I should ask for a food processor for Christmas? LOL The zucchini's were very large. I chose to grate them for use in bread. After some research, there is debate over blanching and freezing or just straight freezing. The unanimous vote from the preservation pros around here is grate, pack in Ziploc bags, and freeze. I made sure to squeeze the air out of the bag and made a note that many of my favorite food preservation bloggers praise Food Savers for keeping items fresh. (Another item for the Christmas list!) I also froze them in 2 cup measures which seemed to be common in many zucchini bread recipes. With this task done, I look forward to trying my new recipes and sharing them when the harvest season slows down. :)

Tuesday, October 26, 2010

My Primitive Kitchen

Here is my kitchen. I finally have it organized for efficiency in my cooking endeavors or experiments! In the past, storing spices, flour, and sugar was a struggle. It seemed like I made too many trips to the pantry for supplies. I finally decided to get some use out of my vintage canning jars. It didn't take long to fill them up. So, out to the store I went for the little squat Ball jars on the shelf to store my yeast and other spices that are kept in smaller quantities. The large apothecary jars are so handy for sugar and flour. (They need to be filled soon, but I like to let them run down every once and a while.) People often ask if it is a problem having so much flour out at room temperature, but I make my own bread and bake a lot which uses it up pretty fast. The sugar takes a little longer to go down, but it keeps fine and bug free. I found two scoops (one green and one red handled) to go in them. One of my favorite things is the copper measuring cups that my son mounted for me on the wall. My Dad picked them up for scrap metal but brought them to me instead. How lucky is that? On the stove you can see the cast iron dutch oven that my Mom found at a garage sale. It is a size 9. I love the old cast iron to cook with. I cannot believe she stumbled on that treasure!

Here is a full view of my kitchen. I like having some of my older pieces up above the cupboards, but I tried to keep it simple for cleaning reasons. ;0)


The old fruit crates came in handy to give me some height which makes the walls seem not so tall and blank. The wall color lends itself to the orange side of the color wheel. It works well with the vintage pieces.

This piece was a gift from my son, who knows I love the more rustic primitive look. (hubby loves oak) Not only is it a nice stand to put my snack bowl and Hamilton Beach shake machine, but it tips out in front and holds my tall (concealed) garbage can. COOL! It is made from old barn boards and hinges that he salvaged. Even the handle is a salvaged piece. I just love the old wainscoting with its original white paint. I'd have my whole kitchen done like this if we ever build a new house. (Heaven knows my kid has enough boards stored up and then some!) This piece was a complete surprise, but after seeing his skill level, I have had him build some other pieces to store fabric.

My kitchen is finally a warm and inviting place, reflecting my love of the pioneering spirit. I might have a few small things to add in the future. For now, I look around and every piece has a memory for me on how it was found, and a story behind it on how it fit into history.

Sunday, October 24, 2010

Painting on an Ostrich Egg

I had a friend bring me two hollow ostrich eggs. They were enormous eggs that her grand kids use to take to show and tell, and with the kids grown, she was in possession of them again. My friend really did not want to display them in their natural state, so she came to me one day with the idea of having one painted with a fall scene and the other with a winter scene. Unfortunately, I forgot to take a pic of the winter scene. :( It was a Cardinal on a branch. But thankfully, I did remember to take a pic of the fall egg. The design is from Maxine Thomas of the "Country Primitives" series. This little scarecrow fit the egg perfectly, and the owner was thrilled with it. Initially, I was a little hesitant to take on the eggs, but they actually made for a very nice surface to paint on once they were primed.

This customer made me work on items that I would not have even considered painting on. (Although, I have enjoyed others ostrich creations.) It makes me happy to give 'cast out' items a new life. There is an art movement for renewing (or repurposing) many items that would, more than likely, end up in a landfill. I am happy to be a part of that movement and am looking to go even 'greener' in other areas of my life also. There is so many new projects that I am working on and will post on in the future. If only the days were longer!! ;0)

Friday, October 22, 2010

Thrifty Friday Finds ~ Old Milk Box

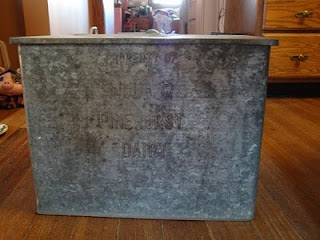
I stumble across some of the neatest finds at flea markets and garage sales (at least to me anyways!) , so I thought that I would do a blog on Fridays to share my treasures. Some of these finds will eventually end up for sale with my crafted items. Here is one of my favorite finds of this year... an old milk box. I have collected a few milk boxes with familiar names and locations, and ones without names to decorate. Now be honest, how many of you remember having one of these? I do, but for those of you who did not have the chance to witness this era, these were set outside the door for the milk man to put his deliveries in.


This particular one is 13 inches tall, 16 1/2 inches wide, and 11 1/2 inches deep. The largest box that I have ever seen. The box was provided by Muller Pinehurst Dairy for their customers. The name and size was what initially grabbed my attention, but the one detail that won me over was under the lid.


How cool is that? A customer could order: cottage cheese, milk, eggs, cream cheese, sour cream, orange juice, and butter. Okay, now it made sense why this box was so unusually large. A whole area of the grocery store dropped off at your front door, and it happens to be those fragile items that we rush to get home to the fridge. I marvel sometimes over the way that life use to be. **sigh** ;0)


Sunday, October 17, 2010

Painting a Bear on a Vintage Sled

I would like to begin this post with the confession that I am a flea market and garage sale addict :0) , and this post will show how I channelled this addiction to do good in my life...

I have found that both of the venues mentioned above are great sources for a variety of surfaces to paint on inexpensively (and with an earth friendly twist!) . I soon created a list of paint friendly items to hunt for and, along with the efforts of my parents, began to stockpile all kinds of inventory. At the same time, I was filling sketch books with roughs of original decorative ideas and began to collect books from various tole artists. I dreamed of the day when I would turn the items into 'recycled' collectibles. The only problem that I had was stopping long enough to put the plan into action. I am happy to announce, that with the creation of Pumpkin Hollow, my dreams are finally seeing the light of day. Yep... It's time to pick up the brushes! But where to start first? Hmmmmm...


SLEDS!! Cold weather is coming, and as you can see by the rafters in my garage, I could spare a few! I will try not to rant to much about my fascination with sleds (or vintage items in general). Okay, give me a little moment here...I can't help but think about all the different models and manufacturers over the years... Not to mention, all the generations of children that have enjoyed them... But what does one do with them when they have run out of use?? Well... give them the honor of being the decorative centerpiece throughout the season, of course!

For my first sled, I was excited to use a pattern from a favorite artist of mine, Shirley Wilson of Ladybug Art (see side bar). Her holiday art has that mystical nostalgic warmth that makes me feel like a little kid on Christmas morning. I armed myself with her book, enlarged and transferred the pattern, and created my own rendition of "Naughty or Nice". (I was never good at sticking to instructions!)


It may not be as expressionistic as Shirley's original, but I couldn't be more thrilled with the results!


I can't help but be reminded of a Chow Chow that I used to have when looking at it. (Her face resembled a teddy bear!)

I do really like this sled. It is hard not to become attached to a finished piece; even though, I know that I can make another. **sigh** The idea is to get enough pieces finished to make a new page of my blog or open an etsy store to sell the collectables that I create. So if there is an item that you are interested in, just email me at pumpkinhollowprimitives (at) hotmail (dot) com. I already have the next sled in progress, and a couple of gourds that would like to get dressed for the season!

Tuesday, October 12, 2010

Hope and The American Cancer Society

While looking through last weekends photos from the campground, I felt the need to do an individual post about a special event that they hosted for the weekend. As many of you know, the American Cancer Society hosts Relay for Life. Last year, the permanent campers took turns walking every hour. This year, there was a bake sale at the barn and The American Cancer Society donated "Hope is Greater" tshirts to be sold. All the money collected from both sales were donated to The American Cancer Society. I personally would like to thank those people who took the time to bake the wonderful items that we purchased last weekend and years past. We appreciated the opportunity to buy shirts for our family. This is a great cause with a lot of heroes working behind the scenes donating of their time, energy, and money. But most importantly, our thoughts and prayers are for those whose lives will be touched by this disease in the future, those who have survived this disease in the past, those who are currently battling to live through it, and for those we have lost along the way. It is a cause near and dear to many.


There was a brief prayer, a reading of names of those afflicted by the disease past and present, and a short speech by one of the attendees with her hopes that those afflicted will get a second chance as she did. Then, these balloons were released for those that we love, and those we will always love, with a reminder to remember that this is the month for Breast Cancer Awareness . Isn't that a beautiful representation of hope?


Now, we were ready for our walk.


I know this photo is a little dark, but I wanted to show this lane of the campground. It was a small segment that represents how all of the roads looked that night. They were all lit up with luminaries donated by The American Cancer Society. These luminaries bordered all of roads through the campgrounds. Some of the luminaries had names of donors on them, and all lit the way for a walk to remember, always...


HOPE... That says it all...

Monday, October 11, 2010

Fall Camping

One of the top ten things for my family to do in the fall is take a weekend and go camping. The chilly air, warm campfires, geese flying over, and fall colored leaves encompass the beauty and wonders of the season...

Oops! Maybe I should have checked with the weatherman first. We arrived at our destination Emerald Acres Campground on October 7 and departed on the 10 th. During our stay, the daytime temps hovered in the balmy (at least for this time of year in Illinois) mid 80's. Makes you want to pull that lawn chair a couple of feet more away from the campfire doesn't it? ;0) But don't worry, we had a fun time as always; even though, we were a little over dressed, and my husband managed to come down with a full blown cold on Friday. I swear there is nothing worse than a summer--ah,er--warm fall cold!


As for those flocks of geese majestically honking while flying over head... Who needs them? These big guys decided they would fill in for the weekend.


Apparently these turkeys did not want to share their campsite with me and my camera!


We were winners on the best part of fall-- the gorgeous display of leaves. We had a beautiful little maple at our site. It was shedding its leaves all weekend and was almost bare when we left. The colors were amazing everywhere!

Another bonus of a warm weekend was a trip to the barn on Saturday night for a banana split! Strawberry, pineapple, and chocolate toppings with coordinating ice cream (vanilla w/ the pineapple) wedged between two halves of banana, and topped with whipped cream, nuts, and a cherry. A Masterpiece!!

It certainly was a wonderful get away, but now I must get back to business. I need to get busy with the last remnants of food preserving, and there are boxes/barrels of gourds, shelves of flea market/garage sales finds, and cupboards/picnic baskets full of fabric that need to transform into special gifts. Isn't fall just the best time of year?!? :0)

Monday, October 4, 2010

About Me


Hello and welcome to Pumpkin Hollow Primitives! I hope you will enjoy visiting with me, and I look forward to welcoming new friends. My name is Brenda, and I grew up in a small town in Illinois. I left to live in the big city (at least to me) for three years, and then moved to an even smaller town (population 425) with my husband and son. Pumpkin Hollow Primitives was originally conceived to house my primitive tole work and has been expanded to include my passion for pioneering history, rural life, cooking/preserving food, and hand crafted hobbies. Oh, just a little bit of everything!

I love to paint on items that are purchased from flea markets and garage sales. I like the idea of recycling and giving them a new life, whether it is an old child's sled or worn out Christmas lights. The challenge is to find a design that works with that particular item. You will also see that I love dried gourds as a sculpting/painting surface. I began working with them last year and found them to be great fun! I use tole patterns from other artists but am currently playing around with some designs of my own. Most of these "one of a kind" items will be made available to purchase.  Oh... and my newest passion is quilting.  I am just starting to learn the ropes and hope to add fiber artist to my resume. ;)  If there is an item you would like to purchase, please feel free to email me ( pumpkinhollowprimitivesathotmail.com remove at and use @) or leave a comment with contact information.

This is my newest blog (I can also be found at http://sketchesfromthecupboardunderthestairs.blogspot.com/ ).  The essence of this blog will be built day by day and blog by blog. Hopefully, it will always be a work in progress and an evolution of ideas. There will always be room for one more friend, so if you are so inclined, I am always open to great advice, funny comments, or just a friend to say hello. So pull up a chair and have a visit-- feel free to check out a few of my favorite blogs, too!  :0)