Whimsical and Homespun Art Creations with a Little Rural Living Thrown In


Thursday, October 20, 2022

Follow Up: Dehydrated Mini Marshmallows in a Magic Mill Dehydrator

 Did you think I forgot to update my previous post? lol  I wish it was that simple.  No, I have been spending the last two days learning a few interesting facts regarding the dehydration of marshmallows... completely by accident. 

First, my guessing for processing the marshmallows was way off.  Waaaaay off!  In trying to double check this error, a trip to a local DG was necessary to purchase more marshmallows.  Instead of getting the store brand, they had Jet Puffed on sale.  So, two bags were thrown into my cart with hopes of pinning a correct dehydrating time down.  All internet info suggests dehydrating at 151 degrees.  The Magic Mill has 149 or 159 degrees.  I have been going with the closest at 149 degrees.  Knowing this would throw off the time, the suggested time of 3 to 5 hours probably wasn't going to hold true for my minis.  Which is fine.  Interestingly enough, mine keep coming in at 9 to 10 hours.  I wish I could tell you the second run confirmed my results to 9 or 10, but an interesting issue arose to keep me from pinpointing an exact time.  Either way, my earlier guess was wrong.  Although I can unequivocally say this, 9 to 10 hours works for my Magic Mill.  Honestly, I would try another around, but my house is overfilled with these crunchy puff balls right now.  lol  

This brings me to my second discovery; A fine wine may get better with age... not so with a sugary marshmallow.  My observant spidey senses were taking a brake during my shopping excursion.  The sale was a "two for", and I grabbed two bags only looking at the top bag.  Ugh!  When I got home, the first bag had bouncy marshmallows.  The second bag had sticky, going yellow marshmallows.  In fairness to the DG, the best buy date was October of 2022, but I am here to attest... They were past their prime.  I loaded the dehydrator anyways, after physically pulling most of the marshmallows apart in the second bag.   The dehydrator was loaded with 20 ounces (2 bags).  My time test was ruined by spot checking marshmallows from the bottom three shelves.  The shelves which held the October marshmallows.  Their decomposing state (I was soon to find out. Insert smacking of forehead.)  threw off any possibility of dehydrating properly.    At any rate, I kept extending the time, got tired (for real, it was after my bedtime... lol), and on the last round jumped 2 1/2 hours making the full dehydrating time 10 hours total.  In the morning, I awakened to the process being complete...   But now, let me show you the finished marshmallows...

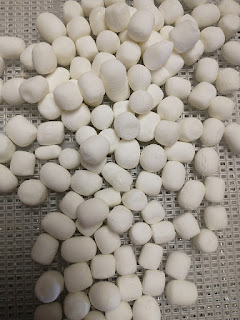
Exhibit A:  Look at the fresh marshmallows once finished.  They literally burst with crunchy exploding flavor.  Seriously, if you're on a diet, a few of these would calm any sugary craving.   Look at their dusky yet puffy exterior... Dehydrated perfection!


Exhibit B:  (Brace yourself) It was hard to get the right angle on these, but this is what the others turned out like.  They had a glassy, wavy, bubbly exterior.  I am assuming was caused by the sugar becoming more hydrated in the breaking down process.  Am I picky about outward appearances?  Absolutely not.  The problem came when they were bit into.  Slightly underdone crunchy turning into major teeth sticking chewy.  Nasty!  They tasted like old marshmallows.  Not all of marshmallows on the three bottom trays were bad.  Those handful of marshmallows in the bag which had still retained a soft powdery exterior were perfect.  So please, learn from my purchase, watch the dates and make sure you shake the bags you buy.  Loose, powdery dull, white marshmallows are the ones to dehydrate.  Just because the date is within selling fresh doesn't mean the product is viable.   It is a taste test you don't want to endure... Trust me!  Blaaaah...


So, what have I learned from this experiment?  First, my hubby thinks I am nuts after dehydrating so many marshmallows.  Well, nothing new there!  lol   Second, marshmallows for sure take about 9 to 10 hours to dehydrate in a Magic Mill at 149 degrees.  Third, a six shelve Magic Mill will hold 2 bags (20 ounces) of marshmallows easily using mesh underneath.  And finally, the resulting dehydrated marshmallows can be vacuumed sealed in 7 pint jars... Well, more likely 7 1/2, but they were rolling everywhere, and I kept eating the stray ones!  ;) 

Onward to the 20 pounds of potatoes I just bought.  :)

Monday, October 17, 2022

Dehydrated Mini Marshmallows with Magic Mill

 Dehydrated mini marshmallows have been on my "to do" list for a while.  Why might you ask?  Well, I love hot chocolate.  (Not so much the store bought, but the kind made from the recipe found on my blog here.Marshmallows are so tempting to buy shopping.  Even more tempting during the holiday season when all brands can be found at rock bottom prices.  My problem lies in the inability to use them up fast enough.  They eventually get a funky color and start to stick together... even before the best buy date. :(    About a month ago, I came across prepper post regarding dehydrating marshmallows.  The prepper dehydrated them at 115 for over 10 hours.  Unfortunately, it didn't work for me.  Instead of wasting the partially dehydrated marshmallows, the Magic Mill got turned up to 151 degrees for 4 hours, and the marshmallows turned out nice and crunchy.  Not quite as sugary as Lucky Charms Cereal but having the same texture.  Score!

The dehydrated marshmallows do a slow melt in a steaming cup of hot chocolate.  Perfect for me!   I purchased three more bags of minis to dehydrate and put in pint ball jars and vacuum seal with my food saver for the possibility of long-term storage.  My Magic Mill with its 6 shelves can hold 2 bags of minis with little effort.  A third bag probably could've been squeezed in, but it was MIA when I started the set up...  So, it will go in the next round!  ;)  

The Magic Mill has been set for 151 degrees at 4 hours.  It was tempting to set it for 5 hours, but if four works, energy has been saved.  

Noteworthy:  The Magic Mill has a square grid on the shelves.  Quite a few of the minis found their way through during the loading process. Knowing that the minis will get slightly larger during the drying process, there is also the possibility of them wedging between the grids.  With this in mind, I decided to use my mesh and honey combed plastic covers on the shelves.  The marshmallows want to roll all over, but this extra effort is a necessary step.  

More tomorrow with the final outcome!  :)


Sunday, October 2, 2022

Dehydrating Sweet Corn with a Magic Mill Dehydrator

Preservation madness has been going on around our homestead as of late.  I have so much to share and am going back to the beginning to tell my adventures.  While finding various ways to preserve plums, the sweetcorn in our area was ripening.  A combination of great farming friends brought some of the best tasting corn into our home with open invitations to pick more.  How wonderful is that?  After eating sweet corn at dinner for two weeks straight and filling the freezer with small, portioned Food Saver bags, I decided to try my hand at dehydrating sweet corn.  From all of my studies, the dehydrated corn, stored properly, will last for years.  (Not that I intend on holding it that long.)  I was equally intrigued by some adventurous souls milling some of their corn and making corn bread.  You know that Mock Mill will be coming soon! ;)  

After eating and freezing the sweet corn gifted to us at each of our places of work from some awesome farmers, Mr. Hollow was kind enough to take up an offer to go pick at one of his friend's farm whose family had already harvested what they needed.  Once I started processing that haul, hubby's bosses' field ripened, and he was given the opportunity to pick even more.  (So many wonderful people to be surrounded by on a daily basis. We are truly blessed.)  Both of my fridges were constantly filled with corn on a rotating schedule.  lol   The dehydrating of the corn was a little bit easier for me to put together and was easy to manage after a full day at work.

First, shuck the first dozen or so ears of corn, get the smaller corn pot boiling with water, blanch the corn for approximately 8 minutes, and slice the kernels from the cobs.  I found working with the smaller pot allowed the first batch to cool before the second batch was blanched.  Then, I could begin the slicing with the first ears out of the pot, allowing the second batch to cool as it waited, and not hold up the assembly line of slicing.  **Additional note...  If you decide to blanch a larger batch and refrigerate, make sure you break up the slabs into individual (or close to it) kernels.  Once they are cold, it is a real bugger to try to pry the slabs apart.   Ask me how I know! ;) 


My Magic Mill dehydrator has six shelves.  It arrived with two plastic screens to aid in the dehydrating of smaller items.  I ordered some BPA free dehydrating mesh to cut and fit for the remaining four shelves.  After the corn kernels were broken from the slabs, the process of loading the trays lined with mesh began.  I didn't get to freaked out about individual kernels touching, but I did not mound the corn either.  Each level of the Magic Mill held approximately 2 medium ears of corn.  After researching the internet for temps and times, I found my corn took a bit longer to dry.  So, in case you are using a Magic Mill as well, it took my corn 11 hours at 131 degrees.  If you go shorter and it doesn't feel dry, just turn the dehydrator back on and give it a few more hours.  No worries.  You can't mess this step up!  


How do you know when it is done?  Give it a pinch.  If the kernels are as hard as candy, you are done.  They will break when you try to bend them and will have a non-tooth-breaking crunch when you chew them.  Yes, I did say chew it. lol  Actually, a nice flavor as well.  

Each level was left to sit in the dehydrator for a few hours to cool and produced slightly less than a cup full of dried corn.  I was very impressed with that!   The corn was moved into a gallon Ziploc where it remained until all the corn was processed.  Then, I took some clean pint jars, some used ball lids reheated in water, and tried out my Food Saver vacuum ball jar sealer.  And guess what?  It worked wonderfully!  Plus, it was another great way to keep using the spent jar lids!  :)   I was accidentally lucky enough to have purchased a Food Saver with the extension for one.  Our combined effort put 11 pints of dehydrated sweet corn on the shelf.  I couldn't be happier.  Plus, it was an effortless and non-taxing project for during the work week.  It will definitely be an annual event should the supply chain present itself again.


At the beginning of the week, I made some beef stew and almost forgot my stash of corn, since this was my first year attempting it.  It was added in the broth stage and took approximately 20 to 30 minutes to rehydrate as the stew simmered way beyond that.  The corn tasted and had the texture of having just been sliced off the cob.  Even my hubby was impressed!  Now that is saying something!!  Also, one extra bonus...  Opening a jar is like smelling fresh sweet corn in the middle of summer.  A definite pick-me-up on a chilly fall or winter day.  :) 

Saturday, September 3, 2022

Preservation of Plums

When I was growing up, my Dad loved his fruit trees.  Unfortunately, the trees never produced as much fruit or as healthy of fruit as he had hoped for.  It certainly didn't stop him from finding sources and bringing home loads of fresh fruits for us to enjoy.  Probably one of the main reasons I have to go to the apple orchards in the fall.  ;)   He often told the story of how my Grandma sent my Dad and his siblings to pick apples at a neighbor's house.  Even though the neighbor wasn't going to use the apples himself, my Grandma insisted on sending over fifty cents for the right to harvest the apples.  That was a long time ago...  I grew up to live in a very small rural town and work in the middle of the town I live in.  There are so many kind people with farms who extend the kindness of harvesting apples off their trees.  I guess those ideals are still alive and well in certain areas of America. And hey, those apples make the best pies, cobbler, and sauce!  :) 

My son and his wife purchased a small farm with two elderly apple trees.  In a good year, the number of apples can be overwhelming.  The fruit trees are definitely happy.  So, my son decided to plant some more trees... a pear, another apple, and a plum tree.  The pear is doing amazing, is doubling its production from last year, and the fruit should be ready to pick soon.  The apple hasn't produced yet but is steadily growing.  The plum tree decided this year was the year to have a crazy harvest.  It is a tiny tree barely taller than me, but it produced a 5-gallon pail and a half of produce.  If I could bottle the smell of those plums, the fragrance would knock your socks off!  Just splendidly plummy!!

It warms my heart for the kids to be expanding their farm in a self-sustaining way.  Since both of them were busy this year, I offered to help preserve the fruit.  Not gonna lie... It was a bigger production than I thought, but all went smoothly.

The first weigh in was for the jam... This kid doesn't mess with jelly.  lol  The grand total was 24 of the fruit jars and 10 pint jars.  If you haven't had plum jam, you are really missing out on a unique flavor.  It does sound like a lot until you start thinking of all the possibilities...  My daughter in law makes homemade ice cream.  Can you imagine a vanilla plum swirl?  I sure can!


With the jam numbers being pretty high, I moved on to dehydrating.  This used up 62 more plums.  


Dehydrating was a new experiment.  I rather liked the tart yet sweet product and found some recipes using rehydrated plums.   Dehydration definitely has possibilities.


My grandson has been doing his share of eating right off the tree.  After sampling one of the plums myself, I cannot blame him. ;)  My son and I pulled a few of the firm plums out for him to munch on in the coming weeks, and the remaining over ripe plums were turned into syrup.  Instead of straining the boiled plums, I used an emulsion blender and gave the syrup some texture.  Wow!  Even better than the jam in my opinion.


With the plums done for the year, the apples have started to fall from one of the older trees.  Although some will become animal feed, there were plenty for me to harvest.  Most were bigger than my hand and in great shape. :)  Not sure if they will become pies or sauce yet.  Which reminds me, I need to go back out tomorrow to scour for some more.  Most of the tree hasn't ripened yet.  I suspect these are falling from the very top.  And I'm hoping to get ahead of the huge harvest and not get taken off guard like with the plums. lol  What a blessing these trees are.  My Dad is watching their success... I am sure.   Now the kids have added grapes and blueberries to their fruit grove.   Wonderful times to come. :)

Monday, August 29, 2022

Thrifty Find Vintage Sunbeam Iron

Every once in a while, a special piece speaks to you.  This is one of those items.  Vintage irons are always a beautiful piece of nostalgia for sewing rooms.  Years ago, I purchased several at a single sale.  Due to space concerns, I sold most of them off and vowed to not get lured into purchasing an iron ever again... with this one exception:   The Sunbeam Electric Iron with trivet in its original case sitting on the shelf at the local thrift store.  Too cool to pass up!


Quite the fancy unit in its day.   Makes me wonder who in the 1920's or 30's decided to make this purchase.  How much did they spend?  Were they excited as I was to receive it into their home?  Well-chosen curiosities are the best things to surround oneself with.  They can inspire and ignite the imagination while giving a sense of warmth from those that came before us.  At least, it does for this artist. :)


Friday, August 19, 2022

127 Yard Sale Kentucky and Tennessee

The 127 Yard Sale was always our "go to" summer vacation for over 12 years.  It has been 5 years, since we have driven and taken in the lovely scenery of Kentucky and Tennesse.  A few years, we have even completed the trek through Georgia and Alabama.  After a great deal of procrastination, we booked some reservations and set off to see how the sales have changed.  In Tennessee, the sale sites changed slightly with some popping up in new locations.  Kentucky was a little more sparce but still had some areas well worth visiting.  In one of these sites in Kentucky, we found this vintage Baby Brother child's sewing machine.  It is exceptional shape for its age, and I am looking forward to shining her up.  :)  


There are some splotches of paint on the platform and a coating of dust to remove.  Although dust never shows well, it does a decent job of protecting surfaces over the years if its dry.


 Not gonna lie, I went into the trip a little stressed and wore myself out cleaning my basement.  Nesting is one of the faults I have.  Interesting fact, July had 5 weeks in it.  Mistakenly, my brain had me cleaning weeks ahead of the trip, instead of my usual week before. lol  Instead of taking a break, I pushed myself to finish the job I started.  Took a few trips to the local thrift store prior to the trip to donate and left on the adventure with a clear mind of not only what I had, but also, what I needed to sell off in the future and a list of items to search for to complete some projects.  My only apprehension was taking our Mini Cooper Countryman instead of the truck.  Not that I usually buy anything huge, but you never know!  ;) 

One of the items on my "lookout" list was wooden spools.  Not for the beautiful spools themselves, but for the thread held on them.  Most of these contain wool thread.  If you search through for the fat ones, they contain quite a bit of wool thread.  Saves loads of money!  Not as strong as some threads for stitching but will look lovely on recycled wool candle mats and penny rugs.  The gentlemen, who was selling these, was the same person and site where I purchased them 5 years ago!  lol   I am going to do some wool testing on a few of the spools.  There were a few that didn't have that special feel to them.  Still some lovely thread, but I try to stick to the wool ones, unless they fooled me and test otherwise.  

In the past, I have found a wider range of colors.  Great for a little pizzaz, but I was happy to add the more subdued colors from this trip.  Plus, he had some great earth tones which could be over dyed nicely.


The gentlemen who sold the Baby Brother threw in the Singer stitch cams.  Although I currently do not have a machine for them, they might come in handy in the future should the machine enter the herd or will be good for trading.  Also, as luck would have it, these attachments, vintage needles, and book for a Pfaff 130-6 were put out for free. How terrific is that?  I love my Pfaff.  Any opportunity to acquire original attachments and bobbins is a wonderful day.  To find them for free...  Simply awesome!  In the bag for the Pfaff parts, there were also vintage huge, curved needles used in sewing farm bags and leather items.   

At one of the stops, my eye spied a Singer Featherweight.  Surprisingly, the seller was asking $300.00.   It had its box and attachments.  I refrained and wince in writing this.  She probably would have come down a bit, but I have a few Featherweights.  My Hubby was a little disappointed when I left it behind to become someone else's treasure.  Now, that is why I clean prior to leaving.  I look at items in a different light.  Sewing machines can add up and overtake space quickly.  Plus, I have a Vintage GE, which was the precursor to the Featherweight, arriving soon to join the herd.  ;)   With the addition of a few vintage Playskool puzzes and random kitchen items, it was a nice round thoughtful haul.  Once I part with a few things, my want list will grow.  It was just lovely to be back on the road again! :)

Wednesday, August 17, 2022

Mockmill 100 for Grinding Grain

 Time to get busy and embrace a healthier future grinding my own grain with the Mockmill 100!  

If some of my old pals are still out there (and for those who are just meeting me), you all know how I love to cook, bake, and create.  As with everyone else, the past few years have had their ups and for me one extreme down.  Now it is time to move forward.   I'm ready to shake up my world.  One big part of my shake up is to get healthier with my food.  Even though I still cook and eat mainly at home, I have gotten away from all of the great stuff on this blog and have fallen into being a quick meal cook.  Some quick meals aren't so bad... others are not only unhealthy but expensive.  I'm shaking my life up!  Step 1 make a decision... Any decision that gets me motivated and inspires me to action.   One of my big decisions brewing over the past 3 weeks was to get a better grip on the flour that I use.  My prepping nature has my freezers full of flour.  Not completely a bad thing... Just a little annoying at harvest time, when the veggies start rolling in.  (I have some ideas for those as well! ;) )   In my quest to find a more space friendly, longer-term storage for my flour, I came across several articles and videos on wheat berries and milling flour at home.   Sounds interesting, right? ;)   

Are you aware properly prepped wheat berries can be stored up to 25 years +?  Also, there is NO freezer required.  Mind blowing, right?  How about the fact that I can grind my flour on a need basis?  Awesome!  Throw in a list of grains that can be ground... some going back to ancient time...  My mind is blowing up with huge ideas.  Aaaaaaghhh!

My decision... get a grain mill.   There are many out there let me tell you.  Hand operated or electric, prices are all over the place, and loads of friendly people who will offer lots of opinions on the topic.  The last few weeks have been research heaven.  Just an amazing experience in learning.  My decision was to go electric (contemplating a backup hand operated later for emergencies), finding a mid-range price, and taking in all the advice from my prepping friends and YouTube testers.  Of course, add a little procrasting as well followed by a quick text to my Sister to have her tell me to just DO IT!  I always can count on her to give a nudge, shove, or kick to the rear.  lol  

Which leads me to Step 2...  Acquisition of important instruments to complete a mission.  I did it.  I bought a mill.  A Mockmill 100 that works with a grinding stone set up.  Yep, I took a deep breath and dove in.  And Guess what?  It is on back order.  Waah waah waaaaah...   But seriously, that's okay! ;)   The delay is being looked at in a positive way.  It will give me plenty of time to study all about grains, blending, and just plain understanding the whole process from start to finish.  Plus, I can decide which grains to purchase, acquire some food grade storage buckets to house them, and allocate an area for them to reside.  Always good to be prepared!  

So, Step 3... Take action will have to wait on this particular adventure until October.  Although, I feel all my research will be the foundation of and for the final step.  Definitely required for success.  I am so excited!  This post is getting long, so I will save some sites and information for another day. ;)  Since mine will be a bit into the future to photograph, below is a photo from the Mockmill site.  It will be shipping from Breadtopia.  :)  

Now, I am off to look at some grain!  :)