Last year seemed to fly by. Without actually realizing it, some great changes were happening to me. I know what your thinking... Okay Brenda, how could you not realize it? Well, with the new job having kicked off at the end of April, my best guess is that I was too caught up in the now of learning new tasks. I was truly a "fish-out-of-water" going from a job based in art to a job based in computers and finance. Yikes! But, I was fortunate enough to be blessed with a knowledgeable mentor, making a world of difference to the new beginning. My new job marked the first positive change in my life for 2012, it put all my money making responsibilities into ONE scheduled time frame. Months after being hired, I felt a burden being lifted from my shoulders... Then came the ripple effect...
As I became more comfortable in my position and extra hours took money woes away from me, I found myself turning away from hobbies and interests. Was this some kind of burn out? No, it is my belief that I was on the precipice of a great change in my life...
The Great Epiphany... ;) I think part of what makes an Epiphany so great is that they arrive to you at the darnedest times and are so mine blowing in their simplicity. You know, that "Wow... I could have had a V8 moment". One warm summer day while mowing, my mind was mulling over the various craft projects in my head, when suddenly I thought, "Why am I sticking with projects that I am so utterly tired of? (To be brutally honest, the necessity for deriving an income from them has now been removed from the equation.) So, why am I putting myself through completing tasks that I feel are becoming a burden or heaven forbid a bad job?" (Hmmm... interesting thoughts that spanned over that half of an hour.) Then came the new realization... The epiphany that I had been waiting for... " I no longer need to stick with popular crafts or side jobs for monetary survival... I am free to explore any idea that enters my head, to create any craft, to delve into the great realm of learning without being pulled out by other responsibilities that cut drastically into my free time. And even better yet, I do not have to feel guilty about following my true dreams." And let me tell you, I have notebooks filled with ideas from over the years of various topics that I would love to dive deeper into. This brings me to the second positive change in 2012...
The Guide... Not long after my epiphany, Etsy ran an interesting story on multi tasking personalities. The term Multipotentialites was the name for persons that in essence are drawn to study a wide range of subjects, wants to explore all their interests at once, are multi-tasking in nature, and feel the pressure of time to master all the subjects that they love. It described me and my "running in all directions" life! The article couldn't have come at a better time to help me manage my after work hours and led me to the coiner of the personality's name, Emily at Puttylike. It was there that I learned that I did not have some crazy form of ADD, just a different way of viewing the world. I learned a lot about myself on that site and was directed towards the books of Barbara Sher, who is one of the leading authorities on this personality type. Her books "Wishcraft", "Refuse to Choose", and "I Could Do Anything, If Only I Knew What It Was" opened my eyes to a more organized way of living with my personality. Which, I am sure was a relief to Mr. Hollow and FarmerBoy, too. ;)
The Work in Progress... The end of the year was devoted to organizing my mind and house, discovering my true interests (no matter how many there may be), and finding the surprisingly few overarching passions that link them together to fit them into my life. Although I am not done completely with these tasks, the end of 2012 saw my life heading in the right direction. My excitement for the New Year was something that I hadn't felt so strongly about in a long time.
As the ground breaking part of my journey continues, my creativity is renewed and my sense of exploration is stronger than ever. The Hollow will see some new crafts, recipes, organizing tips, along with new finds, and adventures. I am so happy with the twists and turns of 2012 and look forward with excitement to sharing with my friends at The Hollow in 2013!

Thursday, January 10, 2013

Friday, January 4, 2013
Copper Gifts Huge Gingerbread Man Cookie Cutter
Happy New Year! Instead of starting off with a traditional New Year's post, I decided to share one of my Christmas presents with you. Leading up to this purchase... I had a phone conversation with my Sister a few weeks before the Holiday, and we had a discussion about how sometimes you just have to buy a gift for the holidays that is something crazy... something that you simply just want to have. So parting with my practical ways, I purchased for myself a Huge Gingerbread Man cookie cutter from Copper Gifts. When I saw this huge ginger featured on the Food Channel a few years ago, my wish was to some day add it to my cookie cutter collection. I am happy to say that it was my most frivolous and favorite gift of the season!
**Note** Raymond and Beth Braman (owners of Copper Gifts) make some of the most gorgeous copper cookie cutters in their Kansas based business. The copper creations range from mini cutters all the way up to the enormous sized Gingerbread Man! The enormous size ginger is over 20 inches tall... That is one BIG cookie! :) Although I was in awe of their latest enormous creation, my mind was set on a "cookie sheet manageable" Huge Gingerbread Man that measures 14.5 x 10 inches.
A week before Christmas my present arrived. It was such a thrill to hold this beautiful cookie cutter. Look at how they wrapped it! It came with a shimmering red bow, laminated recipe card, and to gather his bag... a lovely tied ribbon with their company name printed on it. Very festive! :)

I had Farmer Girl hold onto him to give you a little perspective on the size of this big guy. Copper Gifts shaped him out of a 2 inch wide band of copper. He is sturdy! On his handle, the company hammered their logo into the copper. The quality of work on this cutter is amazing. I couldn't be more thrilled!

I was so busy with last minute preparations that I forgot to take pics of the baking process. So, this pic was hastily snapped at my family's Christmas gathering. As you can see, my nieces already had begun to devour his right leg! ;)

If you would like to spend some time browsing the Copper Gifts Website, it can be found here. As you all know, I love handcrafted items and am in awe of the talented Artisans that practice their crafts. I hope to keep discovering new people and purchasing their works of art. I am so glad that I have my friends here at the Hollow to share my wonderful discoveries with. My sincerest wish is that we all be blessed with a joy filled year... WELCOME 2013!! :)
Tuesday, December 25, 2012

Tuesday, December 18, 2012
Hammond's Candies Candy Canes ~ Made In America!
After watching Hammond's Candies in Denver, Colorado handcraft their fine hard candies on the Food Network, it has been a dream of mine to have some of their creations in our stockings for the holidays. The way they start with a HUGE piece of striped sugar and work it down to a hand sized or bite sized candy is such a wondrous marvel, matching the skills of even Mr. Willy Wonka! ;) I am happy to say, that after bullying Mr. Hollow into doing a little frivolous shopping on Sunday, I found these... Hammond's Candies very own Candy Canes!!
The candy canes are sooo much more beautiful in person. It was the eye catching colors of the canes in the display at the Monroe, Shopko store caught my eye. I have NEVER seen such wonderful striping, and the canes are longer than my hand and as big around as my thumb. I wish that there had been a sign with Hammond's name above them, but there wasn't. :( The craftsmanship of the candy was what drew me in. I had already decided on first site that they were going into our stockings. Imagine my surprise, as I drew the first cane out of one of the various pails and saw the Hammond's Candies tag. They are truly a work of art, and I look forward to tasting them. Next year, I will definitely order some of their other candies at their online store here. And to make things even sweeter, their tag reads... Handmade in the USA! :)

Thursday, December 13, 2012
Large Hershey Bar Snowman (4.4 oz.) ~ A Quick Christmas Gifting How To
If you find yourself in a pinch, artist Laurie Furnell has offered a FREE Christmas print out (made possible by Aimee Asher Boutique) to create a festive holiday snowman from a large or regular sized Hershey bar. I had read about this darling snowman a few months ago, and he has taken center stage in my house with the Christmas holiday right around the corner. They will come in handy at work where we do a small gift exchange. I love the idea of a little holiday stitching, some quick-time crafting, and being able to give the gift of CHOCOLATE. Who wouldn't appreciate that! PLUS... It gives me an excuse to use some of that 1.00 a yard fleece that I purchased from the JoAnn Fabrics' Black Friday Sale a few years back. ;)

I started by going to Laurie Furnell's free snowman download here. (You will have to register but will not be charged at check out.) There is a print out for her rules, the finished product, print out for a regular size Hershey bar, and a print out for an 8 oz. bar. I choose the 8 oz bar design and printed it to fit on a regular sheet of paper, which was perfect for a 4.7 oz. large Hershey bar. Then, I began to sift through my stash of fleece and construct a pattern for my festive goodies. :)

I know it is a little hard to see in the picture, but you will need to cut down the paper to the right of the design and on the bottom line. Then, tape the seal flap on the bottom of the Hershey bar wrapper to the front of the candy. This will keep it hidden from view.

I find that Hershey was pretty accurate with my batch of bars. Once I flipped the print to the back side, the Hershey bar could be placed front side down on the paper. The right side of the paper could be placed over the back of the bar and lined up on the brown line above the final vitamin line, and the snowman's face would be nicely centered on the reverse side. After using three pieces of tape to secure the right side, the left side was placed over it... three more pieces of tape and onward to the stitching part of the project. Yeah!!

If you are like me and would like a snugger fit to your stocking hat, cut a piece of fleece approximately 7 3/4 inches square. On my paper pattern, there is a dotted line 1 1/4 inches down from the top of the pattern to aid me in marking the fringe for the pom pom top.

On the reverse side of the folded fleece, make the line for the fringe. (A Sharpie marker works great for this.) While the fleece is still out, a strip can be cut 1 1/4 inches wide and approximately 17 1/2 inches long for a matching scarf. (This will leave you a little excess for adjustments after placement.)
Working on the reverse side of the fleece, a simple overcast stitch can be used from the bottom up to the tassel line. Tie off the thread and the bottom of the hat is finished. With scissors in hand, cut the fleece in approximately 1/4 inch increments from the top of the fleece to the tassel line, creating the fringe for the pom pom. Now turn the hat right side out. Starting at the center seam, use a gathering stitch under the fringe and pull tight. I like to wrap the thread one more time around the fringe line, pull tight, and tie off. This will create a darling little pom pom. Folding from the bottom of the hat, there will be enough fleece to fold twice. Now it is time to dress the snowman!!

Aren't they darling?? I cannot wait to dive into the others! All together, there will be 10 snowmen here at The Hollow. And who knows... Maybe some more to follow. ;) I even have some really funky tie dyed fleece that will fit my Manager's personality perfectly. This project has peaked my creative senses and has immersed me in the holiday spirit. It is such a blast!
As you can see by the photo, one of my co workers is a marksman (He is also the only rooster in our hen house!), so the camo fleece came in handy. The candy cane stripe is perfect for a wonderfully Christmasy decoration. And for my fellow co-worker that makes me laugh with stories of her mischeivious pooch, a red hat and scarf adorned with doggy prints. :)
It makes me laugh to think that I almost got rid of some of my fleece last summer! I cannot wait to do some more of these little snowmen... I am sooo hooked. Think of the possibilities. Hmmm... Mismatched hat and scarves... Felted wool hat and scarves... Even different kinds of candy bars. The options are limitless.

A HUGE Thank-you to Laurie Furnell for such a charming printable design. And for those that decide to take advantage of this freebie, the design will be available to you for 7 days or 5 clicks. This would be such an inexpensive gift for kids to create for friends and teachers, too! If you have a little time on your hands, check out Aimee Asher's website. It really is an inspiring place to visit. Happy Holidays to All!!
Sunday, November 18, 2012
How to Bake a Whole Sugar Pumpkin to Process and Freeze
While Farmerboy was shopping for his Halloween pumpkins to carve, he brought home three sugar (or commonly tagged "pumpkin pie") pumpkins. Why? Who knows... Apparently, he felt that his mother would like to take on the challenge of making her own pumpkin puree from scratch. UGH!! My mind was filled with the idea of cutting the tough rinds, scraping out the seeds, cubing and cooking the remaining pumpkin. The end result would probably be me with a soupy mess! :(
I was telling my Mom about my troubles one afternoon, when she mentioned having seen a program on TV that processed the pumpkins by baking them whole. What? I am not going to lie here... My mind was filled with exploding pumpkins and seedy guts hanging all over my oven. I could tell later that evening that Mr. Hollow's thinking wasn't much different. But, after a little research that surprisingly brought few results, my mind was made up to take a stab at this short cut. Armed with very little knowledge (and after waiting for Mr. Hollow to leave for work), the little pumpkins went into the oven. This is how I prepared and baked them:
All three pumpkins were washed and dried. They were rubbed all over with a paper towel-- moistened in olive oil. I took a pointed steak knife and pierced the rind all over (was hoping this would deter any explosions!). They were then set directly on the oven rack with a cookie sheet on the rack immediately below them to catch any run off. Next, I turned the oven on 400 degrees and let them bake for about an hour. They were checked by pushing a knife through the pumpkin and into the flesh. The rind and flesh were soft, so I knew that they were finished baking. The picture below is how they looked after removal from the oven.

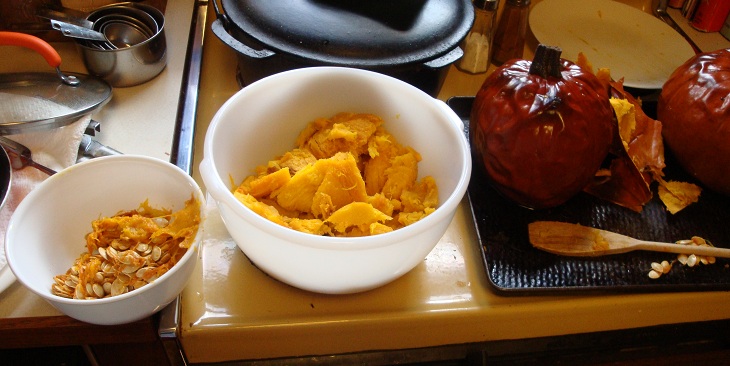
My Braun hand held processor turned the pumpkin flesh into a smooth puree. Three pumpkins yielded 5 containers of pumpkin puree at 2 cups each. Four of the containers are now in the deep freeze. Not a bad haul for an afternoon of experimenting! :)
The next test was to make a pie. I noticed that the pumpkin did seem a little runnier in the mixing stage... And the pie did bake a little longer than my pies made with canned pumpkin... But I am happy to say that it tasted absolutely perfect!
Did I ever tell you that my all time favorite dessert is Pumpkin Pie? I don't even need Cool Whip to enjoy it! :)

I do not know if planting, harvesting and processing pumpkins on a larger scale is in my future, but the idea is certainly more tempting with this method! :)
Saturday, November 3, 2012
Thrifty Find ~ Singer 99k Sewing Machine
Monday was a great day to take off for the local thrift store to drop off a few boxes and bags of goods that needed to find a new home. It always makes me feel better to lighten the load! :) I browsed around the store to check out the wool sweaters and was thrilled to find one with some gorgeous pastel stripes. Then, I happened upon some dress slacks for work... Double Score!! How much more could a girl ask for? So, my next stop was the check out counter. One of the ladies standing in the vicinity suggested that I lay down my items and take a look up front. My eye spied some farm toys in the distance, so I made a beeline to them and noticed that they were not vintage... :( Feeling as though my luck filled hunt was over, I headed back down the isle to the counter. One parting glance to the front ledge of the store stopped me in my tracks ... a Singer 99k with its original carrier sat gleaming in the light of the window. SWEET!

Now I will be candidly honest and admit that I have repeatedly told Mr. Hollow during our travels that collecting sewing machines was not for me due to size and space. (As if that ever stopped me with my other collections! ;) ) We have seen a few heavily used Singer models here and there, and they never really spoke to me. ( Restoration on mechanical items isn't a big desire of mine or more importantly to Mr. Hollow.) But I can honestly say, this nearly mint machine took my breath away. *sigh*

My camera does not do it justice. Although this model isn't as desired as the freestanding featherweight predecessors, the 99k is still an example of fine craftsmanship that has the ability to last through the test of time. Don't you just love the work light mounted on the back? Whoever had owned this 99k obviously cherished it, since its gleaming black paint and ornate design have only a few minor blemishes. Truly an amazing fact... Since after checking out the serial number, I found out this machine was shipped new from Kilbowie, Scotland on September 11, 1954.

These Singers are such a stark contrast to the plastic that has taken over many of the modern day counterparts. Not that there aren't great machines out there... Don't get me wrong... But as with my Kenmores, I do tend to favor the metal bodied machines. Maybe, it is my fear of breaking things! ;)

The Singer 99k tilts on metal posts that fit into round slots at the back of the base. When I got home, I looked under the machine and found some extra Singer needles, a pile of bobbins, the original tube of oil, original manual, and a slew of feet that offer more options than I could ever dream of!

Now seriously... How can you go wrong buying any working sewing machine for $18.00?

Subscribe to:
Posts (Atom)